杜宽老师k8s课程学习记录
6.1 Replication Controller和ReplicaSet
Replication Controller(复制控制器,RC)和ReplicaSet(复制集,RS)是两种简单部署Pod的方式。因为在生产环境中,主要使用更高级的Deployment等方式进行Pod的管理和部署,所以本节只对Replication Controller和Replica Set的部署方式进行简单介绍。
1.1Replication Controller
Replication Controller(简称RC)可确保Pod副本数达到期望值,也就是RC定义的数量。换句话说,Replication Controller可确保一个Pod或一组同类Pod总是可用。
如果存在的Pod大于设定的值,则Replication Controller将终止额外的Pod。如果太小,Replication Controller将启动更多的Pod用于保证达到期望值。与手动创建Pod不同的是,用Replication Controller维护的Pod在失败、删除或终止时会自动替换。因此即使应用程序只需要一个Pod,也应该使用Replication Controller或其他方式管理。Replication Controller类似于进程管理程序,但是Replication Controller不是监视单个节点上的各个进程,而是监视多个节点上的多个Pod。
定义一个Replication Controller的示例如下。
apiVersion: v1
kind: ReplicationController
metadata:
  name: nginx
spec:
  replicas: 3
  selector:
    app: nginx
  template:
    metadata:
      name: nginx
      labels:
        app: nginx
    spec:
      containers:
      - name: nginx
        image: nginx
        ports:
        - containerPort: 80
1.2ReplicaSet
ReplicaSet是支持基于集合的标签选择器的下一代Replication Controller,它主要用作Deployment协调创建、删除和更新Pod,和Replication Controller唯一的区别是,ReplicaSet支持标签选择器。在实际应用中,虽然ReplicaSet可以单独使用,但是一般建议使用Deployment来自动管理ReplicaSet,除非自定义的Pod不需要更新或有其他编排等。
定义一个ReplicaSet的示例如下:
apiVersion: apps/v1
kind: ReplicaSet
metadata:
  name: frontend
  labels:
    app: guestbook
    tier: frontend
spec:
  # modify replicas according to your case
  replicas: 3
  selector:
    matchLabels:
      tier: frontend
    matchExpressions:
      - {key: tier, operator: In, values: [frontend]}
  template:
    metadata:
      labels:
        app: guestbook
        tier: frontend
    spec:
      containers:
      - name: php-redis
        image: gcr.io/google_samples/gb-frontend:v3
        resources:
          requests:
            cpu: 100m
            memory: 100Mi
        env:
        - name: GET_HOSTS_FROM
          value: dns
          # If your cluster config does not include a dns service, then to
          # instead access environment variables to find service host
          # info, comment out the 'value: dns' line above, and uncomment the
          # line below.
          # value: env
        ports:
        - containerPort: 80
Replication Controller和ReplicaSet的创建删除和Pod并无太大区别,Replication Controller目前几乎已经不在生产环境中使用,ReplicaSet也很少单独被使用,都是使用更高级的资源Deployment、DaemonSet、StatefulSet进行管理Pod。
6.2 什么是无状态调度 deployment


6.3 创建deployment
创建yaml文件模板
kubectl create deploy nginx --image=nginx:1.15.2 --replicas=3 -oyaml --dry-run=client > nginx-deploy.yaml
[root@k8s-master01 ~]# cat nginx-deploy_0806.yaml
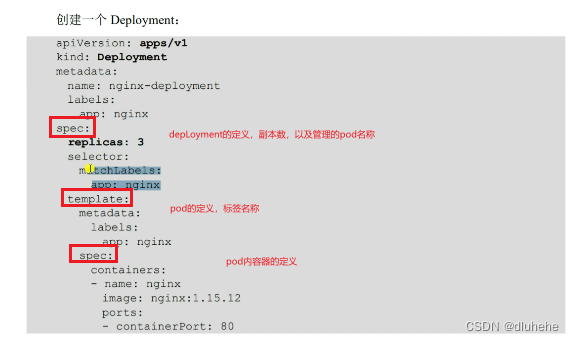
apiVersion: apps/v1
kind: Deployment
metadata:
# creationTimestamp: null
labels:
app: nginx
name: nginx
spec:
replicas: 3
selector:
matchLabels:
app: nginx
# strategy: {}
template:
metadata:
# creationTimestamp: null
labels:
app: nginx
spec:
containers:
- image: nginx:1.15.2
name: nginx
# resources: {}
#status: {}
[root@k8s-master01 ~]#
创建三个副本名为nginx的deployment
[root@k8s-master01 ~]# kubectl create  -f nginx-deploy_0806.yaml
deployment.apps/nginx created
[root@k8s-master01 ~]#
[root@k8s-master01 ~]# kubectl create -f nginx-deploy_0806.yaml
deployment.apps/nginx created
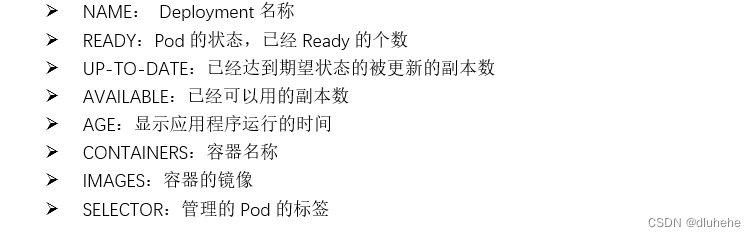
[root@k8s-master01 ~]# kubectl get deploy
NAME READY UP-TO-DATE AVAILABLE AGE
nginx 0/3 3 0 79s
[root@k8s-master01 ~]#

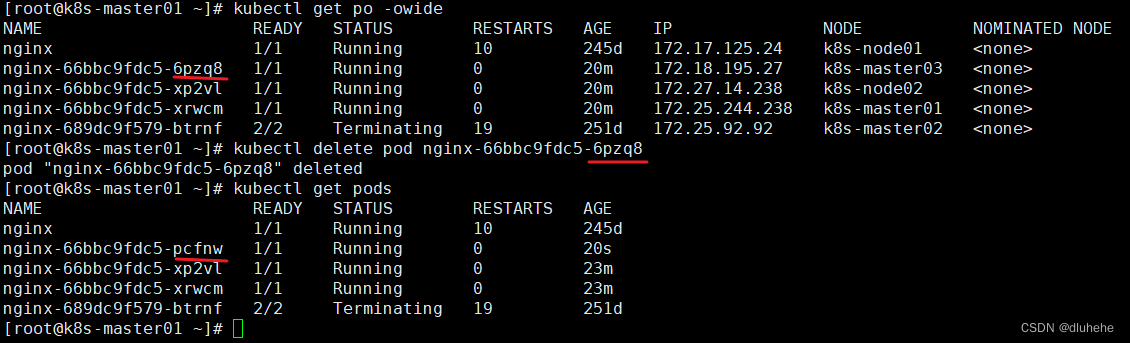
删除pod测试,rs会迅速启动新pod,以维持副本数为3

删除deploy方式,kubectl delete deploy 名称或者删除yaml文件
本地yaml文件更新后,记得kubectl replace -f nginx-deploy_0806.yaml或者kubectl apply -f nginx-deploy_0806.yaml。
[root@k8s-master01 ~]# kubectl rollout status deployment/nginx
deployment "nginx" successfully rolled out
[root@k8s-master01 ~]# kubectl get po --show-labels
NAME                     READY   STATUS        RESTARTS   AGE    LABELS
nginx                    1/1     Running       10         245d   app=nginx,role=frontend
nginx-66bbc9fdc5-pcfnw   1/1     Running       0          11m    app=nginx,pod-template-hash=66bbc9fdc5
nginx-66bbc9fdc5-xp2vl   1/1     Running       0          34m    app=nginx,pod-template-hash=66bbc9fdc5
nginx-66bbc9fdc5-xrwcm   1/1     Running       0          34m    app=nginx,pod-template-hash=66bbc9fdc5
nginx-689dc9f579-btrnf   2/2     Terminating   19         251d   app=nginx,pod-template-hash=689dc9f579
[root@k8s-master01 ~]#
6.4 Deployment的更新
三种方法:set,edit,修改yaml文件然后replace(不建议直接更新,先把yaml文件导出来再修改,kubectl get deploy -oyaml 删除无关后再改);
1)set命令
更改deployment的镜像并记录:
kubectl set image deploy nginx nginx=registry.cn-beijing.aliyuncs.com/dotbalo/nginx:1.15.12 --record
查看更新过程:
# kubectl rollout status deploy nginx

或者
# kubectl describe deploy nginx

edit
kubectl edit deploy nginx

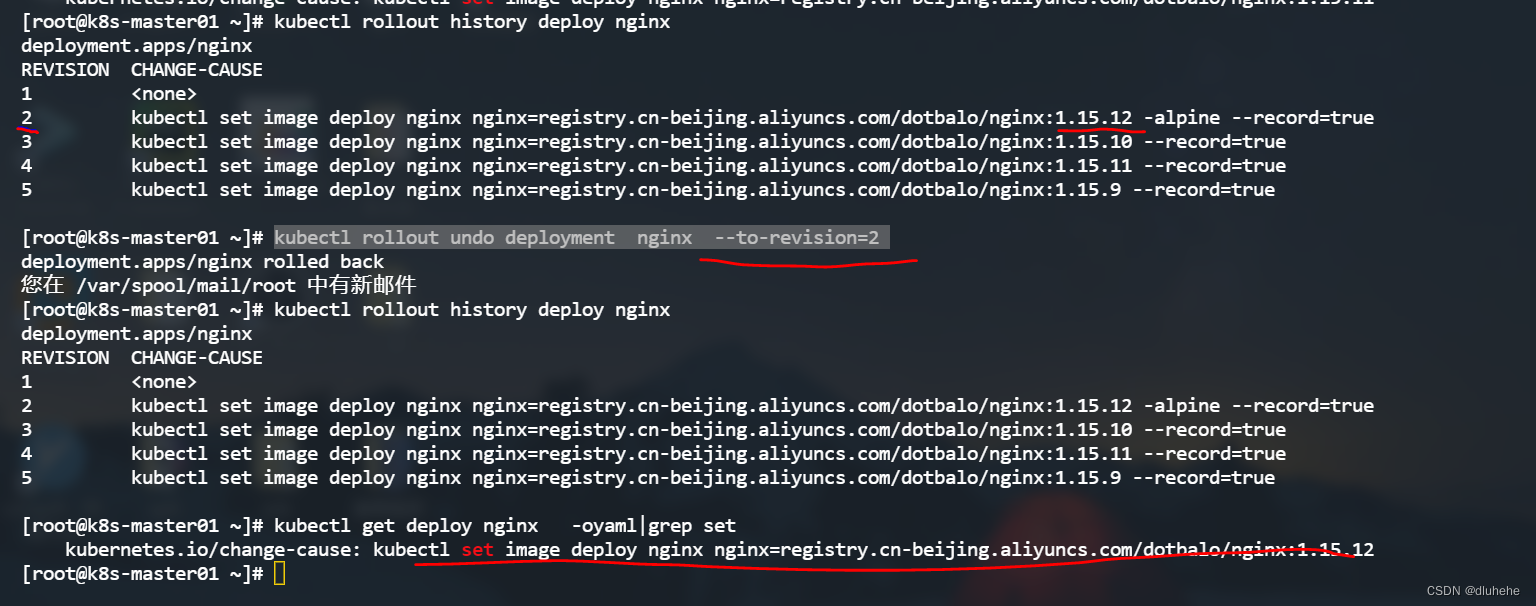
6.5 Deployment的回滚
kubectl set image deploy nginx nginx=registry.cn-beijing.aliyuncs.com/dotbalo/nginx:1.15.10 --record
kubectl set image deploy nginx nginx=registry.cn-beijing.aliyuncs.com/dotbalo/nginx:1.15.11
--record
kubectl set image deploy nginx nginx=registry.cn-beijing.aliyuncs.com/dotbalo/nginx:1.15.9 --record
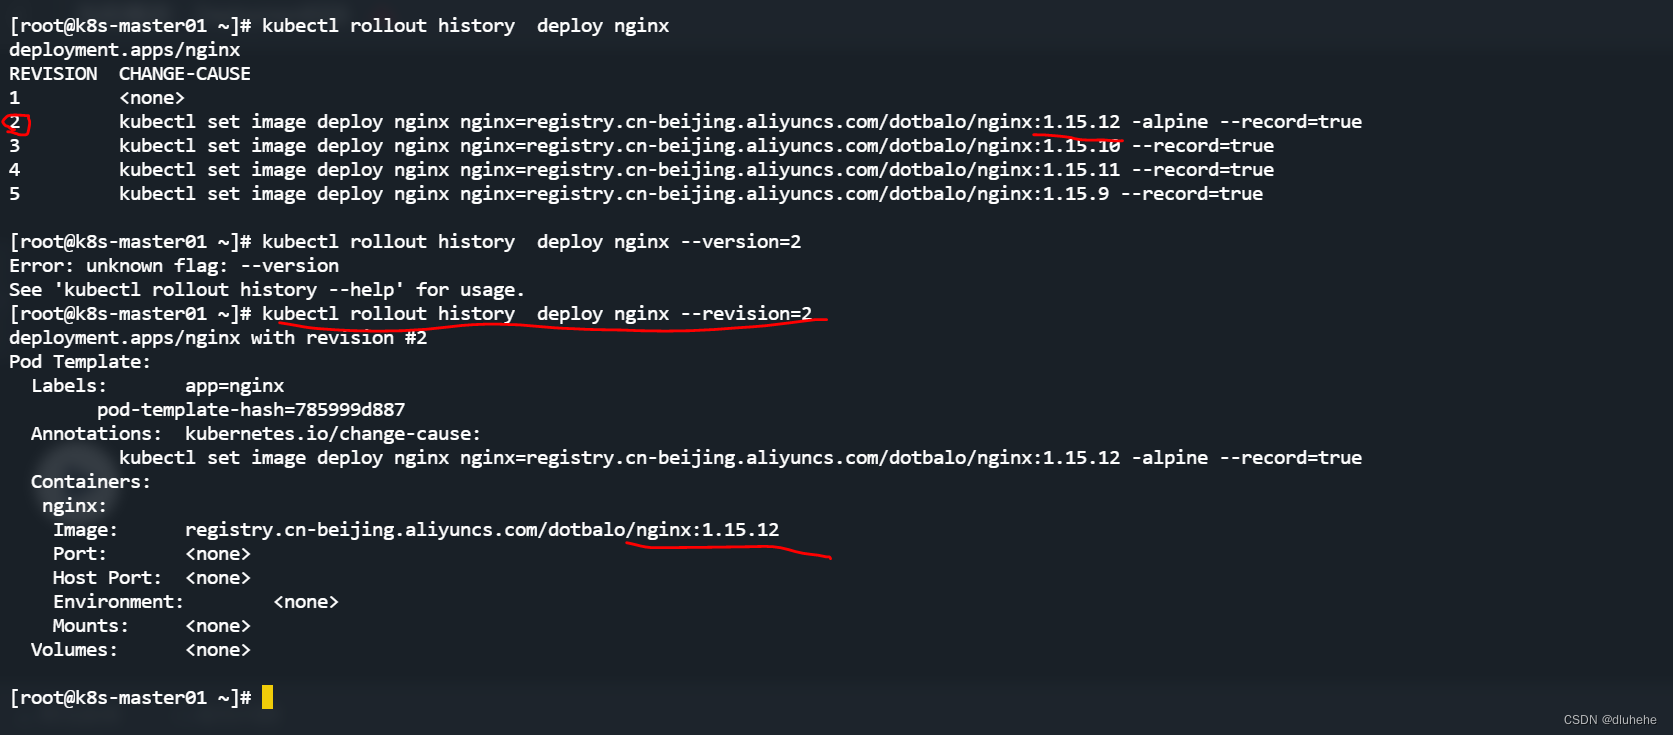
查看版本历史
kubectl rollout history deploy nginx

查看指定版本的信息
kubectl rollout history deploy nginx --revision=2
回滚到上一个版本
kubectl rollout undo deploy nginx
回滚到指定版本
kubectl rollout undo deployment nginx --to-revision=2
6.6 deployment的扩缩容
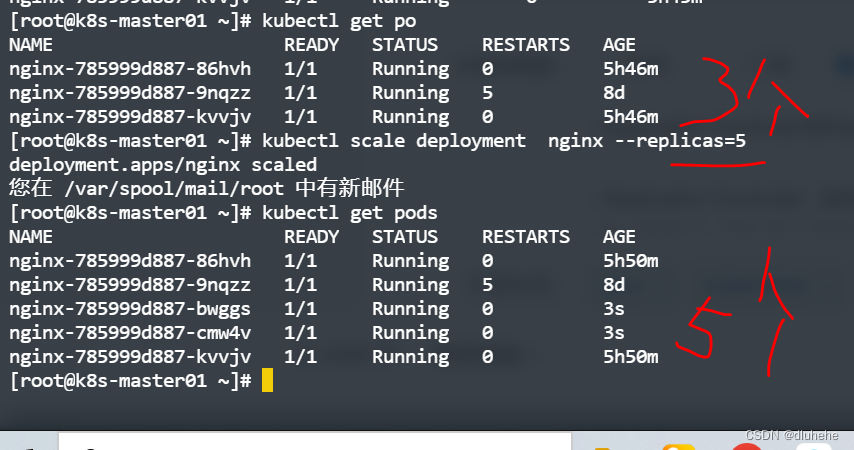
缩容两种方式:edit改relicas副本数or 使用scale命令,适用于无状态应用,有状态应用如redis,kafufa等不能进行缩容;
scale命令缩容
kubectl scale deployment nginx --replicas=3
缩容前:5个pod
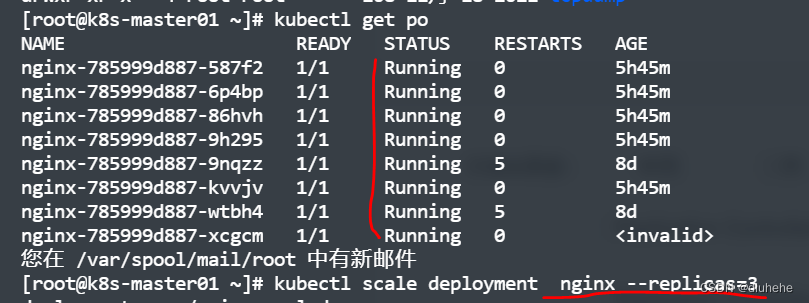
缩容后:3个pod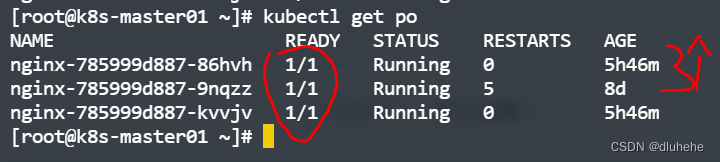
扩容两种方式:edit改relicas副本数or 使用scale命令
使用scale命令扩容:3个pod扩容至5个
kubectl scale deployment nginx --replicas=5
6.7 暂停和恢复Deployment更新
目的:应对不能使用edit的多次更改只触发一次pod更新场景
暂停deploy更新
# kubectl rollout pause deployment/nginx
此时更新pod内容
kubectl set image deploy nginx nginx=nginx:1.9.1
kubectl set resources deploy/nginx -c=nginx  --limits=cpu=201m,memory=521Mi
结果验证;deploy的yaml文件更新了

而pod没有更新

此时再恢复暂停
kubectl rollout resume deploy nginx


触发pod更新

vim deploy.yaml文件后不会触发pod更新,必须kubectl replace/apply deploy.yaml;
edit更改deploy.yaml会自动触发pod更新;
6.8 更新Deployment的注意事项
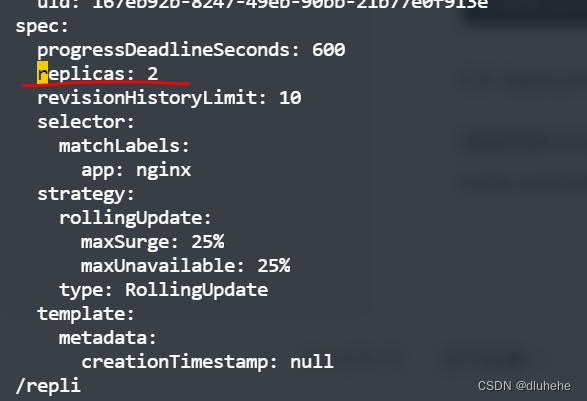
在默认情况下,revision保留10个旧的ReplicaSet,其余的将在后台进行垃圾回收,可以在.spec.revisionHistoryLimit设置保留ReplicaSet的个数。当设置为0时,不保留历史记录。
更新策略:
. .spec.strategy.type==Recreate ,表示重建,先删掉旧的 Pod 再创建新的 Pod
.spec.strategy.type==RollingUpdate ,表示滚动更新,可以指定 maxUnavailable 和 maxSurge
来控制滚动更新过程;
.spec.strategy.rollingUpdate.maxUnavailable,指定在回滚更新时最大不可用的Pod数量,可选字段,默认为25%,可以设置为数字或百分比,如果maxSurge为0,则该值不能为0;
.spec.strategy.rollingUpdate.maxSurge可以超过期望值的最大Pod数,可选字段,默认为25%,可以设置成数字或百分比,如果maxUnavailable为0,则该值不能为0。
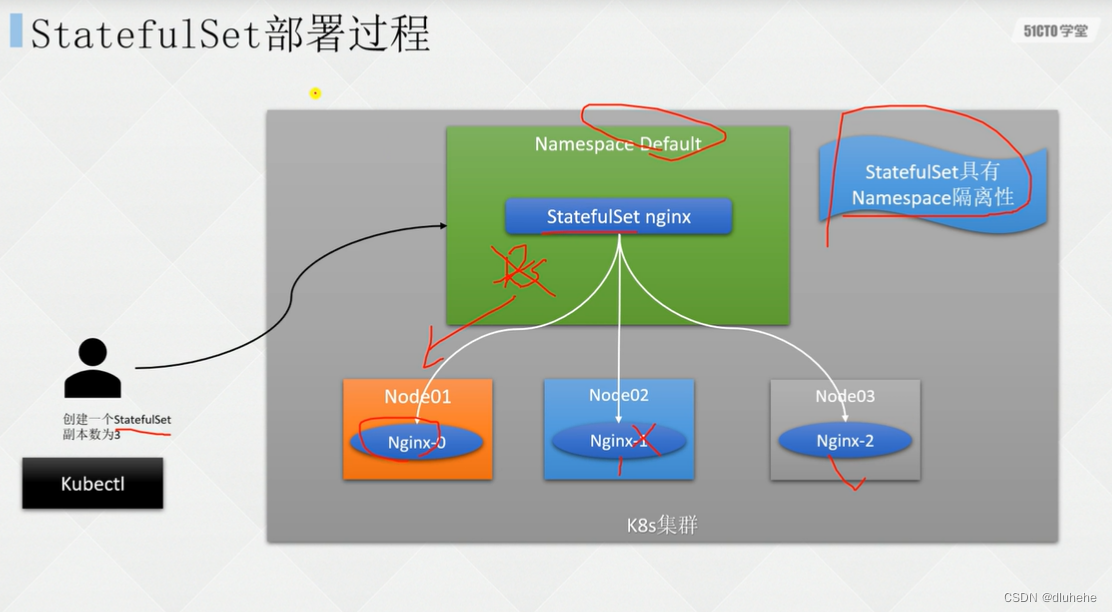
6.9 有状态应用管理StatefulSet

6.10 什么是Headless Service
6.11 创建一个StatefulSet
创建之前先删除之前创建的pod
kubectl delete -f nginx-deploy_1109.yaml

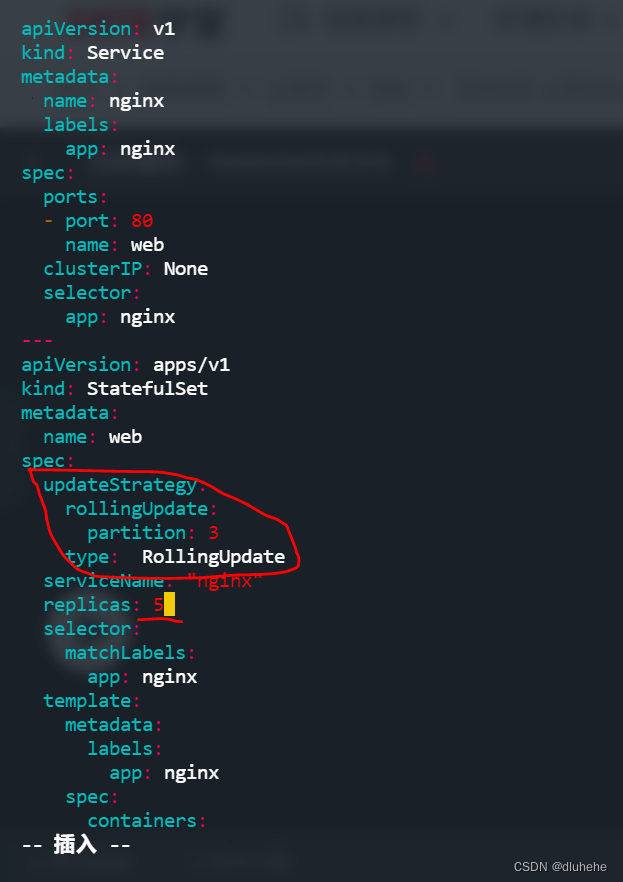
vim statefulset ,内容来自官网文档:StatefulSet 基础 | Kubernetes
apiVersion: v1
kind: Service
metadata:
  name: nginx
  labels:
    app: nginx
spec:
  ports:
  - port: 80
    name: web
  clusterIP: None
  selector:
    app: nginx
---
apiVersion: apps/v1
kind: StatefulSet
metadata:
  name: web
spec:
  serviceName: "nginx"
  replicas: 3
  selector:
    matchLabels:
      app: nginx
  template:
    metadata:
      labels:
        app: nginx
    spec:
      containers:
      - name: nginx
        image: registry.cn-beijing.aliyuncs.com/dotbalo/nginx:1.15.12-alpine
        ports:
        - containerPort: 80
          name: web
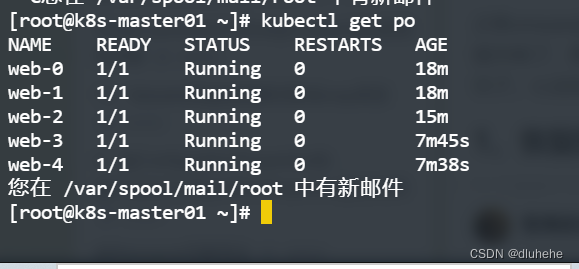
kubectl create -f statefulset.yaml

扩容: vim statefulset.yaml 修改副本数为5
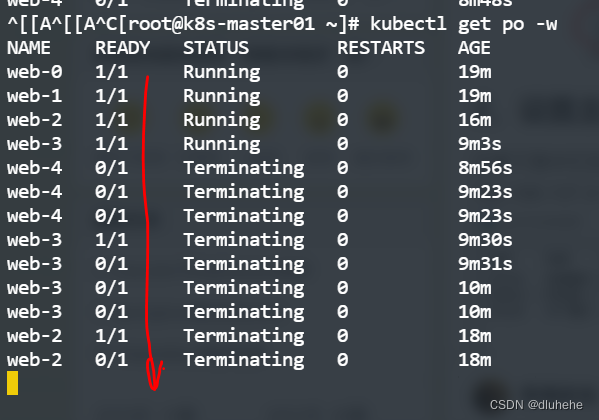
创建时顺序:web-0 --->web-4
删除时顺序:web-4 --->web-0

kubectl replace/apply -f statefulset.yaml
kubectl get po -w ---一直更新滚动pod创建状态

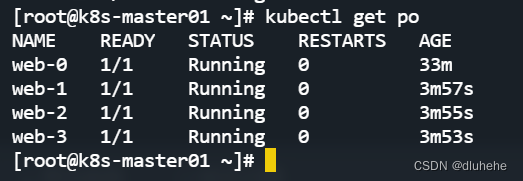
缩容: vim statefulset.yaml 修改副本数为1
kubectl apply/replace -f statefulset.yaml
删除过程中,比如删除web-3异常,就不会继续删除web-2 pod了;

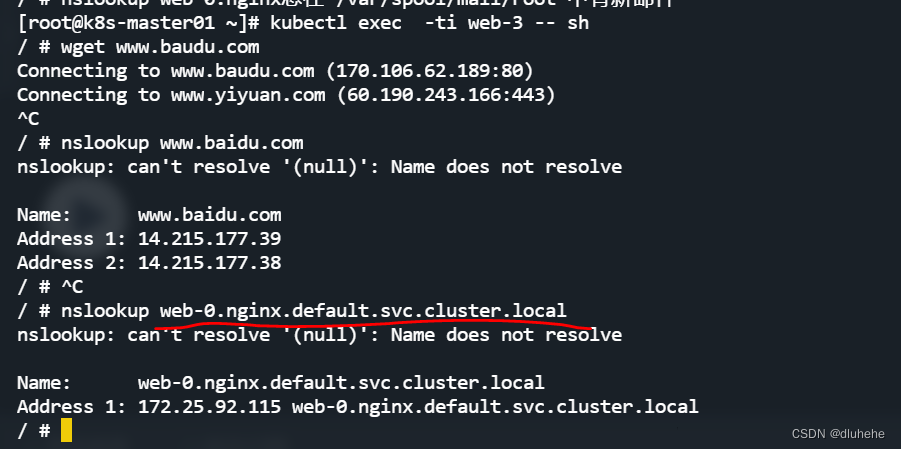
6.12 Headless Service 通信原理
重新将副本数由1改为4,然后apply/replace一下


6.13 StatefulSet扩容和缩容
扩容:副本数由4扩容至5个
有状态的statefulset虽然支持缩容,但生产上一般不会操作。
kubectl scale sts web --replicas=5
 6.14 StatefulSet更新策略
On Delete策略:OnDelete更新策略实现了传统(1.7版本之前)的行为,它也是默认的更新策略。当我们选择这个更新策略并修改StatefulSet的.spec.template字段时,StatefulSet控制器不会自动更新Pod,必须手动删除Pod才能使控制器创建新的Pod。
RollingUpdate策略:RollingUpdate(滚动更新)更新策略会自动更新一个StatefulSet中所有的Pod,采用与序号索引相反的顺序进行滚动更新。
6.15 分段更新
就是只更新部分pod,比如5个pod想只更新其中2个;
eg:大于等于3的pod更新,小于3的pod不更新;可以适用于灰度发布;

kubectl replace -f statefulset.yaml;
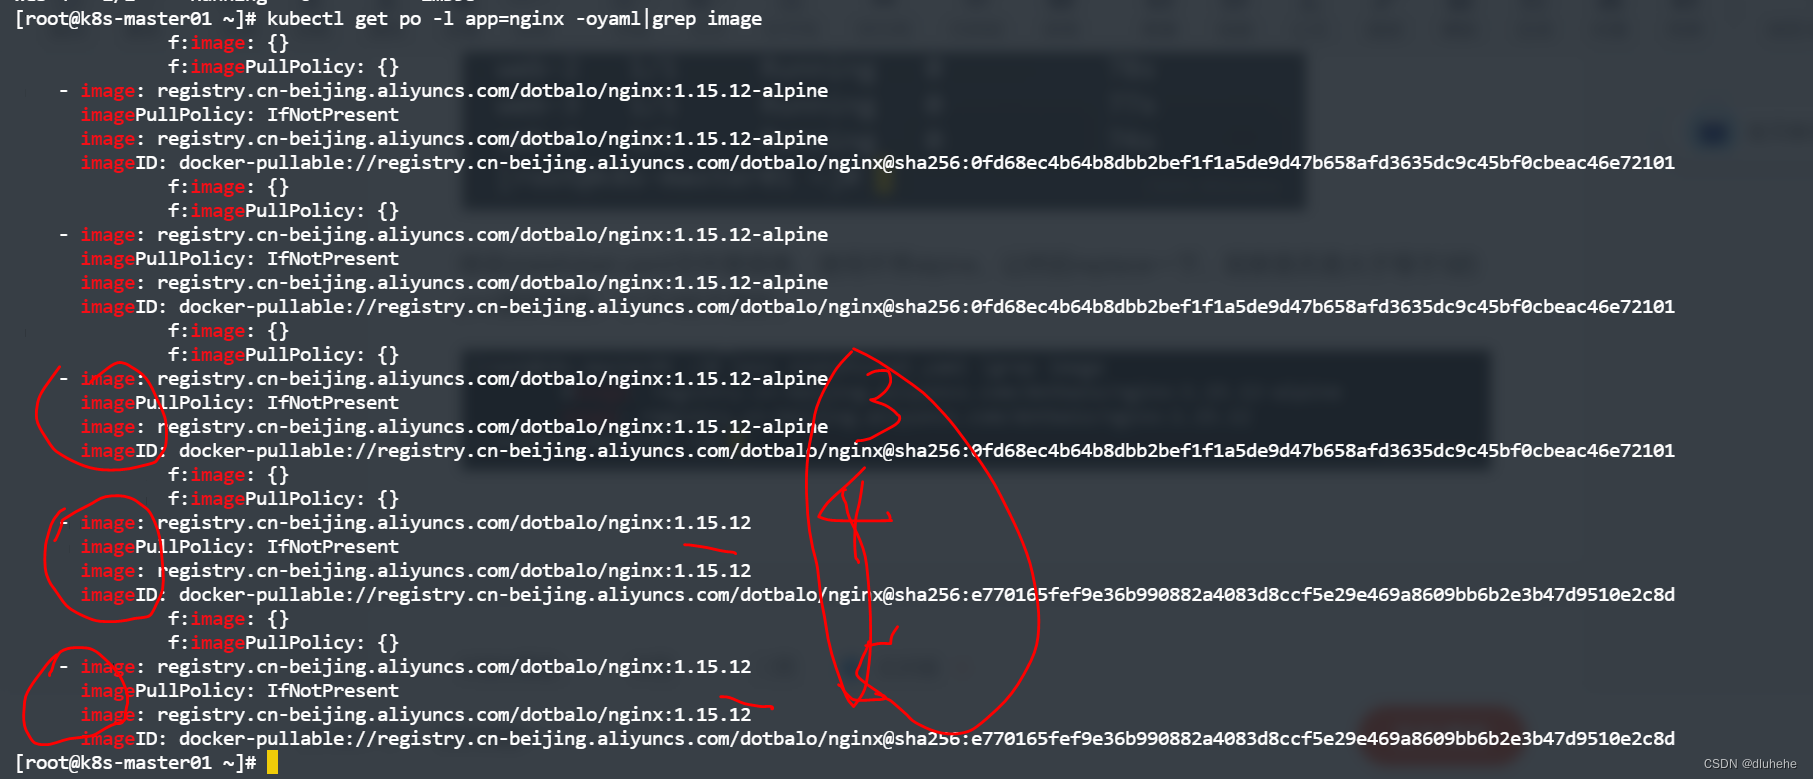
kubectl get po -l app=nginx -oyaml|grep image;--pod镜像不统一,所以删除重新生成
kubectl delete po -l app=nginx

修改statefulset.yaml文件里镜像,使用不带alpine,让然后replace一下,观察是否是大于等于3的pod更新镜像,小于3的不更新。 发现只有3,4,5更新了镜像,1和2没有更新

6.16 删除StatefulSet
删除StatefulSet有两种方式,即级联删除和非级联删除。使用非级联方式删除StatefulSet时,StatefulSet的Pod不会被删除;使用级联删除时,StatefulSet和它的Pod都会被删除。
非级联删除
kubectl delete statefulset web cascade=false # 采用非级联删除


级联删除
省略--cascade=false参数即为级联删除:
kubectl delete statefulset web
也可以通过直接删除statefulset.yaml文件(包括StatefulSet和Service的yaml文件)的方式


删除整个命名空间下所有pod命令
kuebctl delete po --all
6.17 守护进程集DaemonSet


6.18 创建DaemonSet


使用deployment.yaml文件改为DeamonSet的yaml
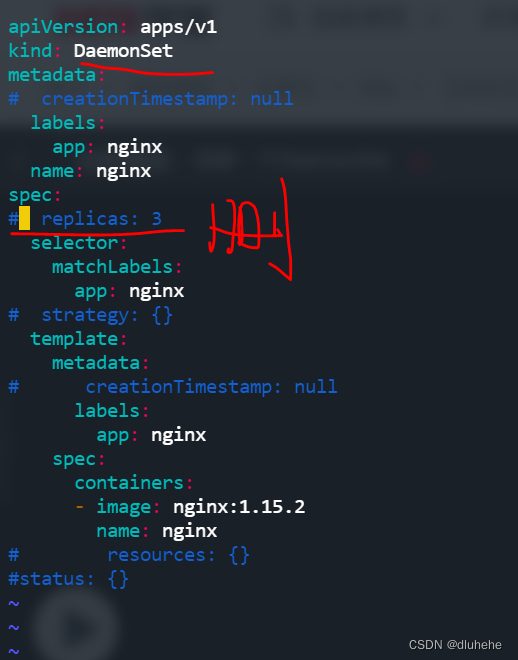
nginx-ds.yamln内容如下:
apiVersion: apps/v1
kind: DaemonSet
metadata:
#  creationTimestamp: null
  labels:
    app: nginx
  name: nginx
spec:
#  replicas: 3
  selector:
    matchLabels:
      app: nginx
#  strategy: {}
  template:
    metadata:
#      creationTimestamp: null
      labels:
        app: nginx
    spec:
      containers:
      - image: registry.cn-beijing.aliyuncs.com/dotbalo/nginx:1.15.12
        name: nginx
#        resources: {}
#status: {}
kubectl create -f nginx-ds.yaml
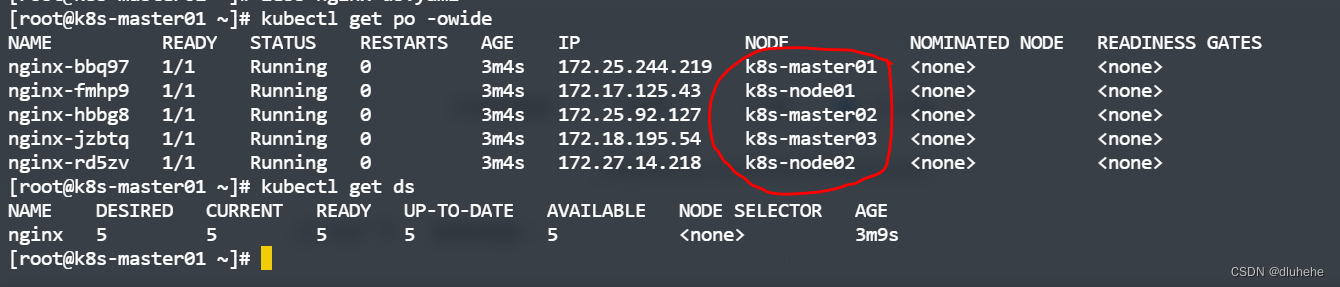
6.19 选择合适的节点部署DeamonSet
给node01,node02打上标签
kubectl label node k8s-node01 k8s-node02 disktype: ssd
 修改nginx-ds.yaml
apiVersion: apps/v1
kind: DaemonSet
metadata:
#  creationTimestamp: null
  labels:
    app: nginx
  name: nginx
spec:
#  replicas: 3
  selector:
    matchLabels:
      app: nginx
#  strategy: {}
  template:
    metadata:
#      creationTimestamp: null
      labels:
        app: nginx
    spec:
      nodeSelector:
        disktype: ssd
      containers:
      - image: registry.cn-beijing.aliyuncs.com/dotbalo/nginx:1.15.12
        name: nginx
#        resources: {}
#status: {}
如果master节点有污点,即使符合ds条件,也不会被分配。

kubectl replace -f nginx-ds.yaml


 6.20 更新和回滚DaemonSet
如果添加了新节点或修改了节点标签(Label),DaemonSet将立刻向新匹配上的节点添加Pod,同时删除不能匹配的节点上的Pod。DaemonSet更新策略和StatefulSet类似,也有OnDelete和RollingUpdate两种方式。
修改镜像为如下可以直接修改yaml文件,然后replace/apply一下;也可以使用如下命令
kubectl set image ds/<daemonset name><container name>= <container new
image> record=true
[root@k8s-master01 ~]# less  nginx-ds.yaml|grep image
      #image: registry.cn-beijing.aliyuncs.com/dotbalo/nginx:1.15.12
      - image: registry.cn-beijing.aliyuncs.com/dotbalo/nginx:1.15.12-alpine
kubectl replace -f nginx-ds.yaml


deployment的副本保存在rs里,deamonset没有rs概念,副本保存在controllerrevision里;

kubectl get controllerrevision nginx-5ddbc5b969 -oyaml
查看deamonset更新策略
kubectl get ds nginx -o go-template='{{.spec.updateStrategy.type}}{{" n"}}'
命令式更新,和之前Deployment、StatefulSet方式一致 kubectl edit ds/<daemonset name>
kubectl patch ds/<daemonset name> -p=<strategic merge patch>
查看更新状态:kubectl rollout status ds/<daemonset name>
列出所有修订版本:kubectl rollout history daemonset <daemonset name>
回滚到指定revision:kubectl rollout undo daemonset <daemonset name> --to-revision=<revision>
删除deamonset:先删除ds,然后再删除其对应的pod;
 kubectl delete ds nginx ;
kubectl delete  pod  nginx-k27z4;
6.21 什么是HPA(水平伸缩扩容)


6.22 自动扩缩容HPA实践
kubectl create deployment hpa-nginx --image=registry.cn-beijing.aliyuncs.com/dotbalo/nginx:1.15.12-alpine --dry-run=client -oyaml >hpa-nginx

apiVersion: apps/v1
kind: Deployment
metadata:
  creationTimestamp: null
  labels:
    app: hpa-nginx
  name: hpa-nginx
spec:
  replicas: 1
  selector:
    matchLabels:
      app: hpa-nginx
  strategy: {}
  template:
    metadata:
      creationTimestamp: null
      labels:
        app: hpa-nginx
    spec:
      containers:
      - image: registry.cn-beijing.aliyuncs.com/dotbalo/nginx:1.15.12-alpine
        name: nginx
        resources:
          requests:
            cpu: 10m
status: {}
kubectl create -f hpa-nginx.yaml

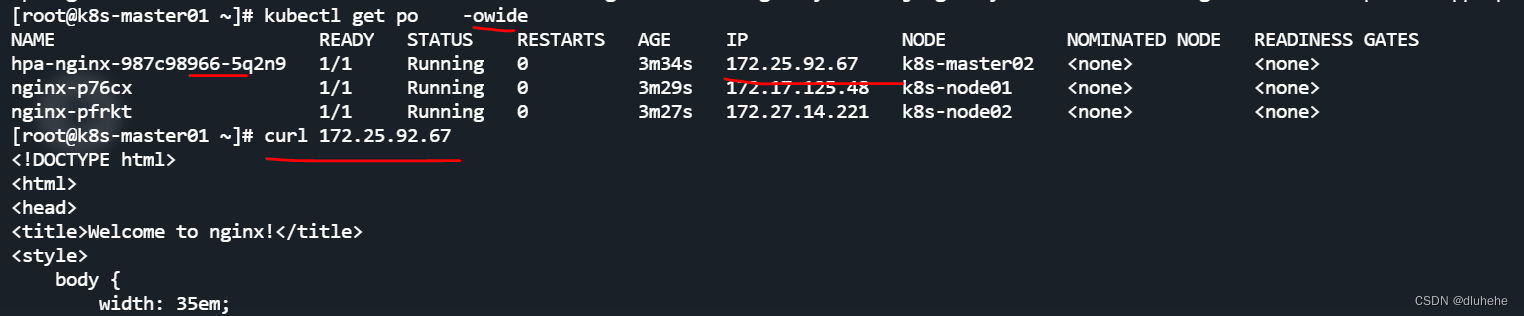

暴露nginx 80端口
kubectl expose deployment hpa-nginx --port=80


配置自动扩缩容指标,一个cpu=1000m
kubectl autoscale deployment hpa-nginx --cpu-percent=10 --min=1 --max=10

压力测试前

死循环压力测试
while true; do wget -q -O- http://10.106.109.244 > /dev/null; done
测试结果


停止掉测试任务,cpu下降,pod副本数逐步下降至1个;

宽哥k8s:https://edu.51cto.com/lecturer/11062970.html