Spring Boot非常适合web应用程序开发。您可以使用嵌入式Tomcat、Jetty、Undertow或Netty来创建一个自包含的HTTP服务器。大多数web应用程序使用spring-boot-starter-web模块来快速启动和运行。你也可以选择使用spring-boot-starter-webflux模块来构建响应式web应用。
1. Web场景
SpringBoot的Web开发能力,由SpringMVC提供。
1. 自动配置
1)整合web场景,导入spring-boot-starter-web
<dependency>
    <groupId>org.springframework.boot</groupId>
    <artifactId>spring-boot-starter-web</artifactId>
</dependency>
2)引入了autoconfigure功能
spring-boot-starter-web导入了一个spring-boot-starter,而spring-boot-starter又导入了spring-boot-autoconfigure包,引入了autoconfigure功能。spring-boot-autoconfigure包依赖一个注解:@EnableAutoConfiguration,有了这个注解,SpringBoot会让spring-boot-autoconfigure包下写好的配置类生效。
3)@EnableAutoConfiguration注解
@Import(AutoConfigurationImportSelector.class)注解使用@Import(AutoConfigurationImportSelector.class)批量导入组件
4)@Import注解
@Import(AutoConfigurationImportSelector.class)是通过加载spring-boot-autoconfigure下META-INF/spring/org.springframework.boot.autoconfigure.AutoConfiguration.imports文件中配置的所有组件,将配置类导入进来
5)web相关所有的自动配置类如下:
org.springframework.boot.autoconfigure.web.client.RestTemplateAutoConfiguration
org.springframework.boot.autoconfigure.web.embedded.EmbeddedWebServerFactoryCustomizerAutoConfiguration

org.springframework.boot.autoconfigure.web.reactive.HttpHandlerAutoConfiguration
org.springframework.boot.autoconfigure.web.reactive.ReactiveMultipartAutoConfiguration
org.springframework.boot.autoconfigure.web.reactive.ReactiveWebServerFactoryAutoConfiguration
org.springframework.boot.autoconfigure.web.reactive.WebFluxAutoConfiguration
org.springframework.boot.autoconfigure.web.reactive.WebSessionIdResolverAutoConfiguration
org.springframework.boot.autoconfigure.web.reactive.error.ErrorWebFluxAutoConfiguration
org.springframework.boot.autoconfigure.web.reactive.function.client.ClientHttpConnectorAutoConfiguration
org.springframework.boot.autoconfigure.web.reactive.function.client.WebClientAutoConfiguration

org.springframework.boot.autoconfigure.web.servlet.DispatcherServletAutoConfiguration
org.springframework.boot.autoconfigure.web.servlet.ServletWebServerFactoryAutoConfiguration
org.springframework.boot.autoconfigure.web.servlet.error.ErrorMvcAutoConfiguration
org.springframework.boot.autoconfigure.web.servlet.HttpEncodingAutoConfiguration
org.springframework.boot.autoconfigure.web.servlet.MultipartAutoConfiguration
org.springframework.boot.autoconfigure.web.servlet.WebMvcAutoConfiguration
最终,我们只要分析清楚每一个自动配置类产生了什么样的效果,那在SpringMVC底层,SpringBoot给它自动配置了哪些组件就非常清楚了。
说明:带reactive是响应式web场景,和这里分析的普通web场景没有关系
6)这些自动配置类又绑定了配置文件的许多配置项
- SpringMVC的所有配置项:以spring.mvc为前缀
- Web场景通用配置:以spring.web为前缀
- 文件上传配置:以spring.servlet.multipart为前缀
- 服务器的配置:以server为前缀
2. 默认效果(Spring MVC Auto-configuration)
Spring Boot为Spring MVC提供了自动配置,可以很好地与大多数应用程序配合使用。
自动配置在Spring默认设置的基础上增加了以下特性:
- 包含了ContentNegotiatingViewResolver和BeanNameViewResolver组件,方便视图解析
- 支持服务静态资源,包括支持WebJars
- 自动注册Converter、GenericConverter和Formatter组件,适配常见的数据类型转换和格式化需求
- 支持HttpMessageConverters,可以方便返回json等数据类型
- 自动注册MessageCodesResolver,方便国际化及错误消息处理
- 支持静态index.html
- 自动使用ConfigurableWebBindingInitializer,实现消息处理、数据绑定、类型转换、数据校验等功能
重要:
如果你想保留那些Spring Boot MVC默认配置,并且自定义更多的MVC配置(interceptors(拦截器),formatters(格式化器),view controllers(视图控制器),and other features(其他功能)),可以使用@Configuration注解添加一个WebMvcConfigurer类型的配置类,但不添加@EnableWebMvc。
如果你想提供RequestMappingHandlerMapping、RequestMappingHandlerAdapter或ExceptionHandlerExceptionResolver的自定义实例,并且仍然保持Spring Boot MVC默认配置,你可以声明一个WebMvcRegistrations类型的bean,并使用它来提供这些组件的自定义实例。
如果你想全面接管Spring MVC,使用@Configuration 标注一个配置类,并加上 @EnableWebMvc注解,实现 WebMvcConfigurer 接口,或者像在@EnableWebMvc的Javadoc中描述的那样添加你自己的带有@Configuration注解的DelegatingWebMvcConfiguration。
3. WebMvcAutoConfiguration原理
3.1. 生效条件
@AutoConfiguration(after = { DispatcherServletAutoConfiguration.class, TaskExecutionAutoConfiguration.class,
		ValidationAutoConfiguration.class }) //在这些自动配置类之后配置
@ConditionalOnWebApplication(type = Type.SERVLET) //如果是web应用就生效,类型SERVLET,是一个普通的web应用。与之对应的还有REACTIVE(响应式web)
@ConditionalOnClass({ Servlet.class, DispatcherServlet.class, WebMvcConfigurer.class })
@ConditionalOnMissingBean(WebMvcConfigurationSupport.class) //容器中没有WebMvcConfigurationSupport这个Bean才生效。默认就是没有
@AutoConfigureOrder(Ordered.HIGHEST_PRECEDENCE + 10)//优先级
@ImportRuntimeHints(WebResourcesRuntimeHints.class)
public class WebMvcAutoConfiguration {
}
3.2. WebMvcAutoConfiguration自动配置类生效后,做了什么
1)向容器中添加了2个Filter:HiddenHttpMethodFilter、FormContentFilter
HiddenHttpMethodFilter:页面表单可以提交rest请求(GET、POST、PUT、DELETE)。由于浏览器只支持发送GET和POST方式的请求,而DELETE、PUT等method并不支持,Spring3.0添加了一个过滤器,可以将这些请求转换为标准的http方法,使得支持GET、POST、PUT与DELETE请求,该过滤器为HiddenHttpMethodFilter。
FormContentFilter: 表单内容Filter,GET(数据放URL后面)、POST(数据放请求体)请求可以携带数据,而PUT、DELETE 的请求体数据会被忽略。
为了让Tomcat不忽略PUT、DELETE请求的请求体,可以向容器中添加FormContentFilter。
2)向容器中添加了WebMvcConfigurer组件,给SpringMVC添加各种定制功能
WebMvcConfigure提供的所有功能的相关配置,最终会和配置文件进行绑定
-
WebMvcProperties: 与配置文件中前缀为 spring.mvc 的配置项进行绑定
-
WebProperties: 与配置文件中前缀为 spring.web 的配置项进行绑定
//定义为一个嵌套配置,以确保不在类路径上时不会读取WebMvcConfigurer
// Defined as a nested config to ensure WebMvcConfigurer is not read when not on the classpath
@Configuration(proxyBeanMethods = false)
@Import(EnableWebMvcConfiguration.class) //额外导入了其他配置
@EnableConfigurationProperties({ WebMvcProperties.class, WebProperties.class })
@Order(0)
public static class WebMvcAutoConfigurationAdapter implements WebMvcConfigurer, ServletContextAware{

}
3)其它组件...
提供了配置SpringMVC底层的所有组件入口
3.4. 静态资源处理规则(源码)
添加处理器,以服务静态资源,如图像、js和css文件,这些文件来自于web应用程序根下的特定位置,类路径以及其他。
//配置本地资源映射路径
public void addResourceHandlers(ResourceHandlerRegistry registry) {
	if (!this.resourceProperties.isAddMappings()) {
		logger.debug("Default resource handling disabled");
		return;
	}
	addResourceHandler(registry, this.mvcProperties.getWebjarsPathPattern(),
					"classpath:/META-INF/resources/webjars/");
	addResourceHandler(registry, this.mvcProperties.getStaticPathPattern(), (registration) -> {
				registration.addResourceLocations(this.resourceProperties.getStaticLocations());
		if (this.servletContext != null) {
			ServletContextResource resource = new ServletContextResource(this.servletContext, SERVLET_LOCATION);
					registration.addResourceLocations(resource);
		}
	});
}
规则1:路径匹配:/webjars/*。访问路径匹配 "/webjars/**",就去"classpath:/META-INF/resources/webjars/"下找资源。
访问示例:
http://localhost:8081/webjars/ant-design__icons-vue/6.0.1/AccountBookFilled.js
我们在开发JavaWeb项目的时候,会使用像Maven、Gradle等构建工具以实现对jar包版本依赖管理,以及项目的自动化管理,但对于javascript、css等前端资源包,我们只能采用拷贝到webapp下的方式,这样做就无法对这些资源进行依赖管理。而Webjars提供给我们这些前端资源的jar包形式,我们就可以进行依赖管理。如:
<dependency>
   <groupId>org.webjars.npm</groupId>
   <artifactId>ant-design__icons-vue</artifactId>
   <version>6.0.1</version>
</dependency>
规则2 :路径匹配: /** 。访问路径匹配 "/**" ,就去静态资源默认的4个位置找资源。默认的4个位置如下:
"classpath:/META-INF/resources/", "classpath:/resources/", "classpath:/static/", "classpath:/public/"
规则3:静态资源默认都有缓存规则的设置
所有缓存规则,直接通过配置文件设置: 配置项前缀为 "spring.web"
cachePeriod: 缓存周期;多久不用找服务器要新的。 默认没有,以s为单位
cacheControl: HTTP缓存控制;可以参照https://developer.mozilla.org/zh-CN/docs/Web/HTTP/Caching
useLastModified:是否使用最后一次修改。配合HTTP Cache规则
缓存最终的作用和效果:浏览器访问了一个静态资源,如index.js,如果服务器上这个资源没有发生变化,下次访问的时候就可以直接让浏览器用自己缓存中的东西,而不用给服务器发请求。
registration.setCachePeriod(getSeconds(this.resourceProperties.getCache().getPeriod()));
registration.setCacheControl(this.resourceProperties.getCache().getCachecontrol().toHttpCacheControl());
registration.setUseLastModified(this.resourceProperties.getCache().isUseLastModified());
3.5. EnableWebMvcConfiguration 源码
//SpringBoot给容器中放WebMvcConfigurationSupport组件。
//如果我们自己在容器中添加了WebMvcConfigurationSupport组件,SprinBoot的WebMvcAutoConfiguration都会失效。
@Configuration(proxyBeanMethods = false)
@EnableConfigurationProperties(WebProperties.class)
public static class EnableWebMvcConfiguration extends DelegatingWebMvcConfiguration implements ResourceLoaderAware
{

}
HandlerMapping作用:根据请求的url、method等信息,找哪个Handler能处理请求。
EnableWebMvcConfiguration会向容器中添加WelcomePageHandlerMapping(欢迎页处理器映射)。
WelcomePageHandlerMapping:
访问 /**路径下的所有请求,都是在以上4个静态资源路径下找资源,欢迎页也一样。关于欢迎页:访问/**路径,是在以上4个静态资源路径下找index.html,只要静态资源的位置有一个 index.html页面,项目启动默认访问。
WebMvcAutoConfiguration 是一个自动配置类,它里面有一个 EnableWebMvcConfiguration配置类,而EnableWebMvcConfiguration继于 DelegatingWebMvcConfiguration,这两个配置类都会生效。DelegatingWebMvcConfiguration通过依赖注入把容器中所有 WebMvcConfigurer 注入进来,当调用 DelegatingWebMvcConfiguration 的方法来配置底层规则时,它就会调用所有的WebMvcConfigurer相应的配置底层方法。所以,最终我们自己写的配置底层的方法就 会被调用。
因为项目一启动,WebMvcAutoConfiguration要用EnableWebMvcConfiguration来配置底层,而这个配置类在配置底层的时候,就会从容器中拿到所有的WebMvcConfigurer,当调用 DelegatingWebMvcConfiguration 配置底层规则的方法时,就会调用所有的WebMvcConfigurer相应的配置底层方法。
@Configuration(proxyBeanMethods = false)
public class DelegatingWebMvcConfiguration extends WebMvcConfigurationSupport {

	private final WebMvcConfigurerComposite configurers = new WebMvcConfigurerComposite();


	@Autowired(required = false)
	public void setConfigurers(List<WebMvcConfigurer> configurers) {
		if (!CollectionUtils.isEmpty(configurers)) {
			this.configurers.addWebMvcConfigurers(configurers);
		}
	}

}
3.7. WebMvcConfigurationSupport
提供了很多的默认设置。
其中的一项功能是addDefaultHttpMessageConverters(添加一组默认的HttpMessageConverter实例),其中会判断系统中是否有相应的类(在pom中添加了相关依赖的话就会有),如果有,就加入相应的HttpMessageConverter。
jackson2Present = ClassUtils.isPresent("com.fasterxml.jackson.databind.ObjectMapper", classLoader) &&
				ClassUtils.isPresent("com.fasterxml.jackson.core.JsonGenerator", classLoader);
jackson2XmlPresent = ClassUtils.isPresent("com.fasterxml.jackson.dataformat.xml.XmlMapper", classLoader);
jackson2SmilePresent = ClassUtils.isPresent("com.fasterxml.jackson.dataformat.smile.SmileFactory", classLoader);


protected final void addDefaultHttpMessageConverters(List<HttpMessageConverter<?>> messageConverters) {
		messageConverters.add(new ByteArrayHttpMessageConverter());
		messageConverters.add(new StringHttpMessageConverter());
		messageConverters.add(new ResourceHttpMessageConverter());
		messageConverters.add(new ResourceRegionHttpMessageConverter());
		messageConverters.add(new AllEncompassingFormHttpMessageConverter());

		if (romePresent) {
			messageConverters.add(new AtomFeedHttpMessageConverter());
			messageConverters.add(new RssChannelHttpMessageConverter());
		}

		if (jackson2XmlPresent) {
			Jackson2ObjectMapperBuilder builder = Jackson2ObjectMapperBuilder.xml();
			if (this.applicationContext != null) {
				builder.applicationContext(this.applicationContext);
			}
			messageConverters.add(new MappingJackson2XmlHttpMessageConverter(builder.build()));
		}
		else if (jaxb2Present) {
			messageConverters.add(new Jaxb2RootElementHttpMessageConverter());
		}

		if (kotlinSerializationCborPresent) {
			messageConverters.add(new KotlinSerializationCborHttpMessageConverter());
		}
		if (kotlinSerializationJsonPresent) {
			messageConverters.add(new KotlinSerializationJsonHttpMessageConverter());
		}
		if (kotlinSerializationProtobufPresent) {
			messageConverters.add(new KotlinSerializationProtobufHttpMessageConverter());
		}

		if (jackson2Present) {
			Jackson2ObjectMapperBuilder builder = Jackson2ObjectMapperBuilder.json();
			if (this.applicationContext != null) {
				builder.applicationContext(this.applicationContext);
			}
			messageConverters.add(new MappingJackson2HttpMessageConverter(builder.build()));
		}
		else if (gsonPresent) {
			messageConverters.add(new GsonHttpMessageConverter());
		}
		else if (jsonbPresent) {
			messageConverters.add(new JsonbHttpMessageConverter());
		}

		if (jackson2SmilePresent) {
			Jackson2ObjectMapperBuilder builder = Jackson2ObjectMapperBuilder.smile();
			if (this.applicationContext != null) {
				builder.applicationContext(this.applicationContext);
			}
			messageConverters.add(new MappingJackson2SmileHttpMessageConverter(builder.build()));
		}
		if (jackson2CborPresent) {
			Jackson2ObjectMapperBuilder builder = Jackson2ObjectMapperBuilder.cbor();
			if (this.applicationContext != null) {
				builder.applicationContext(this.applicationContext);
			}
			messageConverters.add(new MappingJackson2CborHttpMessageConverter(builder.build()));
		}
	}
2. 静态资源
2.1. 默认规则
2.1.1. 静态资源映射
静态资源映射规则在 WebMvcAutoConfiguration 中进行了定义:
1) 访问路径匹配 "/webjars/**",就去"classpath:/META-INF/resources/webjars/"下找资源
2) 访问路径匹配 "/**" ,就去静态资源默认的4个位置找资源,资源都在 classpath:/META-INF/resources/、classpath:/resources/、classpath:/static/、classpath:/public/
2.1.2. 静态资源缓存
如前面所述,所有静态资源都定义了缓存规则(浏览器访问过一次,就会缓存一段时间):
period: 缓存间隔。 默认 0S;
cacheControl:缓存控制。 默认无;
useLastModified:是否使用lastModified头(默认是true);配合HTTP Cache规则
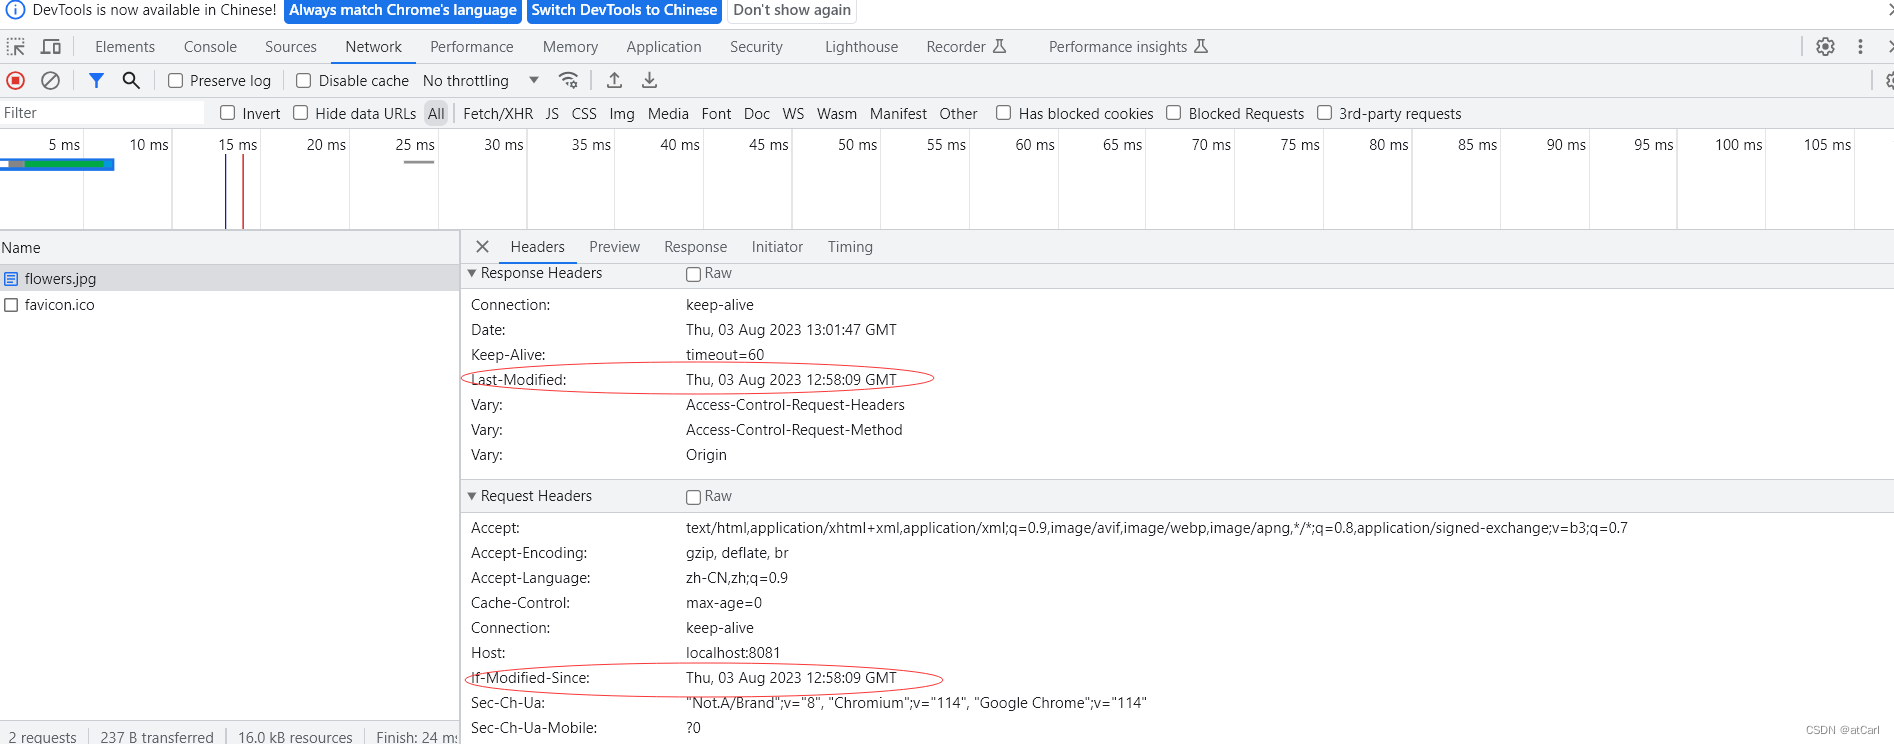
使用lastModified头,浏览器的响应头中会包含Last-Modified

关于useLastModified:
1)如果浏览器每次发送请求,都要向服务器获取新的资源,而如果资源在服务器中又没有发生变化,由于这些资源可能很大,又限制于网络传输的速率,这个时候去加载页面的速度可能就不会很快,那么进一步就会影响到用户的使用感。
2)如果请求只是从缓存中获取,那服务器中的资源如果发生了变化,浏览器也不会及时获取。
有了useLastModified,就可以解决这两个问题。浏览器请求服务器资源的时候,发现自己缓存的文件有 Last Modified ,那么在请求中会包含 If Modified Since,去找服务器确认:服务器中静态资源的修改时间和If Modified Since是否相同。如果相同,浏览器就用缓存中的资源,如果不同,则服务器给浏览器返回最新的资源。
2.1.3. 欢迎页
欢迎页规则在 WebMvcAutoConfiguration 中进行了定义:
在静态资源目录下找 index.html,没有就在 templates下找index模板页
2.1.4. Favicon
与其他静态资源一样,Spring Boot在配置的静态内容位置中检查favicon.ico。如果存在这样的文件,它将自动用作应用程序的图标。
2.1.5. 缓存实验
1)配置缓存规则
server.port=8081

#spring.web:
#1.配置国际化的区域信息
#2.配置静态资源策略(功能开启、处理链、缓存)

#开启静态资源映射规则(默认就是true)
spring.web.resources.add-mappings=true

#设置缓存
spring.web.resources.cache.period=3600
#缓存详细合并项控制:缓存控制HTTP头,仅允许有效的指令合并。覆盖'spring.web.resources.cache.period'属性:浏览器第一次请求服务器,服务器告诉浏览器此资源缓存7200秒,7200秒以内的所有对此资源的访问,不用发请求给服务器,7200秒以后发请求给服务器
spring.web.resources.cache.cachecontrol.max-age=7200
#使用资源的最后一次修改时间,来对比服务器和浏览器的资源是否相同,有没有发生变化。相同返回 304
#默认就是true
spring.web.resources.cache.use-last-modified=true
2)启动SpringBoot项目,访问项目中的静态资源
这里,我访问的是自己项目中的 flowers.jpg

第一次访问 200
第二次访问(F5刷新) 304

Ctrl+F5强制刷新 200
使用ctrl+F5进行刷新,这个时候浏览器就不会重复利用之前已经缓存的数据了,而是去清空缓存,把所有的资源进行重新下载,使网页与本机储存的网页时间标记相同。
这两个的区别很大:一个网页,不仅仅只是有一个HTML,还会依赖其他很多的资源,比如:CSS、JS、图片等。这些资源都是网络下载到浏览器本地的。由于这些资源可能很大,又限制于网络传输的速率,这个时候去加载页面的速度可能就不会很快,那么进一步就会影响到用户的使用感。这个时候,浏览器就会把这些依赖的资源直接缓存到本地,后续访问的时候速度就很快了, 因为是已经缓存了,就不需要去下载了。
我们先使用F5刷新:
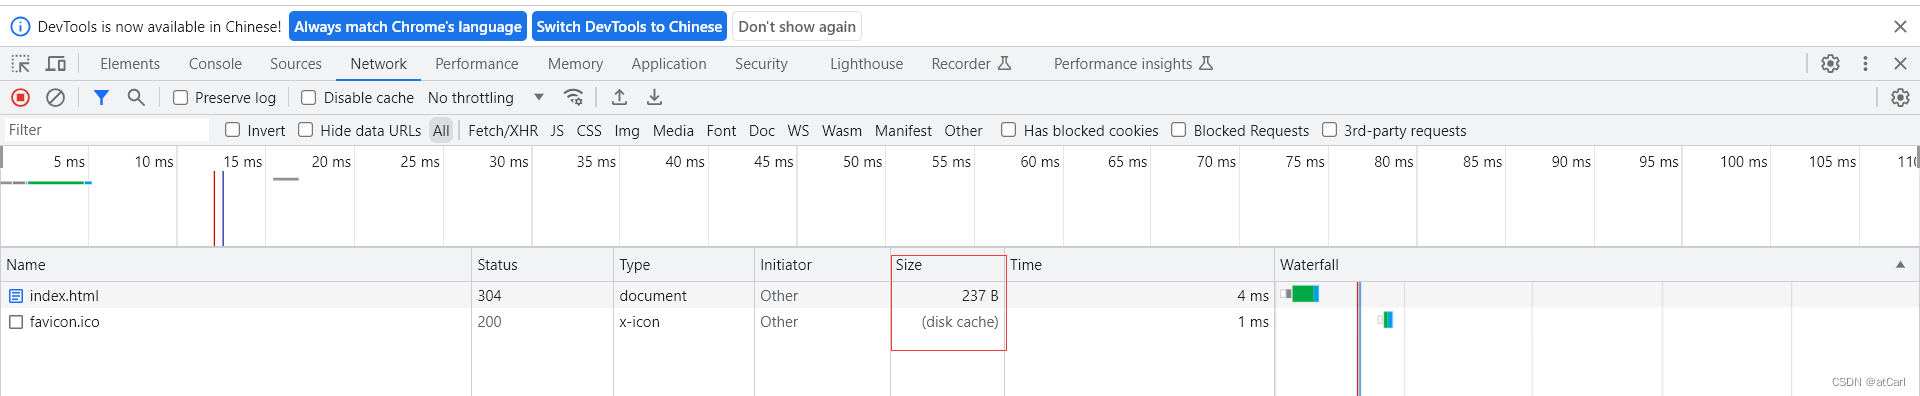
下面我们再使用ctrl + F5 刷新:

我们可以看到,此时加载的这些文件大小都来自于网络下载,而且显示了多大的文件。其实我们通过加载时间,也可以理解为什么浏览器会有缓存机制,使用F5刷新的时候,加载时间在4ms左右,但是使用ctrl + F5的时候,加载时间在6ms秒左右,这就能够理解浏览器为什么就会把这些依赖的资源直接缓存到本地,后续访问的时候速度就会很快。
总结:
ctrl + F5 是直接请求服务器的资源,让当前页面的资源重新全部从服务器上下载下来,这样就全部更新了。
关于HTTP 304状态码
304 未被修改。
自从上次请求后,请求的网页未被修改过。服务器返回此响应时,不会返回网页内容。
如果网页自请求者上次请求后再也没有更改过,你应将服务器配置为返回此响应码(称为if-modified-since http标头)。服务器可以告诉浏览器自从上次抓取后网页没有变更,进而节省带宽和开销。
整个请求响应过程如下:
客户端在请求一个文件的时候,发现自己缓存的文件有 Last Modified ,那么在请求中会包含 If Modified Since ,这个时间就是缓存文件的 Last Modified 。因此,如果请求中包含 If Modified Since,就说明客户端已经有缓存,服务端只要判断这个时间和当前请求的文件的最近修改时间是否一致,就可以确定是返回 304 还是 200 。对于静态文件,例如:CSS、图片,服务器会自动完成 Last Modified 和 If Modified Since 的比较,完成缓存或者更新。
2.2. 自定义静态资源规则
自定义静态资源路径、自定义缓存规则
2.2.1. 配置方式
前缀为spring.mvc,可以配置:静态资源访问路径规则
前缀为spring.web,可以配置:1)静态资源目录 2)静态资源缓存策略
#共享缓存
#spring.web.resources.cache.cachecontrol.cache-public=true
#自定义静态资源文件夹位置
spring.web.resources.static-locations=classpath:/custom/

#自定义webjars访问路径规则
spring.mvc.webjars-path-pattern=/wj/**
#自定义静态资源访问路径规则
spring.mvc.static-path-pattern=/static/**
2.2.2. 代码方式
- 使用@Configuration注解添加一个WebMvcConfigurer类型的配置类,但不添加@EnableWebMvc
- @EnableWebMvc 会禁用SpringBoot的默认配置
- 容器中只要有一个 WebMvcConfigurer 组件,配置的底层行为都会生效
方式一:
@Configuration //这是一个配置类
public class MyConfig implements WebMvcConfigurer {

    @Override
    public void addResourceHandlers(ResourceHandlerRegistry registry) {
        //自定义新的规则(SpringBoot的默认配置仍会保留)
        registry.addResourceHandler("/static/**")
                .addResourceLocations("classpath:/custom/")
                .setCacheControl(CacheControl.maxAge(1260, TimeUnit.SECONDS));
    }
}
方式二:
@Configuration //这是一个配置类,给容器中添加一个 WebMvcConfigurer 组件,就能自定义底层
public class MyConfig {


    @Bean
    public WebMvcConfigurer webMvcConfigurer(){
        return new WebMvcConfigurer() {
            @Override
            public void addResourceHandlers(ResourceHandlerRegistry registry) {
                registry.addResourceHandler("/static/**")
                        .addResourceLocations("classpath:/custom/")
                        .setCacheControl(CacheControl.maxAge(1260, TimeUnit.SECONDS));
            }
        };
    }

}
3. 路径匹配
Spring5.3 之后加入了更多的请求路径匹配的实现策略。以前只支持 AntPathMatcher 策略,现在提供了 PathPatternParser 策略,并且可以让我们指定到底使用哪种策略。
3.1. Ant风格路径用法
Ant 风格的路径模式语法具有以下规则:
- *:表示任意数量的字符
- ?:表示任意一个字符
- **:表示任意数量的目录
- {}:表示一个命名的模式占位符
- []:表示字符集合,例如[a-z]表示小写字母
例如:
*.html 匹配任意名称、扩展名为.html的文件
/folder1/*/*.java 匹配在folder1目录下的任意两级目录下的.java文件
/folder2/**/*.jsp 匹配在folder2目录下任意目录深度的.jsp文件
/{type}/{id}.html 匹配任意文件名为{id}.html,在任意命名的{type}目录下的文件
注意:Ant 风格的路径模式语法中的特殊字符需要转义,如:
要匹配文件路径中的星号,则需要转义为\\*
要匹配文件路径中的问号,则需要转义为\\?
3.2. 模式切换
AntPathMatcher 与 PathPatternParser对比:
- PathPatternParser 在 jmh 基准测试下,有 6~8 倍吞吐量提升,降低 30%~40%空间分配率
- PathPatternParser 兼容 AntPathMatcher语法,并支持更多类型的路径模式
- PathPatternParser "**" 多段匹配的支持仅允许在模式末尾使用,不能用在中间
    /**
     * {}:表示一个命名的模式占位符。
     * []:表示字符集合,例如[a-z]表示小写字母,后面的 + 表示可以有多个
     *
     * SpringBoot默认使用新版 PathPatternParser 进行路径匹配
     * 不能匹配 ** 在中间的情况,剩下的和AntPathMatcher语法兼容
     *
     */
    //PathPatternParser不能适配ant风格路径 **在中间的情况:@GetMapping("/hel*/b?/**/{p1:[a-f]+}")不支持
    @GetMapping("/hel*/b?/{p1:[a-f]+}")
    public String hello(HttpServletRequest request, @PathVariable("p1") String path) {

        log.info("路径变量p1: {}", path);
        //获取请求路径
        String uri = request.getRequestURI();
        return uri;
    }
总结:
- 使用默认的路径匹配规则,是由 PathPatternParser 提供的
- 如果路径中间需要有 **,需要改变路径匹配策略,替换成ant风格路径
# 改变路径匹配策略:
# 老版策略:ant_path_matcher , 新版策略:path_pattern_parser
#路径匹配策略,默认是 path_pattern_parser
spring.mvc.pathmatch.matching-strategy=path_pattern_parser
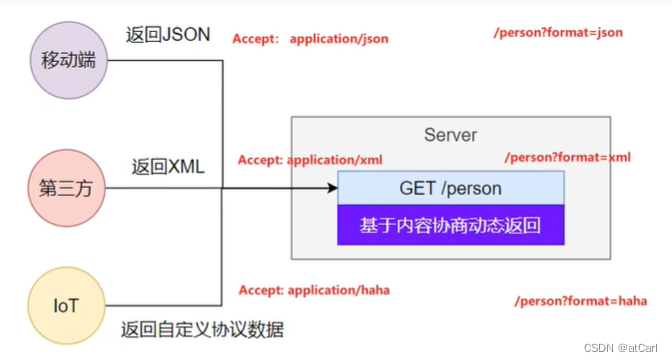
4. 内容协商
一套系统适配多端数据返回
内容协商功能本身就是SpringMVC自带的功能,SpringBoot做了一个整合。
4.1. 多端内容适配
4.1.1. 默认规则
SpringBoot 多端内容适配:
1)基于请求头内容协商(默认开启):
- 客户端向服务端发送请求,携带HTTP标准的Accept请求头,Accept: application/json、application/xml、text/yaml
- 这是HTTP协议中规定的标准,Accept代表客户端想要接收服务端什么样的数据
- 服务端根据客户端请求头期望的数据类型进行动态返回
2)基于请求参数内容协商(默认不生效,需要开启):
- 发送请求 GET /projects/person?format=json ,匹配到 @GetMapping("/projects/person")
- 根据参数协商,优先返回 json 类型数据。
- 发送请求 GET /projects/person?format=xml,优先返回 xml 类型数据
4.1.2. 效果演示
请求同一个接口,可以返回json和xml不同格式数据
4.1.2.1. 基于请求头内容协商
1)返回json格式数据
① 控制器方法
/**
* 1、SpringBoot默认支持把对象写为json,因为web场景导入了jackson的包,可以将Java对象转换为json数据
* 2、jackson也支持把数据写为xml,需要导入xml相关依赖
*/
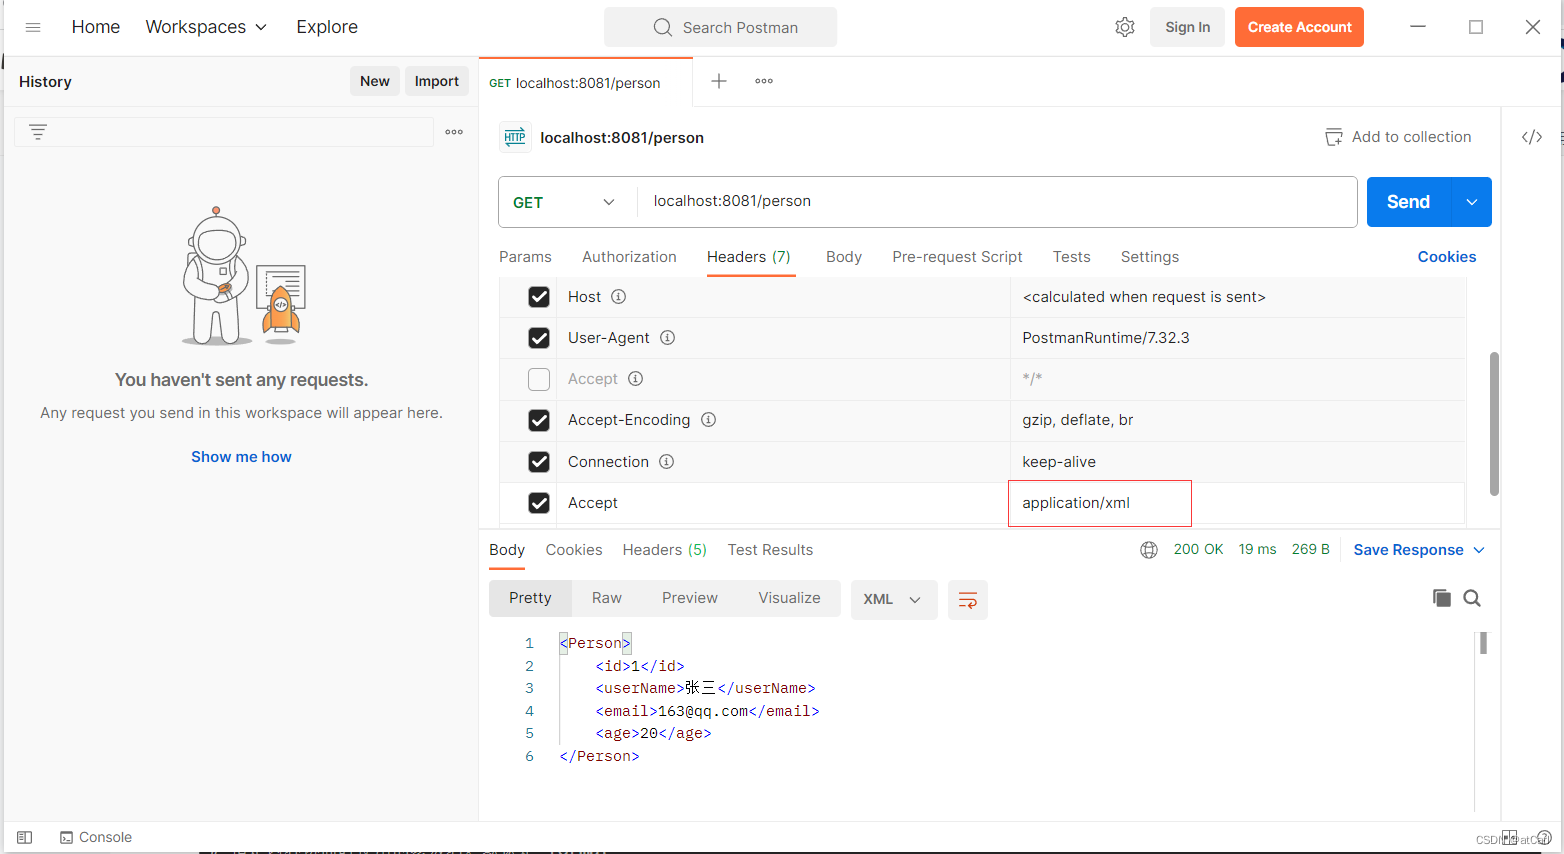
@GetMapping("/person")
public Person person() {
Person person = new Person();
person.setId(1L);
person.setUserName("张三");
person.setEmail("163@qq.com");
person.setAge(20);
return person;
}
② 发送请求(基于请求头内容协商)

2)返回xml格式数据
① 引入支持输出xml内容依赖
<dependency>
    <groupId>com.fasterxml.jackson.dataformat</groupId>
    <artifactId>jackson-dataformat-xml</artifactId>
</dependency>
② 标注注解
@JacksonXmlRootElement  // 可以写出为xml文档
@Data
public class Person {
    private Long id;
    private String userName;
    private String email;
    private Integer age;
}
③ 发送请求(基于请求头内容协商)
4.1.2.2. 基于请求参数的内容协商
基于请求参数内容协商,默认不生效,需要开启。
① 开启请求参数内容协商功能
# 开启基于请求参数的内容协商功能,默认参数名:format
spring.mvc.contentnegotiation.favor-parameter=true
# 指定内容协商时使用的参数名
spring.mvc.contentnegotiation.parameter-name=type
② 代码等相关配置同上面基于请求头内容协商部分
③ 测试效果


4.1.3. 配置协商规则与支持类型
1)修改内容协商方式
#开启基于请求参数的内容协商功能
spring.mvc.contentnegotiation.favor-parameter=true
#自定义参数名,指定内容协商时使用的参数名,默认为format
spring.mvc.contentnegotiation.parameter-name=myparam
2)大多数 MediaType 都是开箱即用的。也可以自定义内容类型,如:
spring.mvc.contentnegotiation.media-types.myYaml=text/yaml
4.2. 自定义内容返回
4.2.1. 增加yaml返回支持
1)导入依赖
<dependency>
    <groupId>com.fasterxml.jackson.dataformat</groupId>
    <artifactId>jackson-dataformat-yaml</artifactId>
</dependency>
2)编写配置
#新增一种媒体类型
spring.mvc.contentnegotiation.media-types.yaml=text/yaml
说明:要能进行内容协商,相当于要告知SpringBoot,系统中存在一种新格式:yaml。怎么告知?需要在配置文件中编写配置
3)增加HttpMessageConverter组件,专门负责把对象写出为yaml格式
    @Bean
    public WebMvcConfigurer webMvcConfigurer(){
        return new WebMvcConfigurer() {
            @Override //配置一个能把对象转为yaml的messageConverter
            public void configureMessageConverters(List<HttpMessageConverter<?>> converters) {
                converters.add(new MyYamlHttpMessageConverter());
            }
        };
    }
4)请求示例

4.2.2. HttpMessageConverter的示例写法
public class MyYamlHttpMessageConverter extends AbstractHttpMessageConverter<Object> {

    private ObjectMapper objectMapper = null;

    public MyYamlHttpMessageConverter(){
        //告诉SpringBoot这个MessageConverter支持哪种媒体类型
        super(new MediaType("text", "yaml", Charset.forName("UTF-8")));
        //disable(YAMLGenerator.Feature.WRITE_DOC_START_MARKER) 禁用文档开始标记:---
        YAMLFactory yamlFactory = new YAMLFactory().disable(YAMLGenerator.Feature.WRITE_DOC_START_MARKER);
         this.objectMapper = new ObjectMapper(yamlFactory);
    }
    @Override
    protected boolean supports(Class<?> clazz) {
        //这里面可以增加逻辑判断,只要是对象类型,不是基本数据类型都支持
        //这里只是简单的写法,返回true,恒真,表示无条件支持
        return true;
    }

    //配合@RequestBody使用
    @Override
    protected Object readInternal(Class<?> clazz, HttpInputMessage inputMessage) throws IOException, HttpMessageNotReadableException {
        return null;
    }

    //配合@ResponseBody使用,把对象以什么样的数据格式写出去
    @Override
    protected void writeInternal(Object methodReturnValue, HttpOutputMessage outputMessage) throws IOException, HttpMessageNotWritableException {
        //try-with写法,自动关流
        try(OutputStream os = outputMessage.getBody()){
            //将控制器方法的返回值写成yaml,写到输出流里
            this.objectMapper.writeValue(os,methodReturnValue);
        }
    }

}
4.2.3. 思考:如何增加其他
1) 配置媒体类型支持:
如:spring.mvc.contentnegotiation.media-types.yaml=text/yaml
2) 编写对应的HttpMessageConverter,并且要告诉SpringBoot这个MessageConverter支持的媒体类型。参考上述示例。
3) 把MessageConverter组件加入到底层
容器中放一个`WebMvcConfigurer` 组件,并配置底层的MessageConverter
4.3. 内容协商原理-HttpMessageConverter
HttpMessageConverter 是怎么工作的?何时工作?
如果我们熟悉了 HttpMessageConverter 的工作原理,就可以定制 HttpMessageConverter 来实现多端内容协商
通过WebMvcConfigurer提供的configureMessageConverters(),来自定义HttpMessageConverter,从而修改底层的MessageConverter
4.3.1. @ResponseBody由HttpMessageConverter处理
标注了@ResponseBody注解的控制器方法的返回值,将会由支持它的HttpMessageConverter写给浏览器
4.3.1.1. 如果控制器方法标注了 @ResponseBody 注解
1)请求到服务端,会先由DispatcherServlet的doDispatch()进行处理
2)在doDispatch()中,针对当前的请求,会找到一个 HandlerAdapter 适配器,利用适配器执行目标方法
3)如果控制器方法上写的是@RequestMapping及其派生注解,会由RequestMappingHandlerAdapter来执行,调用invokeHandlerMethod()来执行目标方法
4)目标方法执行之前,准备好两个重要的东西
HandlerMethodArgumentResolver:参数解析器,确定目标方法每个参数值
HandlerMethodReturnValueHandler:返回值处理器,确定目标方法的返回值该怎么处理
5)invokeHandlerMethod()中的invokeAndHandle()会真正执行目标方法
6)目标方法执行完成,会返回返回值对象
7)在invokeAndHandl()中,得到返回值对象后,会先找一个合适的HandlerMethodReturnValueHandler(返回值处理器 )
8)最终找到 RequestResponseBodyMethodProcessor,能处理标注了@ResponseBody注解的方法
9)RequestResponseBodyMethodProcessor 调用writeWithMessageConverters(),利用MessageConverter把返回值写出去
上面解释了:@ResponseBody注解标注的控制器方法,最后是由HttpMessageConverter来处理
HttpMessageConverter是怎么处理的?
4.3.1.2. HttpMessageConverter 会先进行内容协商
1) 遍历所有的MessageConverter,找哪个MessageConverter能够支持写出相应内容类型的数据
2)默认MessageConverter有以下
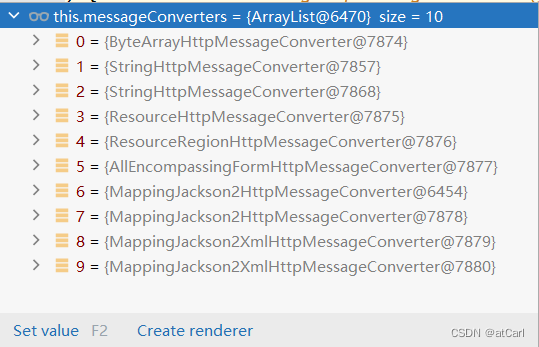
3)如果想要的数据格式是json,MappingJackson2HttpMessageConverter支持写出json格式的数据
4)jackson用ObjectMapper把对象写出去
4.3.2. WebMvcAutoConfiguration提供几种默认HttpMessageConverters
EnableWebMvcConfiguration通过addDefaultHttpMessageConverters添加了默认的MessageConverter。如下:
ByteArrayHttpMessageConverter: 支持字节数据读写
StringHttpMessageConverter: 支持字符串读写
ResourceHttpMessageConverter:支持资源读写
ResourceRegionHttpMessageConverter: 支持分区资源写出
AllEncompassingFormHttpMessageConverter:支持表单xml/json读写
MappingJackson2HttpMessageConverter: 支持请求响应体Json读写
默认8个:
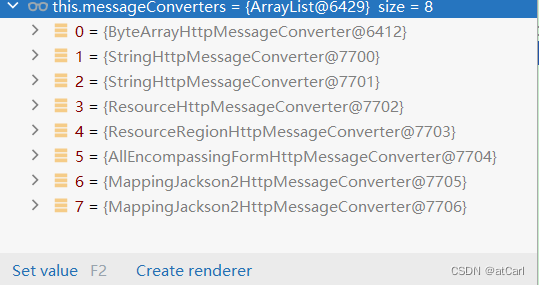
系统提供默认的MessageConverter 功能有限,仅用于json或者普通数据返回。如果需要额外增加新的内容协商功能,那就必须要增加新的HttpMessageConverter。
5. 模板引擎
由于 SpringBoot 使用了嵌入式 Servlet 容器,所以 JSP 默认是不能使用的。如果需要服务端页面渲染,优先考虑使用模板引擎。
现在流行的两种开发方式:前后端分离开发、服务端渲染(前后端不分离)

模板引擎页面默认放在 src/main/resources/templates
SpringBoot 包含以下模板引擎的自动配置
- FreeMarker
- Groovy
- Thymeleaf
- Mustache
Thymeleaf官网:https://www.thymeleaf.org/
<!DOCTYPE html>
<html xmlns:th="http://www.thymeleaf.org">
<head>
	<title>Good Thymes Virtual Grocery</title>
	<meta http-equiv="Content-Type" content="text/html; charset=UTF-8" />
	<link rel="stylesheet" type="text/css" media="all" th:href="@{/css/gtvg.css}" />
</head>
<body>
	<p th:text="#{home.welcome}">Welcome to our grocery store!</p>
</body
</html>
5.1. Thymeleaf整合
<dependency>
    <groupId>org.springframework.boot</groupId>
    <artifactId>spring-boot-starter-thymeleaf</artifactId>
</dependency>
按照SpringBoot自动配置的原理机制,导了starter之后,就会有对应的XXXAutoConfiguration
自动配置原理
1)开启了 org.springframework.boot.autoconfigure.thymeleaf.ThymeleafAutoConfiguration 自动配置
2)属性绑定在 ThymeleafProperties 中,对应配置文件中前缀为"spring.thymeleaf"的配置
3)所有的模板页面默认在 classpath:/templates文件夹下
4)默认规则:所有的模板页面在 classpath:/templates/下面找,找后缀名为.html的页面
5.2. 基础语法
5.2.1. 核心用法
th:xxx:动态渲染指定的 html 标签属性值、或者th指令(遍历、判断等)
● th:text:标签体内文本值渲染,不会解析html,可对表达式或变量求值,并将结果显示在其被包含的 html 标签体内替换原有html文本
● th:utext:utext会解析html
● th:属性:标签指定属性渲染,动态替换任意属性的值
● th:attr:标签任意属性渲染,html标签中所有的属性对应的值,都可以在 th:arr 中动态取出
● th:ifth:each...:其他th指令
说明:th:text,以纯文本显示且不解析内容里的HTML标签或元素 ;th:utext,把整个内容当成是HTML来解析并展示
String text = "<span style='color:red'>" + "text效果" + "</span>";
String utext = "<span style='color:red'>" + "utext效果" + "</span>";

model.addAttribute("text",text);
model.addAttribute("utext",utext);

<h1 th:text="${text}">hello</h1> 解析结果为:<span style='color:red'>text效果</span>
<h1 th:utext="${utext}">hello</h1> 解析结果为:utext效果

<!-- th:任意html属性  动态替换任意属性的值-->
<img th:src="${imgUrl}" src="flowers.jpg" style="width: 300px"/>
<!--th:arr:任意属性指定   html标签中所有的属性对应的值,都可以在 th:arr 中动态取出-->
<img src="flowers.jpg" style="width:300px" th:attr="src=${imgUrl},style=${width}"/>
系统工具&内置对象:thymeleaf详细文档
- param:请求参数对象
- session:session对象
- application:application对象
- #execInfo:模板执行信息
- #messages:国际化消息
- #uris:uri/url工具
- #conversions:类型转换工具
- #dates:日期工具,是java.util.Date对象的工具类
- #calendars:类似#dates,只不过是java.util.Calendar对象的工具类
- #temporals: JDK8+ java.time API 工具类
- #numbers:数字操作工具
- #strings:字符串操作
- #objects:对象操作
- #bools:bool操作
- #arrays:array工具
- #lists:list工具
- #sets:set工具
- #maps:map工具
- #aggregates:集合聚合工具(sum、avg)
- #ids:id生成工具
5.2.2. 语法示例
表达式:用来动态取值
- ${}:变量取值
- @{}:url取值
- #{}:国际化消息
- ~{}:片段引用
- *{}:变量选择:需要配合th:object绑定对象
常见:
- 文本: 'one text','another one!',...
- 数字: 0,34,3.0,12.3,...
- 布尔:true、false
- null: null
- 变量名: one,sometext,main...
文本操作:
- 拼串: +
- 文本替换:| The name is ${name} |
布尔操作:
比较运算:
- 比较:>,<,<=,>=(gt,lt,ge,le)
- 等值运算:==,!=(eq,ne)
条件运算:
- if-then: (if)?(then)
- if-then-else: (if)?(then):(else)
- default: (value)?:(defaultValue)
特殊语法:
所有以上都可以嵌套组合
'User is ' + (${user.isAdmin()} ? 'Administrator' : (${user.type} ?: 'Unknown'))
5.2.3. 属性设置
th:href="@{/list}"
th:attr="class=${active}"
th:attr="src=${imgUrl},style=${width}"
th:checked="${user.active}"
5.2.4. 遍历
语法: th:each="元素名,迭代状态 : ${集合}"
<tr th:each="person: ${persons}">
  <td th:text="${person.userName}"></td>
  <td th:text="${person.email}"></td>
  <td th:text="${person.age}"></td>
</tr>

<tr th:each="person,iterStat : ${persons}" th:if="${person.age > 10}" th:object="${person}">
        <th scope="row" >[[${person.id}]]</th>
       <!-- <td th:text="${person.userName}"></td>-->
        <td th:text="*{userName}"></td>
        <td th:if="${#strings.isEmpty(person.email)}" th:text="没有邮箱信息"></td>
        <td th:if="${not #strings.isEmpty(person.email)}" th:text="${person.email}"></td>
        <td th:text="|${person.age} - ${person.age >= 18 ? '成年':'未成年' }|"></td>
        <td th:switch="${person.role}">
            <button th:case="'admin'" type="button" class="btn btn-danger">管理员</button>
            <button th:case="'pm'" type="button" class="btn btn-primary">项目经理</button>
            <button th:case="'hr'" type="button" class="btn btn-default">人事</button>
        </td>
        <td>
            index:[[${iterStat.index}]] <br/>
            count:[[${iterStat.count}]] <br/>
            size(总数量):[[${iterStat.size}]] <br/>
            current(当前对象):[[${iterStat.current}]] <br/>
            even(true)/odd(false):[[${iterStat.even}]] <br/>
            first:[[${iterStat.first}]] <br/>
            last:[[${iterStat.last}]] <br/>
        </td>
</tr>
iterStat(迭代状态 ) 有以下属性:
- index:当前遍历元素的索引,从0开始
- count:当前遍历元素的索引,从1开始
- size:需要遍历元素的总数量
- current:当前正在遍历的元素对象
- even/odd:是否偶数/奇数行
- first:是否第一个元素
- last:是否最后一个元素
5.2.5. 判断
th:if
<td th:if="${#strings.isEmpty(person.email)}" th:text="没有邮箱信息"></td>
<td th:if="${not #strings.isEmpty(person.email)}" th:text="${person.email}"></td>
th:switch
<td th:switch="${person.role}">
   <button th:case="'admin'" type="button" class="btn btn-danger">管理员</button>
   <button th:case="'pm'" type="button" class="btn btn-primary">项目经理</button>
   <button th:case="'hr'" type="button" class="btn btn-default">人事</button>
</td>
5.2.6. 属性优先级
如下优先级从高到底
| Order |
Feature |
Attributes |
| 1 |
片段包含 |
th:insert th:replace |
| 2 |
遍历 |
th:each |
| 3 |
判断 |
th:if th:unless th:switch th:case |
| 4 |
定义本地变量 |
th:object th:with |
| 5 |
通用方式属性修改 |
th:attr th:attrprepend th:attrappend |
| 6 |
指定属性修改 |
th:value th:href th:src ... |
| 7 |
文本值 |
th:text th:utext |
| 8 |
片段指定 |
th:fragment |
| 9 |
片段移除 |
th:remove |
5.2.7. 行内写法
[[...]] 或 [(...)]
<th scope="row" >[[${person.id}]]</th>
5.2.8. 变量选择
<div th:object="${session.person}">
  <p>id: <span th:text="*{id}">1</span>.</p>
  <p>name: <span th:text="*{userName}">张三</span>.</p>
  <p>email: <span th:text="*{email}">zhangsan<@163.com</span>.</p>
</div>
等同于
<div>
  <p>id: <span th:text="*{session.person.id}">1</span>.</p>
  <p>name: <span th:text="*{session.person.userName}">张三</span>.</p>
  <p>email: <span th:text="*{session.person.email}">zhangsan<@163.com</span>.</p>
</div>
5.2.9. 模板布局
- 定义模板: th:fragment
- 引用模板:~{templatename::selector}
- 插入模板:th:insert、th:replace
<footer th:fragment="copy">© 2011 The Good Thymes Virtual Grocery</footer>
<body>
<div th:insert="~{footer :: copy}"></div>
<div th:replace="~{footer :: copy}"></div>
</body>
<body>
结果:
<body>
<div>
<footer>© 2011 The Good Thymes Virtual Grocery</footer>
</div>
<footer>© 2011 The Good Thymes Virtual Grocery</footer>
</body>
</body>
Spring为开发者提供了一个名为spring-boot-devtools的模块来使Spring Boot应用支持热部署,提高开发者的开发效率,无需手动重启Spring Boot应用。
SpringBoot devtools实现热部署说明:
- spring-boot-devtools热部署是对修改的类和配置文件进行重新加载,所以在重新加载的过程中会看到项目启动的过程,其本质上只是对修改类和配置文件的重新加载,所以速度极快
- idea监测到项目runninng 或者 debuging 会停用自动编译,所以还需要手动build [Ctrl + F9]
- spring-boot-devtools 对于前端使用模板引擎的项目,能够自动禁用缓存,在页面修改后(修改后还需要手动build),只需要刷新浏览器页面即可
<dependency>
   <groupId>org.springframework.boot</groupId>
   <artifactId>spring-boot-devtools</artifactId>
 </dependency>
修改页面后,ctrl+F9,可以看到效果;
如果是java代码的修改,建议重启。如果使用devtools热启动,可能会在某些场景下引起一些bug,难以排查
6. 国际化
国际化的自动配置参照MessageSourceAutoConfiguration
实现步骤:
1. Spring Boot 在类路径根下查找messages资源绑定文件,文件名为:messages.properties
2. 多语言可以定义多个消息文件,命名为messages_区域代码.properties。如:
- messages.properties:默认
- messages_zh_CN.properties:中文环境
- messages_en_US.properties:英语环境
3. 在页面中可以使用表达式 #{}获取国际化的配置项值
在程序中可以自动注入 MessageSource组件,获取国际化的配置项值
@Autowired
MessageSource messageSource;

@GetMapping("/message")
public String getMessageContent(HttpServletRequest request) {

   Locale locale = request.getLocale();
   //利用代码的方式获取国际化配置文件中指定的配置项的值
   String login = messageSource.getMessage("login", null, locale);
   return login;
}
7. 错误处理
7.1. 默认机制
错误处理的自动配置都在ErrorMvcAutoConfiguration中,两大核心机制:
-
SpringBoot 会自适应处理错误,响应页面或JSON数据(如果是浏览器会优先响应页面,如果是移动端会优先响应json数据)
-
SpringMVC的错误处理机制依然保留,SpringMVC处理不了,才会交给SpringBoot进行处理
步骤(规则):
1. 解析一个错误页
如果发生了500、404、503、403 这些错误
ⅰ. 如果有模板引擎,默认在 classpath:/templates/error/精确码.html下找
ⅱ. 如果没有模板引擎,在静态资源文件夹下找 精确码.html
如果匹配不到精确码.html这些精确的错误页,就去找5xx.html,4xx.html模糊匹配
ⅰ. 如果有模板引擎,默认在 classpath:/templates/error/5xx.html
ⅱ. 如果没有模板引擎,在静态资源文件夹下找 5xx.html
2. 如果模板引擎路径templates下有 error.html页面,就直接渲染

SpringMVC处理不了的请求,转给/error,/error请求 最终由SpringBoot底层的BasicErrorController进行处理,BasicErrorController会经过内容协商,如果要页面就响应错误信息页面,如果要json,就响应json。
发生错误以后,SpringMVC处理不了,转发给/error路径,SpringBoot在底层写好一个 BasicErrorController的组件,专门处理这个请求
//返回错误信息的html页面
@RequestMapping(produces = MediaType.TEXT_HTML_VALUE) //返回HTML
	public ModelAndView errorHtml(HttpServletRequest request, HttpServletResponse response) {
	HttpStatus status = getStatus(request);
	Map<String, Object> model = Collections
		.unmodifiableMap(getErrorAttributes(request, getErrorAttributeOptions(request, MediaType.TEXT_HTML)));
	response.setStatus(status.value());
	ModelAndView modelAndView = resolveErrorView(request, response, status, model);
	return (modelAndView != null) ? modelAndView : new ModelAndView("error", model);
}

//返回错误信息的json数据
@RequestMapping //返回 ResponseEntity, JSON
public ResponseEntity<Map<String, Object>> error(HttpServletRequest request) {
	HttpStatus status = getStatus(request);
	if (status == HttpStatus.NO_CONTENT) {
		return new ResponseEntity<>(status);
	}
	Map<String, Object> body = getErrorAttributes(request, getErrorAttributeOptions(request, MediaType.ALL));
	return new ResponseEntity<>(body, status);
}
错误页面是这么解析到的,容器中有一个错误视图解析器,利用错误视图解析器进行解析,最终返回相应的视图(返回ModelAndView,即错误页地址)
// 解析错误的自定义视图地址
ModelAndView modelAndView = resolveErrorView(request, response, status, model);
// 如果解析不到错误页面的地址,默认的错误页就是 视图名为error的错误页面
return (modelAndView != null) ? modelAndView : new ModelAndView("error", model);
@Bean
@ConditionalOnBean(DispatcherServlet.class)
@ConditionalOnMissingBean(ErrorViewResolver.class)
DefaultErrorViewResolver conventionErrorViewResolver() {
    return new DefaultErrorViewResolver(this.applicationContext, this.resources);
}
SpringBoot解析自定义错误页的默认规则
	@Override
	public ModelAndView resolveErrorView(HttpServletRequest request, HttpStatus status, Map<String, Object> model) {
		ModelAndView modelAndView = resolve(String.valueOf(status.value()), model);
		if (modelAndView == null && SERIES_VIEWS.containsKey(status.series())) {
			modelAndView = resolve(SERIES_VIEWS.get(status.series()), model);
		}
		return modelAndView;
	}

	private ModelAndView resolve(String viewName, Map<String, Object> model) {
		String errorViewName = "error/" + viewName;
		TemplateAvailabilityProvider provider = this.templateAvailabilityProviders.getProvider(errorViewName,
				this.applicationContext);
		if (provider != null) {
			return new ModelAndView(errorViewName, model);
		}
		return resolveResource(errorViewName, model);
	}

	private ModelAndView resolveResource(String viewName, Map<String, Object> model) {
		for (String location : this.resources.getStaticLocations()) {
			try {
				Resource resource = this.applicationContext.getResource(location);
				resource = resource.createRelative(viewName + ".html");
				if (resource.exists()) {
					return new ModelAndView(new HtmlResourceView(resource), model);
				}
			}
			catch (Exception ex) {
			}
		}
		return null;
	}
容器中有一个默认的名为 error 的 View; 提供了默认错误白页功能
7.2. 自定义错误响应
7.2.1. 自定义json响应
使用@ControllerAdvice + @ExceptionHandler 进行统一异常处理
7.2.2. 自定义页面响应
根据SpringBoot的错误页面规则,自定义页面模板
7.3. 最佳实战
1. 前后端分离
后台发生的所有异常,@ControllerAdvice + @ExceptionHandler进行统一异常处理。
2. 服务端页面渲染
不可预知的一些,HTTP码表示的服务器或客户端错误
在classpath:/templates/error/下面,加一些常用精确的错误码页面。500.html,404.html
在classpath:/templates/error/下面,加一些通用模糊匹配的错误码页面。 5xx.html,4xx.html
发生业务错误
核心业务,每一种错误,都应该通过代码控制,跳转到自己定制的错误页。
通用业务,classpath:/templates/error.html页面,显示错误信息。
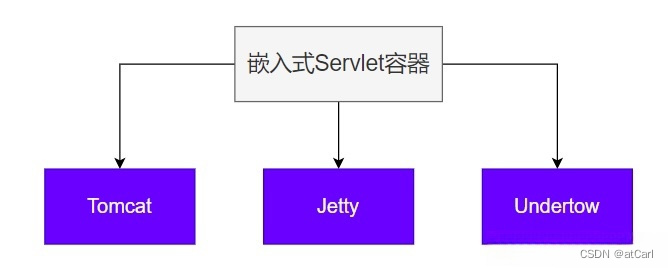
8. 嵌入式容器
不用单独安装,项目就能启动
Servlet容器:管理、运行Servlet组件(Servlet、Filter、Listener)的环境,一般指服务器。
8.1. 自动配置原理
- SpringBoot 默认嵌入Tomcat作为Servlet容器
- 自动配置类是ServletWebServerFactoryAutoConfiguration,EmbeddedWebServerFactoryCustomizerAutoConfiguration
自动配置类开始分析功能
@AutoConfiguration(after = SslAutoConfiguration.class)
@AutoConfigureOrder(Ordered.HIGHEST_PRECEDENCE)
@ConditionalOnClass(ServletRequest.class)
@ConditionalOnWebApplication(type = Type.SERVLET)
@EnableConfigurationProperties(ServerProperties.class)
@Import({ ServletWebServerFactoryAutoConfiguration.BeanPostProcessorsRegistrar.class,
		ServletWebServerFactoryConfiguration.EmbeddedTomcat.class,
		ServletWebServerFactoryConfiguration.EmbeddedJetty.class,
		ServletWebServerFactoryConfiguration.EmbeddedUndertow.class })
public class ServletWebServerFactoryAutoConfiguration {

}
1)ServletWebServerFactoryAutoConfiguration 自动配置了嵌入式容器场景。
2)ServletWebServerFactoryAutoConfiguration绑定了ServerProperties配置类,所有和服务器相关的配置项,都以"server"为前缀。
3)ServletWebServerFactoryAutoConfiguration 导入了嵌入式的三大服务器 Tomcat、Jetty、Undertow:
- 导入 Tomcat、Jetty、Undertow 都有条件注解,系统中要有相关的类(也就是导了包)才能生效
- 由于web场景的starter中引了tomcat的starter,导了tomcat相关的包,所以默认tomcat配置生效,EmbeddedTomcat给容器中添加了 TomcatServletWebServerFactory(Tomcat的web服务器工厂)
- Tomcat、Jetty、Undertow 都给容器中放了一个 web服务器工厂(造web服务器的):XXXServletWebServerFactory
- 每个web服务器工厂都具备一个功能:获取web服务器(getWebServer)
- TomcatServletWebServerFactory创建了tomcat(通过getWebServer来创建)
ServletWebServerFactory 什么时候会把WebServer创建出来?
IOC容器(ServletWebServerApplicationContext)启动的时候会调用createWebServer,创建web服务器。Spring容器启动的时候,在refresh()这一步,会预留一个时机,刷新子容器,即调用onRefresh()。
@Override
	public void refresh() throws BeansException, IllegalStateException {
		synchronized (this.startupShutdownMonitor) {
			StartupStep contextRefresh = this.applicationStartup.start("spring.context.refresh");

			// Prepare this context for refreshing.
			prepareRefresh();

			// Tell the subclass to refresh the internal bean factory.
			ConfigurableListableBeanFactory beanFactory = obtainFreshBeanFactory();

			// Prepare the bean factory for use in this context.
			prepareBeanFactory(beanFactory);

			try {
				// Allows post-processing of the bean factory in context subclasses.
				postProcessBeanFactory(beanFactory);

				StartupStep beanPostProcess = this.applicationStartup.start("spring.context.beans.post-process");
				// Invoke factory processors registered as beans in the context.
				invokeBeanFactoryPostProcessors(beanFactory);

				// Register bean processors that intercept bean creation.
				registerBeanPostProcessors(beanFactory);
				beanPostProcess.end();

				// Initialize message source for this context.
				initMessageSource();

				// Initialize event multicaster for this context.
				initApplicationEventMulticaster();

				// Initialize other special beans in specific context subclasses.
				onRefresh();

				// Check for listener beans and register them.
				registerListeners();

				// Instantiate all remaining (non-lazy-init) singletons.
				finishBeanFactoryInitialization(beanFactory);

				// Last step: publish corresponding event.
				finishRefresh();
			}

			catch (BeansException ex) {
				if (logger.isWarnEnabled()) {
					logger.warn("Exception encountered during context initialization - " +
							"cancelling refresh attempt: " + ex);
				}

				// Destroy already created singletons to avoid dangling resources.
				destroyBeans();

				// Reset 'active' flag.
				cancelRefresh(ex);

				// Propagate exception to caller.
				throw ex;
			}

			finally {
				// Reset common introspection caches in Spring's core, since we
				// might not ever need metadata for singleton beans anymore...
				resetCommonCaches();
				contextRefresh.end();
			}
		}
	}
 protected void onRefresh() {
     super.onRefresh();

     try {
         this.createWebServer();
     } catch (Throwable var2) {
         throw new ApplicationContextException("Unable to start web server", var2);
     }
}
总结:
Web场景的Spring容器启动,在onRefresh的时候,会调用创建web服务器的方法,而Web服务器的创建是通过XXXServletWebServerFactory实现的。容器中会根据条件注解判断是否有相应的类(也就是导了包),启动相关的服务器配置,默认EmbeddedTomcat会给容器中放一个 TomcatServletWebServerFactory,导致项目启动,自动创建出Tomcat。
8.2. 自定义
切换服务器
<dependency>
    <groupId>org.springframework.boot</groupId>
    <artifactId>spring-boot-starter-web</artifactId>
    <exclusions>
        <!-- Exclude the Tomcat dependency -->
        <exclusion>
            <groupId>org.springframework.boot</groupId>
            <artifactId>spring-boot-starter-tomcat</artifactId>
        </exclusion>
    </exclusions>
</dependency>
<!-- Use Jetty instead -->
<dependency>
    <groupId>org.springframework.boot</groupId>
    <artifactId>spring-boot-starter-jetty</artifactId>
</dependency>
8.3. 使用
用法:
- 修改"server"下的相关配置就可以修改服务器参数
- 通过给容器中放一个ServletWebServerFactory,来禁用掉SpringBoot默认配置的服务器工厂,实现自定义嵌入任意服务器
9. 全面接管SpringMVC
- SpringBoot创建的Web应用,底层默认配置好了 SpringMVC 的所有常用组件。
- 如果我们需要全面接管SpringMVC的所有配置并禁用默认配置,仅需要编写一个WebMvcConfigurer配置类,并标注 @EnableWebMvc 即可
9.1. WebMvcAutoConfiguration
WebMvcAutoConfiguration(web场景的自动配置类)生效后,给容器中配置了哪些组件?SpringMVC自动配置场景,具有如下默认行为:
1. 支持RESTful的filter:HiddenHttpMethodFilter;
2. 支持非POST请求的请求体携带数据:FormContentFilter;
3. EnableWebMvcConfiguration:
3.1. RequestMappingHandlerAdapter;
3.2. WelcomePageHandlerMapping: 欢迎页功能支持(在模板引擎目录、静态资源目录下放index.html),项目访问 / ,就默认展示这个页面;
3.3. RequestMappingHandlerMapping:找每个请求由谁处理的映射关系;
3.4. ExceptionHandlerExceptionResolver:默认的异常解析器,所有的异常解析都是由解析器来做的;
3.5. LocaleResolver:国际化解析器;
3.6. ThemeResolver:主题解析器;
3.7. FlashMapManager:临时数据共享;
3.8. FormattingConversionService: 数据格式化 、类型转化;
3.9. Validator: 数据校验,JSR303提供的数据校验功能;
3.10. WebBindingInitializer:请求参数的封装与绑定;
3.11. ContentNegotiationManager:内容协商管理器;
4. WebMvcAutoConfigurationAdapter配置生效,它是一个WebMvcConfigurer,定义MVC底层组件:
4.1. 定义好了 WebMvcConfigurer 底层组件的默认功能(通过重写WebMvcConfigurer 接口的方法)
4.2. 视图解析器:InternalResourceViewResolver,默认的视图解析器;
4.3.视图解析器:BeanNameViewResolver,视图名是组件的beanName,如下,视图名是"myBeanNameViewResolver";
4.4. 内容协商解析器:ContentNegotiatingViewResolver
4.5. 请求上下文过滤器:RequestContextFilter,任意位置可以直接获取当前请求
4.6. 静态资源链规则
4.7. ProblemDetailsExceptionHandler:错误详情,只能处理(捕获)SpringMVC自己定义的一些常见的内部异常
ServletRequestAttributes requestAttributes = (ServletRequestAttributes) RequestContextHolder.getRequestAttributes();
HttpServletRequest request = requestAttributes.getRequest();
@Component("myBeanNameViewResolver")
public class MyBeanNameViewResolver implements View {


    @Override
    public void render(Map<String, ?> model, HttpServletRequest request, HttpServletResponse response) throws Exception {
        response.getWriter().write("testView");
    }


    @Override
    public String getContentType() {
        return View.super.getContentType();
    }

}
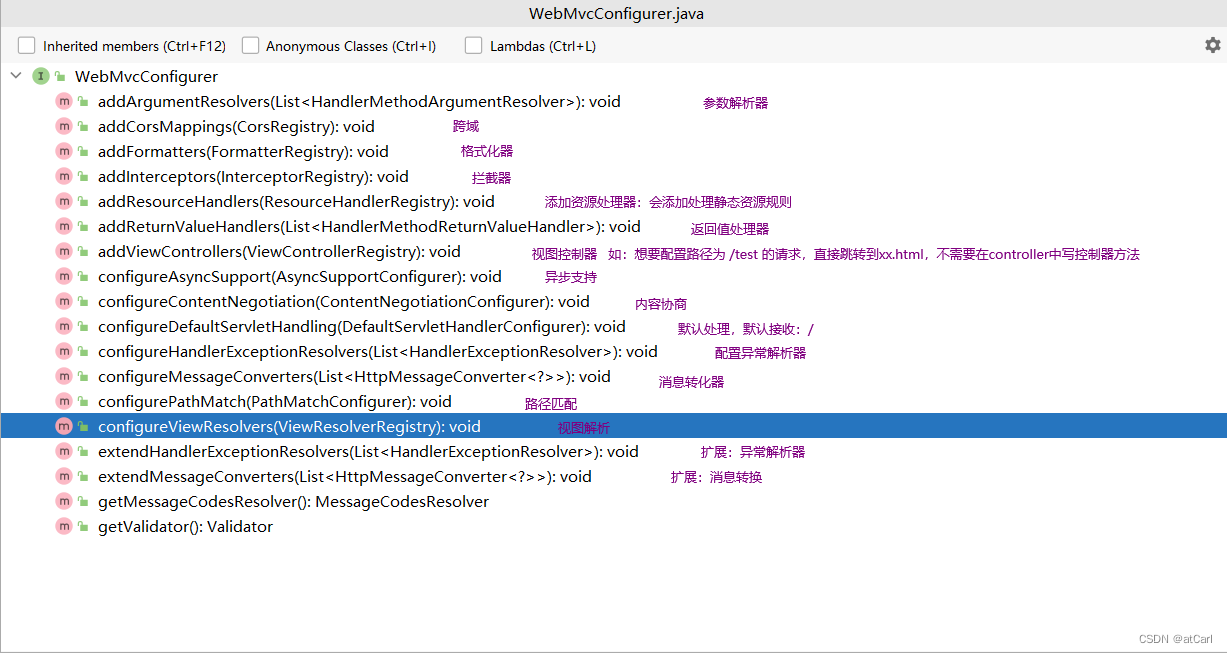
9.2. WebMvcConfigurer 功能
定义、扩展SpringMVC底层功能
| 提供方法 |
核心参数 |
功能 |
默认 |
| addFormatters |
FormatterRegistry |
格式化器:支持属性上@NumberFormat和@DatetimeFormat的数据类型转换 |
GenericConversionService |
| getValidator |
无 |
数据校验:校验 Controller 上使用@Valid标注的参数合法性。需要导入starter-validator |
无 |
| addInterceptors |
InterceptorRegistry |
拦截器:拦截收到的所有请求 |
无 |
| configureContentNegotiation |
ContentNegotiationConfigurer |
内容协商:支持多种数据格式返回。需要配合支持这种类型的HttpMessageConverter |
支持 json |
| configureMessageConverters |
List<HttpMessageConverter<?>> |
消息转换器:标注@ResponseBody的返回值会利用MessageConverter直接写出去 |
8 个,支持byte,string,multipart,resource,json |
| addViewControllers |
ViewControllerRegistry |
视图映射:直接将请求路径与物理视图映射。用于无 java 业务逻辑的直接视图页渲染 |
无
<mvc:view-controller> |
| configureViewResolvers |
ViewResolverRegistry |
视图解析器:逻辑视图转为物理视图 |
ViewResolverComposite |
| addResourceHandlers |
ResourceHandlerRegistry |
静态资源处理:静态资源路径映射、缓存控制 |
ResourceHandlerRegistry |
| configureDefaultServletHandling |
DefaultServletHandlerConfigurer |
默认 Servlet:可以覆盖 Tomcat 的DefaultServlet。让DispatcherServlet拦截/ |
无 |
| configurePathMatch |
PathMatchConfigurer |
路径匹配:自定义 URL 路径匹配。可以自动为所有路径加上指定前缀,比如 /api |
无 |
| configureAsyncSupport |
AsyncSupportConfigurer |
异步支持: |
TaskExecutionAutoConfiguration |
| addCorsMappings |
CorsRegistry |
跨域: |
无 |
| addArgumentResolvers |
List<HandlerMethodArgumentResolver> |
参数解析器: |
mvc 默认提供 |
| addReturnValueHandlers |
List<HandlerMethodReturnValueHandler> |
返回值解析器: |
mvc 默认提供 |
| configureHandlerExceptionResolvers |
List<HandlerExceptionResolver> |
异常处理器: |
默认 3 个
ExceptionHandlerExceptionResolver
ResponseStatusExceptionResolver
DefaultHandlerExceptionResolver |
| getMessageCodesResolver |
无 |
消息码解析器:国际化使用 |
无 |
9.3. @EnableWebMvc 禁用默认行为
1)@EnableWebMvc给容器中导入 DelegatingWebMvcConfiguration组件,它是WebMvcConfigurationSupport类型的;
2)WebMvcAutoConfiguration生效有一个核心的条件注解,@ConditionalOnMissingBean(WebMvcConfigurationSupport.class),容器中没有WebMvcConfigurationSupport,WebMvcAutoConfiguration才生效;
3)@EnableWebMvc 导入 WebMvcConfigurationSupport 使WebMvcAutoConfiguration 失效,导致禁用了默认行为;
@Retention(RetentionPolicy.RUNTIME)
@Target(ElementType.TYPE)
@Documented
@Import(DelegatingWebMvcConfiguration.class)
public @interface EnableWebMvc {
}
总结:
@EnableWebMvc : 禁用了MVC的自动配置
WebMvcConfigurer组件:定义MVC的底层行为
10. 使用方式
SpringBoot 已经默认配置好了Web开发场景常用功能,我们直接使用即可。
三种方式
| 方式 |
用法 |
效果 |
| 全自动(全部使用默认配置) |
直接编写控制器逻辑 |
|
全部使用自动配置默认效果 |
| 手自一体(保留SpringBoot的默认配置,同时还要加一些自定义的规则) |
@Configuration+
配置WebMvcConfigrer+
配置 WebMvcRegistrations |
不要标注@EnableWebMvc |
保留自动配置效果
手动设置部分功能
定义MVC底层组件 |
| 全手动 |
@Configuration + 配置WebMvcConfigurer |
标注@EnableWebMvc |
禁用自动配置效果
全手动设置 |
总结:给容器中添加一个标注@Configuration注解的配置类,实现 WebMvcConfigurer,但是不要标注 @EnableWebMvc注解,实现手自一体的效果。
两种模式
- 前后分离模式: @RestController 响应JSON数据
- 前后不分离模式:@Controller + Thymeleaf模板引擎
11. Web新特性
11.1. Problemdetails
RFC 7807: https://www.rfc-editor.org/rfc/rfc7807
Problemdetails是RFC 7807这个规范定义的一种错误信息返回的数据格式,SpringBoot现在也支持这种格式
原理:在WebMvcAutoConfiguration中会有如下配置
@Configuration(proxyBeanMethods = false)
@ConditionalOnProperty(prefix = "spring.mvc.problemdetails", name = "enabled", havingValue = "true")
static class ProblemDetailsErrorHandlingConfiguration {

    @Bean
    @ConditionalOnMissingBean(ResponseEntityExceptionHandler.class)
    ProblemDetailsExceptionHandler problemDetailsExceptionHandler() {
        return new ProblemDetailsExceptionHandler();
    }

}
ProblemDetailsExceptionHandler上有@ControllerAdvice注解,@ControllerAdvice会将当前类标识为异常处理的组件,用于全局异常处理。
ProblemDetailsExceptionHandler会处理指定异常,如果系统出现以下异常,会被SpringBoot支持以 RFC 7807规范方式返回错误数据,但这个功能默认是关闭的。
	@ExceptionHandler({
			HttpRequestMethodNotSupportedException.class,
			HttpMediaTypeNotSupportedException.class,
			HttpMediaTypeNotAcceptableException.class,
			MissingPathVariableException.class,
			MissingServletRequestParameterException.class,
			MissingServletRequestPartException.class,
			ServletRequestBindingException.class,
			MethodArgumentNotValidException.class,
			NoHandlerFoundException.class,
			AsyncRequestTimeoutException.class,
			ErrorResponseException.class,
			ConversionNotSupportedException.class,
			TypeMismatchException.class,
			HttpMessageNotReadableException.class,
			HttpMessageNotWritableException.class,
			BindException.class
		})
ProblemDetailsExceptionHandler 生效有一个前提条件:需满足@ConditionalOnProperty(prefix = "spring.mvc.problemdetails", name = "enabled", havingValue = "true")这个条件注解中的条件,需要配置一个属性 spring.mvc.problemdetails.enabled=true。
默认(ProblemDetailsExceptionHandler未生效)效果:
响应错误信息的json格式数据
{
    "timestamp": "2023-09-08T16:33:05.494+00:00",
    "status": 405,
    "error": "Method Not Allowed",
    "trace": "org.springframework.web.HttpRequestMethodNotSupportedException: Request method 'POST' is not supported\r\n\tat org.springframework.web.servlet.mvc.method.RequestMappingInfoHandlerMapping.handleNoMatch(RequestMappingInfoHandlerMapping.java:265)\r\n\tat org.springframework.web.servlet.handler.AbstractHandlerMethodMapping.lookupHandlerMethod(AbstractHandlerMethodMapping.java:441)\r\n\tat org.springframework.web.servlet.handler.AbstractHandlerMethodMapping.getHandlerInternal(AbstractHandlerMethodMapping.java:382)\r\n\tat org.springframework.web.servlet.mvc.method.RequestMappingInfoHandlerMapping.getHandlerInternal(RequestMappingInfoHandlerMapping.java:126)\r\n\tat org.springframework.web.servlet.mvc.method.RequestMappingInfoHandlerMapping.getHandlerInternal(RequestMappingInfoHandlerMapping.java:68)\r\n\tat org.springframework.web.servlet.handler.AbstractHandlerMapping.getHandler(AbstractHandlerMapping.java:505)\r\n\tat org.springframework.web.servlet.DispatcherServlet.getHandler(DispatcherServlet.java:1275)\r\n\tat org.springframework.web.servlet.DispatcherServlet.doDispatch(DispatcherServlet.java:1057)\r\n\tat org.springframework.web.servlet.DispatcherServlet.doService(DispatcherServlet.java:974)\r\n\tat org.springframework.web.servlet.FrameworkServlet.processRequest(FrameworkServlet.java:1011)\r\n\tat org.springframework.web.servlet.FrameworkServlet.doPost(FrameworkServlet.java:914)\r\n\tat jakarta.servlet.http.HttpServlet.service(HttpServlet.java:590)\r\n\tat org.springframework.web.servlet.FrameworkServlet.service(FrameworkServlet.java:885)\r\n\tat jakarta.servlet.http.HttpServlet.service(HttpServlet.java:658)\r\n\tat org.apache.catalina.core.ApplicationFilterChain.internalDoFilter(ApplicationFilterChain.java:205)\r\n\tat org.apache.catalina.core.ApplicationFilterChain.doFilter(ApplicationFilterChain.java:149)\r\n\tat org.apache.tomcat.websocket.server.WsFilter.doFilter(WsFilter.java:51)\r\n\tat org.apache.catalina.core.ApplicationFilterChain.internalDoFilter(ApplicationFilterChain.java:174)\r\n\tat org.apache.catalina.core.ApplicationFilterChain.doFilter(ApplicationFilterChain.java:149)\r\n\tat org.springframework.web.filter.RequestContextFilter.doFilterInternal(RequestContextFilter.java:100)\r\n\tat org.springframework.web.filter.OncePerRequestFilter.doFilter(OncePerRequestFilter.java:116)\r\n\tat org.apache.catalina.core.ApplicationFilterChain.internalDoFilter(ApplicationFilterChain.java:174)\r\n\tat org.apache.catalina.core.ApplicationFilterChain.doFilter(ApplicationFilterChain.java:149)\r\n\tat org.springframework.web.filter.FormContentFilter.doFilterInternal(FormContentFilter.java:93)\r\n\tat org.springframework.web.filter.OncePerRequestFilter.doFilter(OncePerRequestFilter.java:116)\r\n\tat org.apache.catalina.core.ApplicationFilterChain.internalDoFilter(ApplicationFilterChain.java:174)\r\n\tat org.apache.catalina.core.ApplicationFilterChain.doFilter(ApplicationFilterChain.java:149)\r\n\tat org.springframework.web.filter.CharacterEncodingFilter.doFilterInternal(CharacterEncodingFilter.java:201)\r\n\tat org.springframework.web.filter.OncePerRequestFilter.doFilter(OncePerRequestFilter.java:116)\r\n\tat org.apache.catalina.core.ApplicationFilterChain.internalDoFilter(ApplicationFilterChain.java:174)\r\n\tat org.apache.catalina.core.ApplicationFilterChain.doFilter(ApplicationFilterChain.java:149)\r\n\tat org.apache.catalina.core.StandardWrapperValve.invoke(StandardWrapperValve.java:166)\r\n\tat org.apache.catalina.core.StandardContextValve.invoke(StandardContextValve.java:90)\r\n\tat org.apache.catalina.authenticator.AuthenticatorBase.invoke(AuthenticatorBase.java:482)\r\n\tat org.apache.catalina.core.StandardHostValve.invoke(StandardHostValve.java:115)\r\n\tat org.apache.catalina.valves.ErrorReportValve.invoke(ErrorReportValve.java:93)\r\n\tat org.apache.catalina.core.StandardEngineValve.invoke(StandardEngineValve.java:74)\r\n\tat org.apache.catalina.connector.CoyoteAdapter.service(CoyoteAdapter.java:341)\r\n\tat org.apache.coyote.http11.Http11Processor.service(Http11Processor.java:391)\r\n\tat org.apache.coyote.AbstractProcessorLight.process(AbstractProcessorLight.java:63)\r\n\tat org.apache.coyote.AbstractProtocol$ConnectionHandler.process(AbstractProtocol.java:894)\r\n\tat org.apache.tomcat.util.net.NioEndpoint$SocketProcessor.doRun(NioEndpoint.java:1740)\r\n\tat org.apache.tomcat.util.net.SocketProcessorBase.run(SocketProcessorBase.java:52)\r\n\tat org.apache.tomcat.util.threads.ThreadPoolExecutor.runWorker(ThreadPoolExecutor.java:1191)\r\n\tat org.apache.tomcat.util.threads.ThreadPoolExecutor$Worker.run(ThreadPoolExecutor.java:659)\r\n\tat org.apache.tomcat.util.threads.TaskThread$WrappingRunnable.run(TaskThread.java:61)\r\n\tat java.base/java.lang.Thread.run(Thread.java:833)\r\n",
    "message": "Method 'POST' is not supported.",
    "path": "/list"
}
开启ProblemDetails(spring.mvc.problemdetails.enabled=true),返回数据使用了新的MediaType
效果:同样也是响应错误信息的json格式数据,但是在响应的Headers中返回的数据类型是application/problem+json
{
    "type": "about:blank",
    "title": "Method Not Allowed",
    "status": 405,
    "detail": "Method 'POST' is not supported.",
    "instance": "/list"
}

11.2. 函数式Web
SpringMVC 5.2 以后,允许我们使用函数式的方式,定义Web的请求处理流程。
Web请求处理的方式:
- @Controller + @RequestMapping:耦合式 (路由、业务耦合)
- 函数式Web:分离式(路由、业务分离)
11.2.1. 场景
案例:User RESTful - CRUD
- GET /user/1 获取1号用户
- GET /users 获取所有用户
- POST /user 请求体携带JSON,新增一个用户
- PUT /user/1 请求体携带JSON,修改1号用户
- DELETE /user/1 删除1号用户
11.2.2. 核心类
- RouterFunction:定义路由信息。
- RequestPredicate:请求谓语。定义请求规则:请求方式(GET、POST)、请求参数。
- ServerRequest:封装请求完整数据。
- ServerResponse:封装响应完整数据。
11.2.3. 示例
@Configuration
public class WebFunctionConfig {

    /**
     *  函数式Web:
     *  1.给容器中放一个bean:类型是RouterFunction<ServerResponse>
     *  2.每个业务准备一个自己的Handler
     *
     *  核心四大对象
     *  RouterFunction: 定义路由信息。发什么请求,谁来处理
     *  RequestPredicate:请求谓语。定义请求规则:请求方式(GET、POST)、请求参数
     *  ServerRequest:  封装请求完整数据
     *  ServerResponse: 封装响应完整数据
     */
    @Bean
    public RouterFunction<ServerResponse> userRoute(UserServiceHandler userServiceHandler/*这个会被自动注入进来*/){
        return RouterFunctions.route()  //开始定义路由信息
                .GET("/user/{id}", RequestPredicates.accept(MediaType.ALL), userServiceHandler :: getUser)
                .GET("/users",userServiceHandler :: getUsers)
                .POST("/user",RequestPredicates.accept(MediaType.APPLICATION_JSON),userServiceHandler ::saveUser)
                .PUT("/user/{id}",RequestPredicates.accept(MediaType.APPLICATION_JSON),userServiceHandler::updateUser)
                .DELETE("/user/{id}",userServiceHandler ::deleteUser)
                .build();
    }


}
@Slf4j
@Component
public class UserServiceHandler {

    private static Map<Integer, User> personMap;
    private static Long initId = 4L;

     static {
         personMap = new HashMap<>();
         personMap.put(1,new User(1L, "张三", "zhangsan@qq.com", 18, "pm"));
         personMap.put(2, new User(2L, "李四", "lisi@qq.com", 20, "admin2"));
         personMap.put(3, new User(3L, "小明", "小明@qq.com", 22, "admin2"));
     }

    /**
     * 查询指定id的用户
     * @param request
     * @return
     */
    public ServerResponse getUser(ServerRequest request) throws Exception{
        String id = request.pathVariable("id");
        log.info("获取第[{}]个用户信息",id);
        //业务处理
        User user = personMap.get(Integer.parseInt(id));
        //构造响应
        return ServerResponse.ok().body(user);
    }

     /**
      * 获取所有用户
      * @param request
      * @return
      * @throws Exception
      */
    public ServerResponse getUsers(ServerRequest request) throws Exception{
        log.info("查询所有用户信息完成");
        //业务处理
        List<User> list = personMap.values().stream().toList();
        //构造响应
        return ServerResponse
                .ok()
                .body(list); //凡是body中的对象,会以json格式写出。就是以前的@ResponseBody原理,利用HttpMessageConverter 一般写出为json
                             //如果要基于内容协商,还可以写出xml等格式
    }


    /**
     * 保存用户
     * @param request
     * @return
     */
    public ServerResponse saveUser(ServerRequest request) throws ServletException, IOException {
        //提取请求体
        User user = request.body(User.class);
        if(user.getId() == null){
            user.setId(initId);
            personMap.put(user.getId().intValue(),user);
        }

        log.info("保存用户信息:{}",user);
        return ServerResponse.ok().build();
    }

    /**
     * 更新用户
     * @param request
     * @return
     */
    public ServerResponse updateUser(ServerRequest request) throws ServletException, IOException {
        String id = request.pathVariable("id");
        User user = request.body(User.class);
        personMap.put(Integer.parseInt(id),user);
        log.info("用户信息更新: {}",user);
        return ServerResponse.ok().build();
    }

    /**
     * 删除用户
     * @param request
     * @return
     */
    public ServerResponse deleteUser(ServerRequest request) {
        String id = request.pathVariable("id");
        personMap.remove(Integer.parseInt(id));
        log.info("删除[{}]用户信息",id);
        return ServerResponse.ok().build();
    }

}