继续解析《Electric Dreams》项目中的自定义节点和子图:SG_CopyPointsWithHierarchy和PostCopyPoints-OffsetIndices
前导文章
《UE5《Electric Dreams》项目PCG技术解析 之 理解Assembly(以SplineExample为例)》
《虚幻引擎程序化资源生成框架PCG 之 UPCGBlueprintElement源码笔记(一)》
《虚幻引擎程序化资源生成框架PCG 之 UPCGBlueprintElement源码笔记(二)数据流》
《UE5《Electric Dreams》项目PCG技术解析 之 PCGCustomNodes详解(一)》
《UE5《Electric Dreams》项目PCG技术解析 之 PCGCustomNodes详解(二)Look At》
标准组合拳
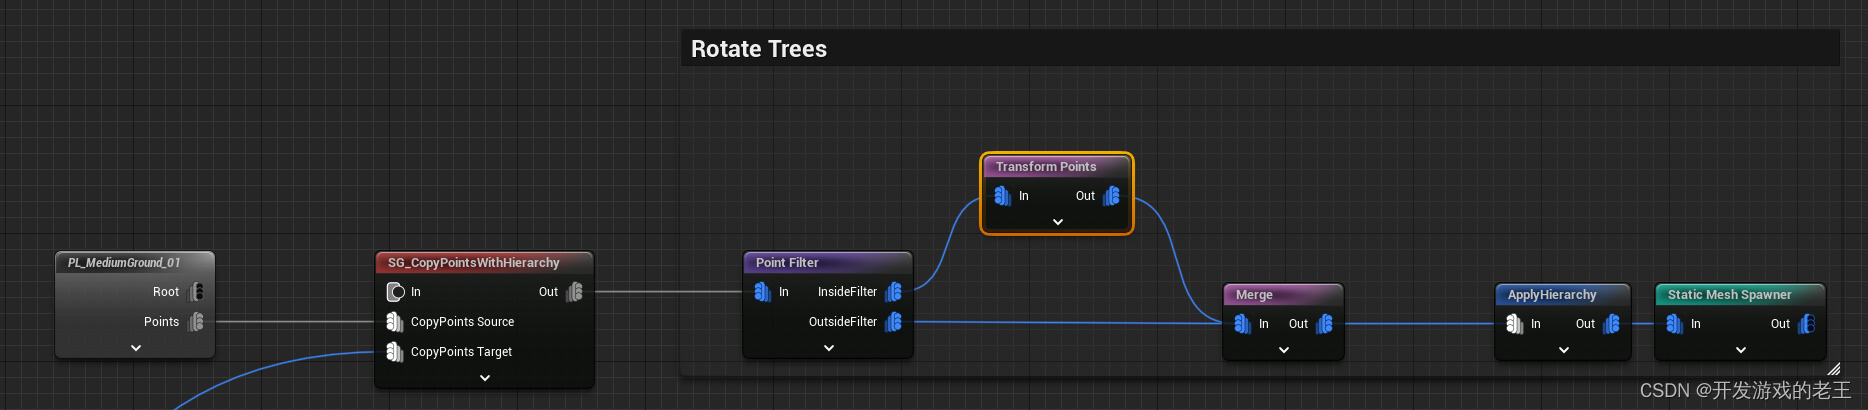
《Electric Dreams》以及官方文档中给出了SG_CopyPointsWithHierarchy和ApplyHierarchy标准使用套路
以下摘自官方文档:
- 由 Level to PCG资产工具 将关卡转换为包含PCG点的PCG设置资产,其相关联的场景层级信息将存储为
metadata特性。
-
SG_CopyPointsWithHierarchy子图表使用目标点变换在多个位置复制PCG设置资产,这与Copy Points节点的作用类似,但它还通过维护和偏移层级特性值,使父级信息对于原始资产点的每个副本来说都是唯一的。
-
Point Filter节点,根据特性选择点。
-
Transform Points节点与ApplyToAttributes选项,对被选中点的相对变换特性执行变换操作。
-
Merge节点,重新组合同一数据流中同一层级的所有点。
-
ApplyHierarchy节点,将相对变换特性与父级变换相结合,应用到点上。
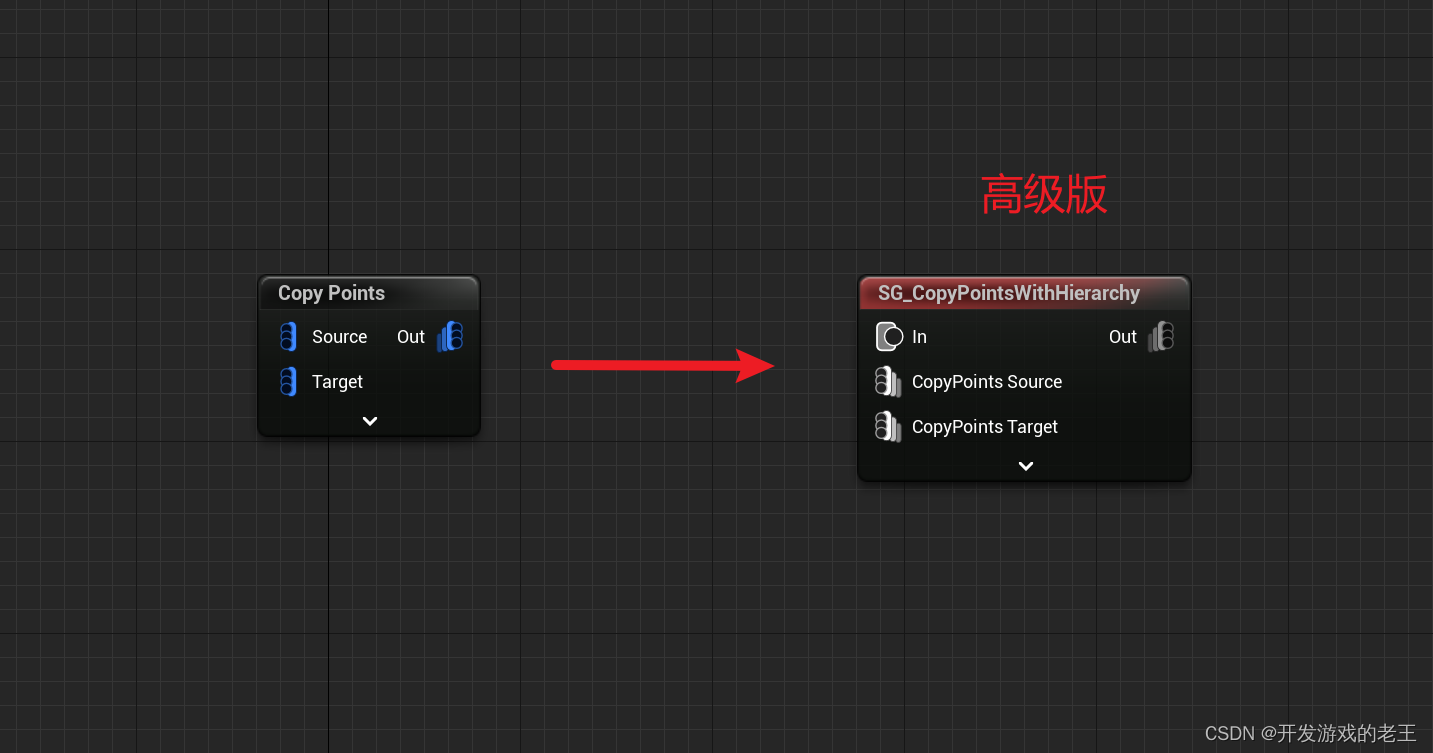
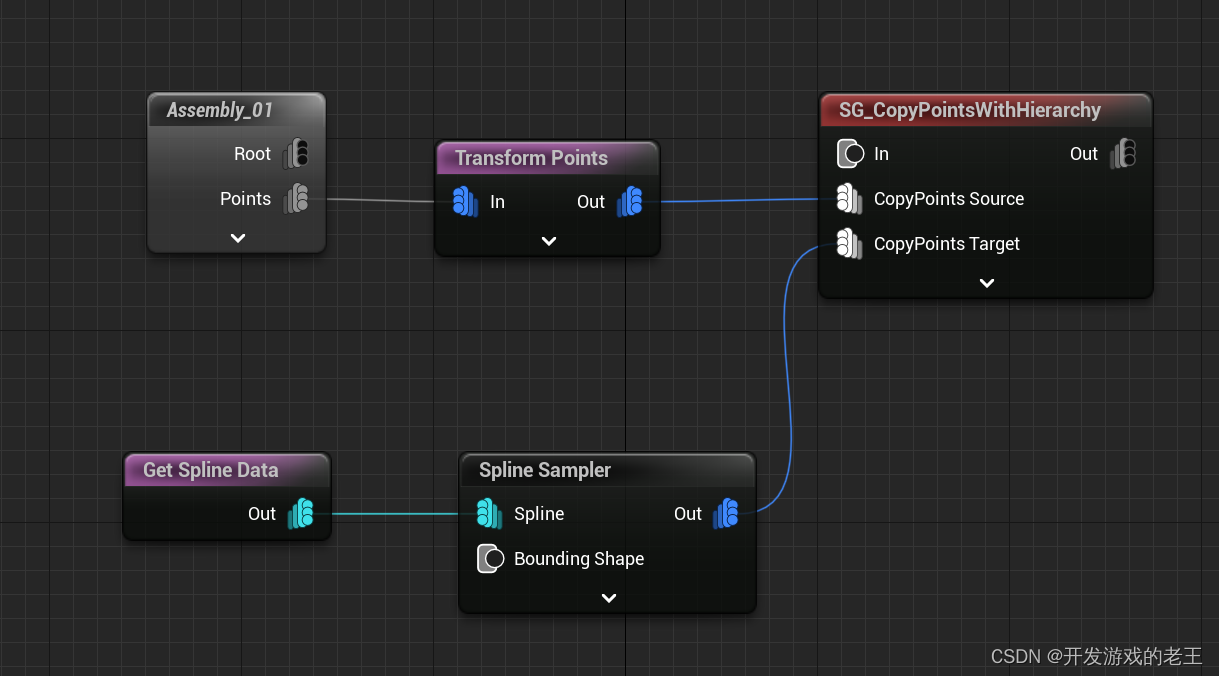
SG_CopyPointsWithHierarchy
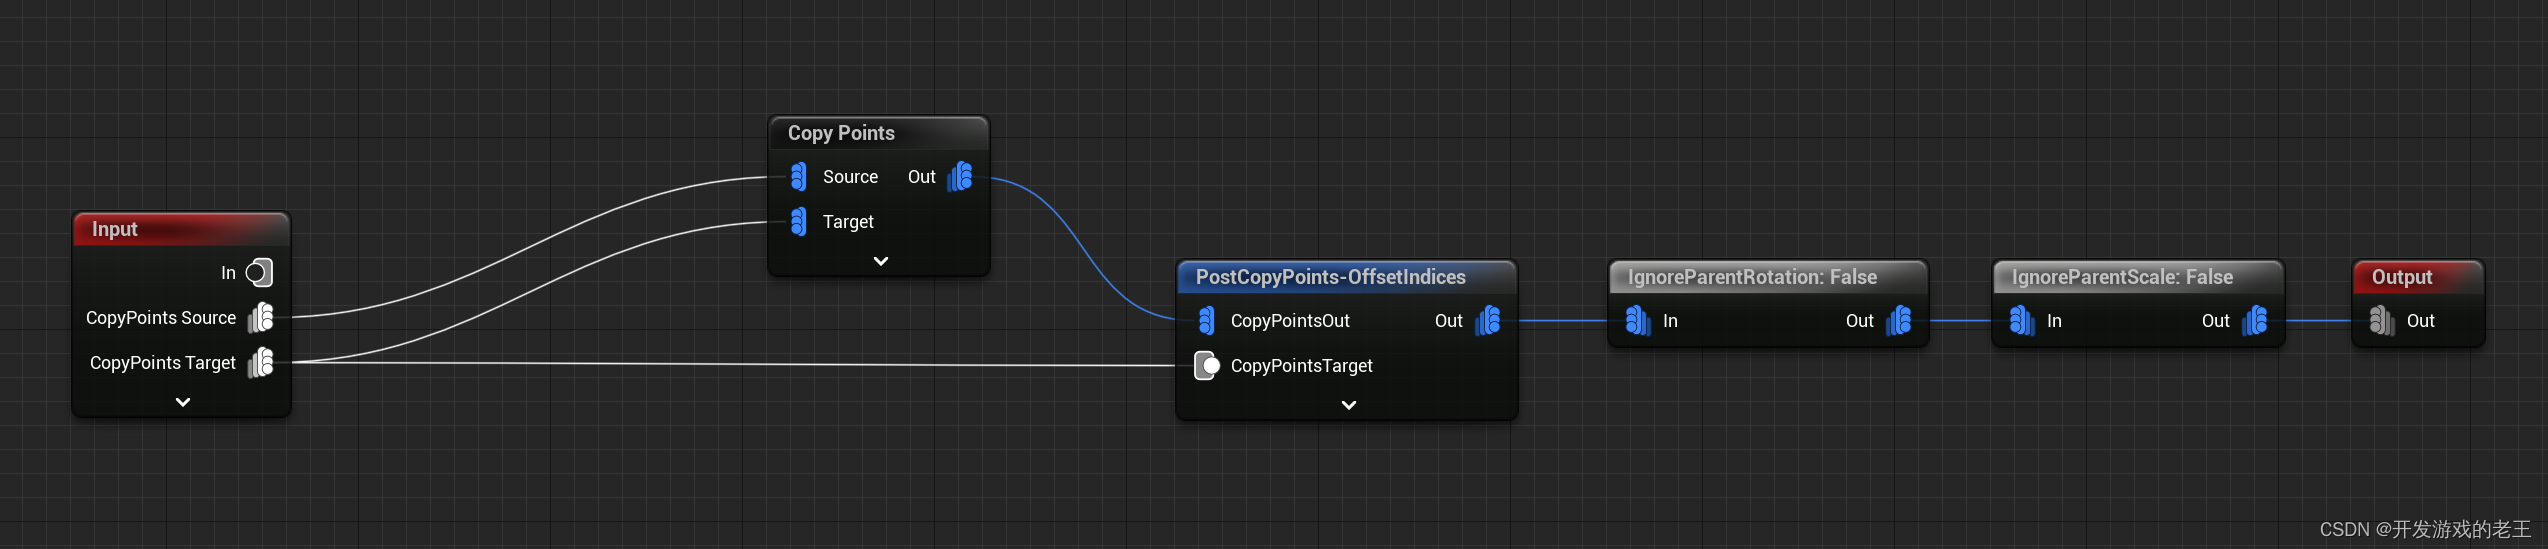
在SG_CopyPointsWithHierarchy中首先进行了Copy Points,而它的关键部分在于PostCopyPoints-OffsetIndices
PostCopyPoints-OffsetIndices
顾名思义:PostCopyPoints-OffsetIndices就是在CopyPoints之后,对Point的"Index"进行Offset。但是理解到这个层次还是让人摸不着头脑。在研究源代码之前我们先看一下它的使用情景。
使用情景
SG_CopyPointsWithHierarchy(以及PostCopyPoints-OffsetIndices)都是结合着Assembly来使用的,所以这个例子要从Assembly开始。
老王在《UE5《Electric Dreams》项目PCG技术解析 之 理解Assembly(以SplineExample为例)》一文中简要介绍过Assembly。
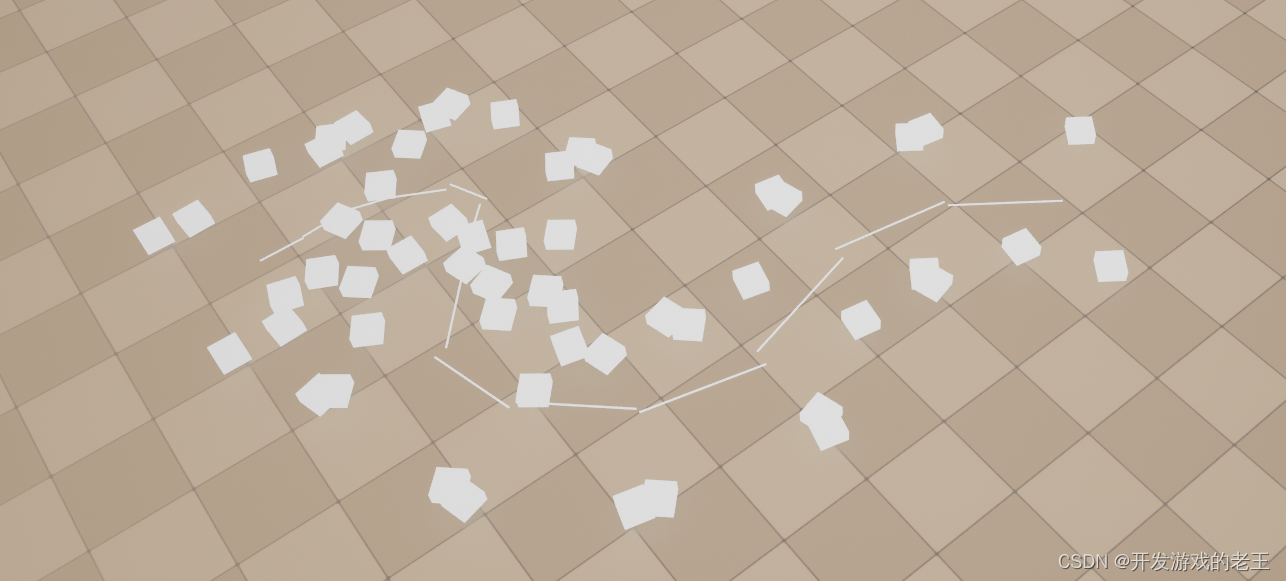
构造一个简单的简单的关卡“Assembly_01”,并使用"PCG-Level to PCGSettings"工具生成对应的“Assembly_01_PCG”

构造一个简单的PCGGraph看一下
"Assembly_01"中Points通道的原始信息

-
Mesh: 模型
-
Material: 材质
-
Actor Index: Actor的Index
-
Parent Index: 这个Actor父级Actor的Index,当
Parent Index为-1时没有父级
-
Hierarchy Depth: 所处层级
-
其它: 相对父级的Transform
"SG_CopyPointsWithHierarchy"的信息
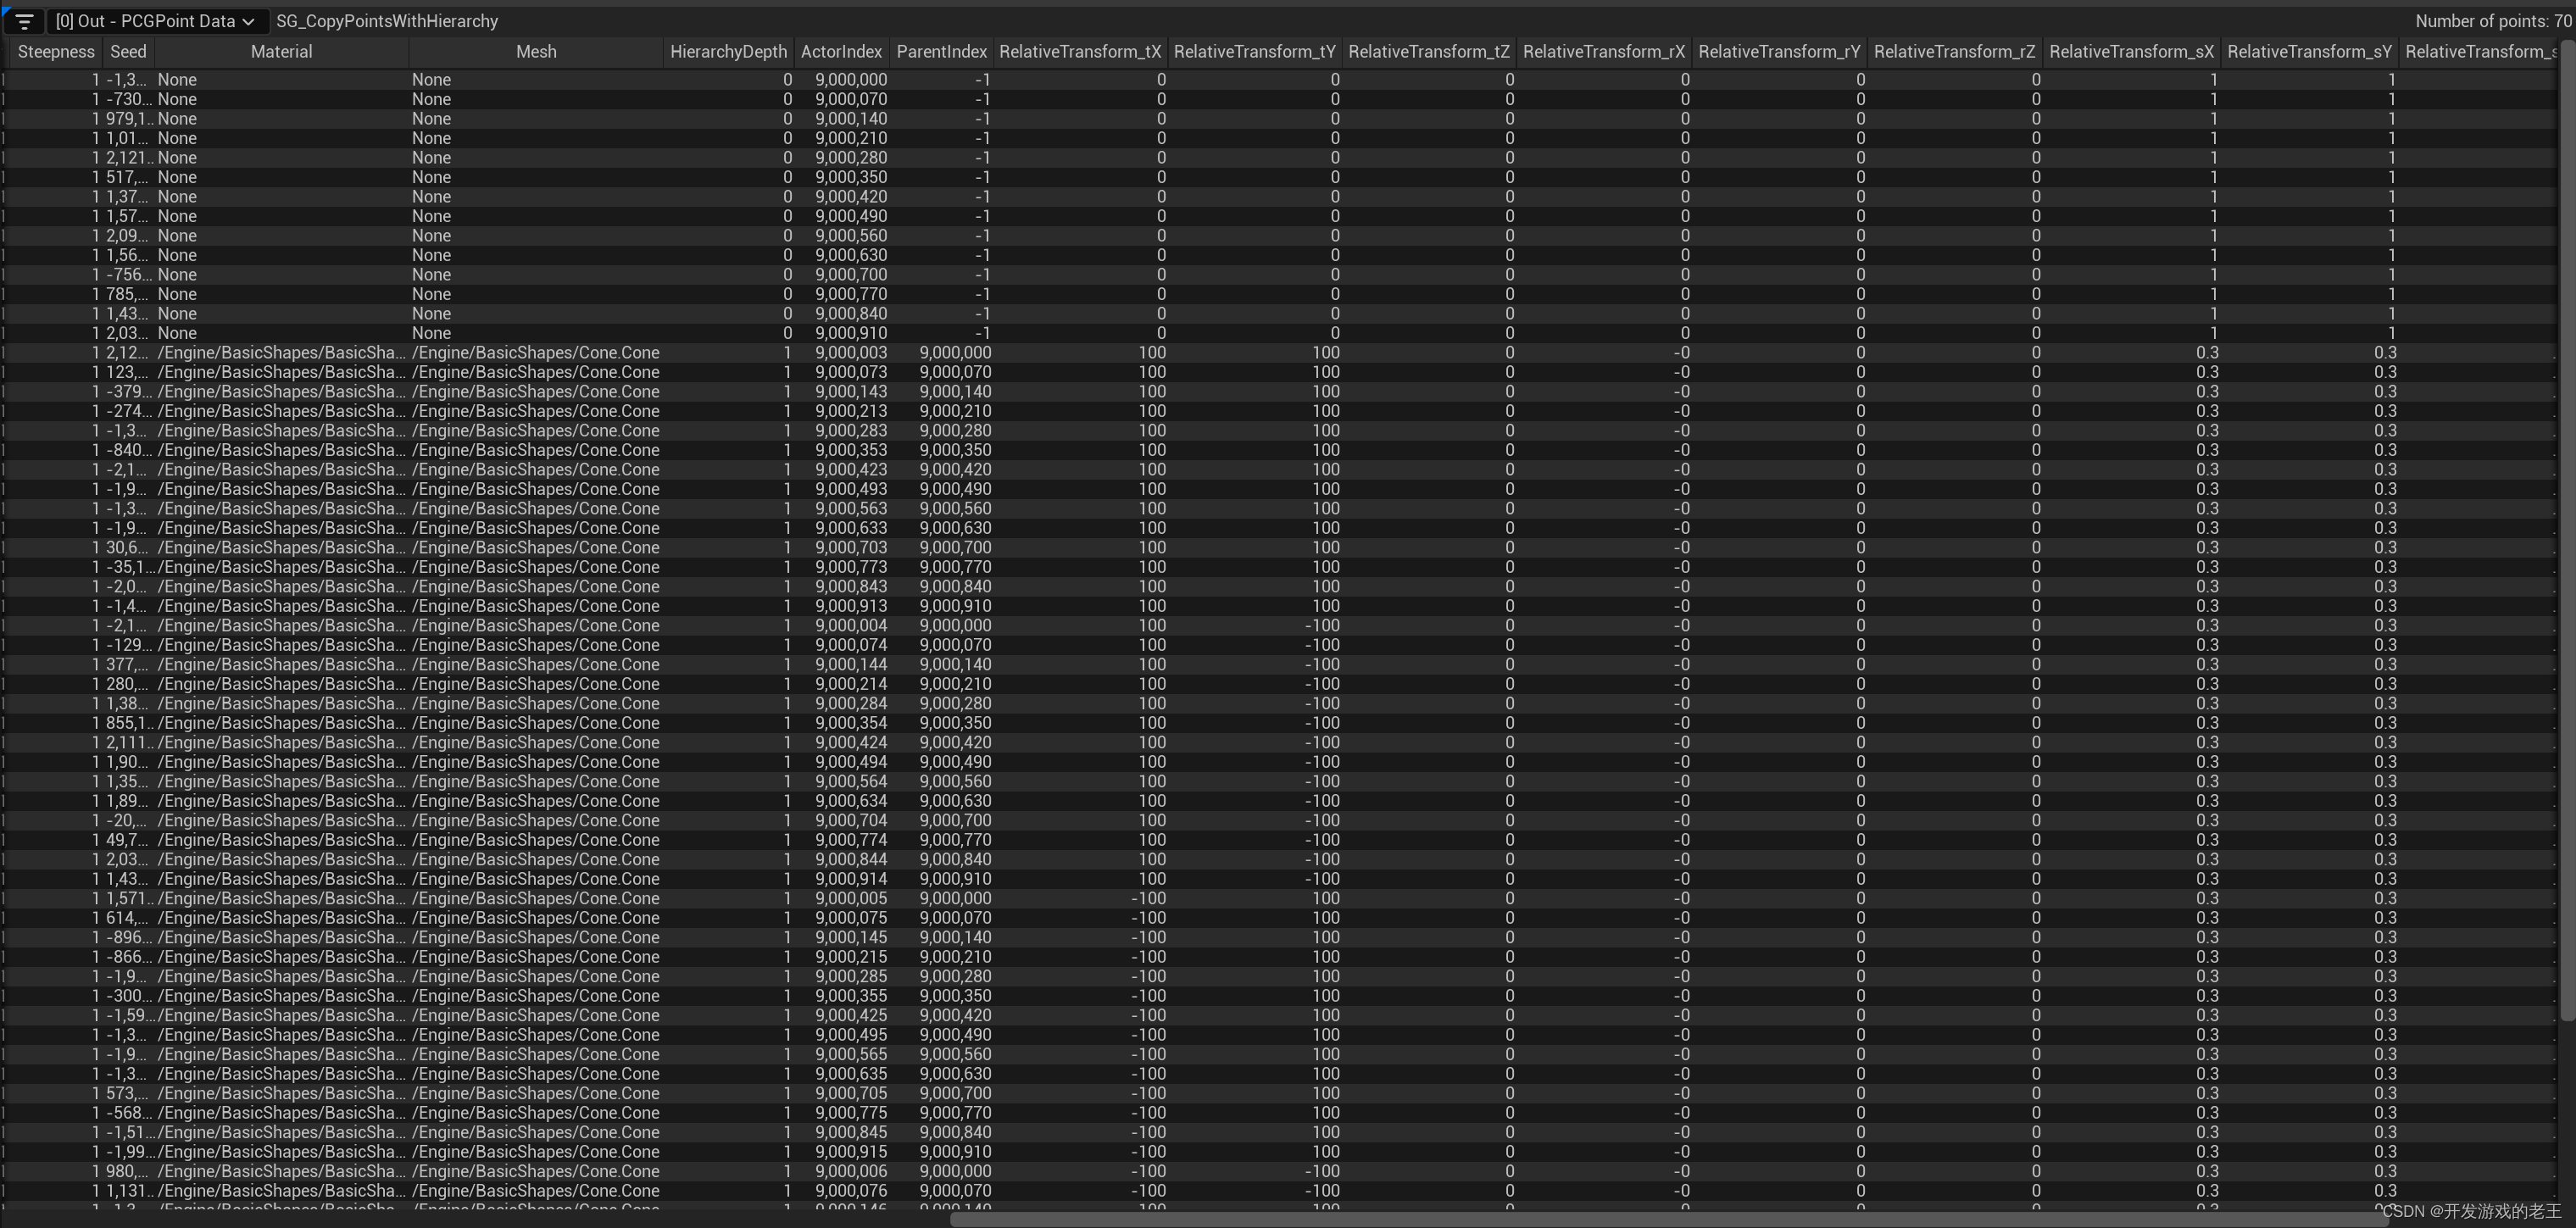
**对比以后我们可以看到PostCopyPoints-OffsetIndices,实际上就是对为每个Point重新分配了Actor Index保证它们在1:N变成M:N*M以后依然有互不相同的Actor Index,并且Parent Index依然对应着它的父级Actor Index。接下来,我们看一下它是如何实现的。

Execute with Context
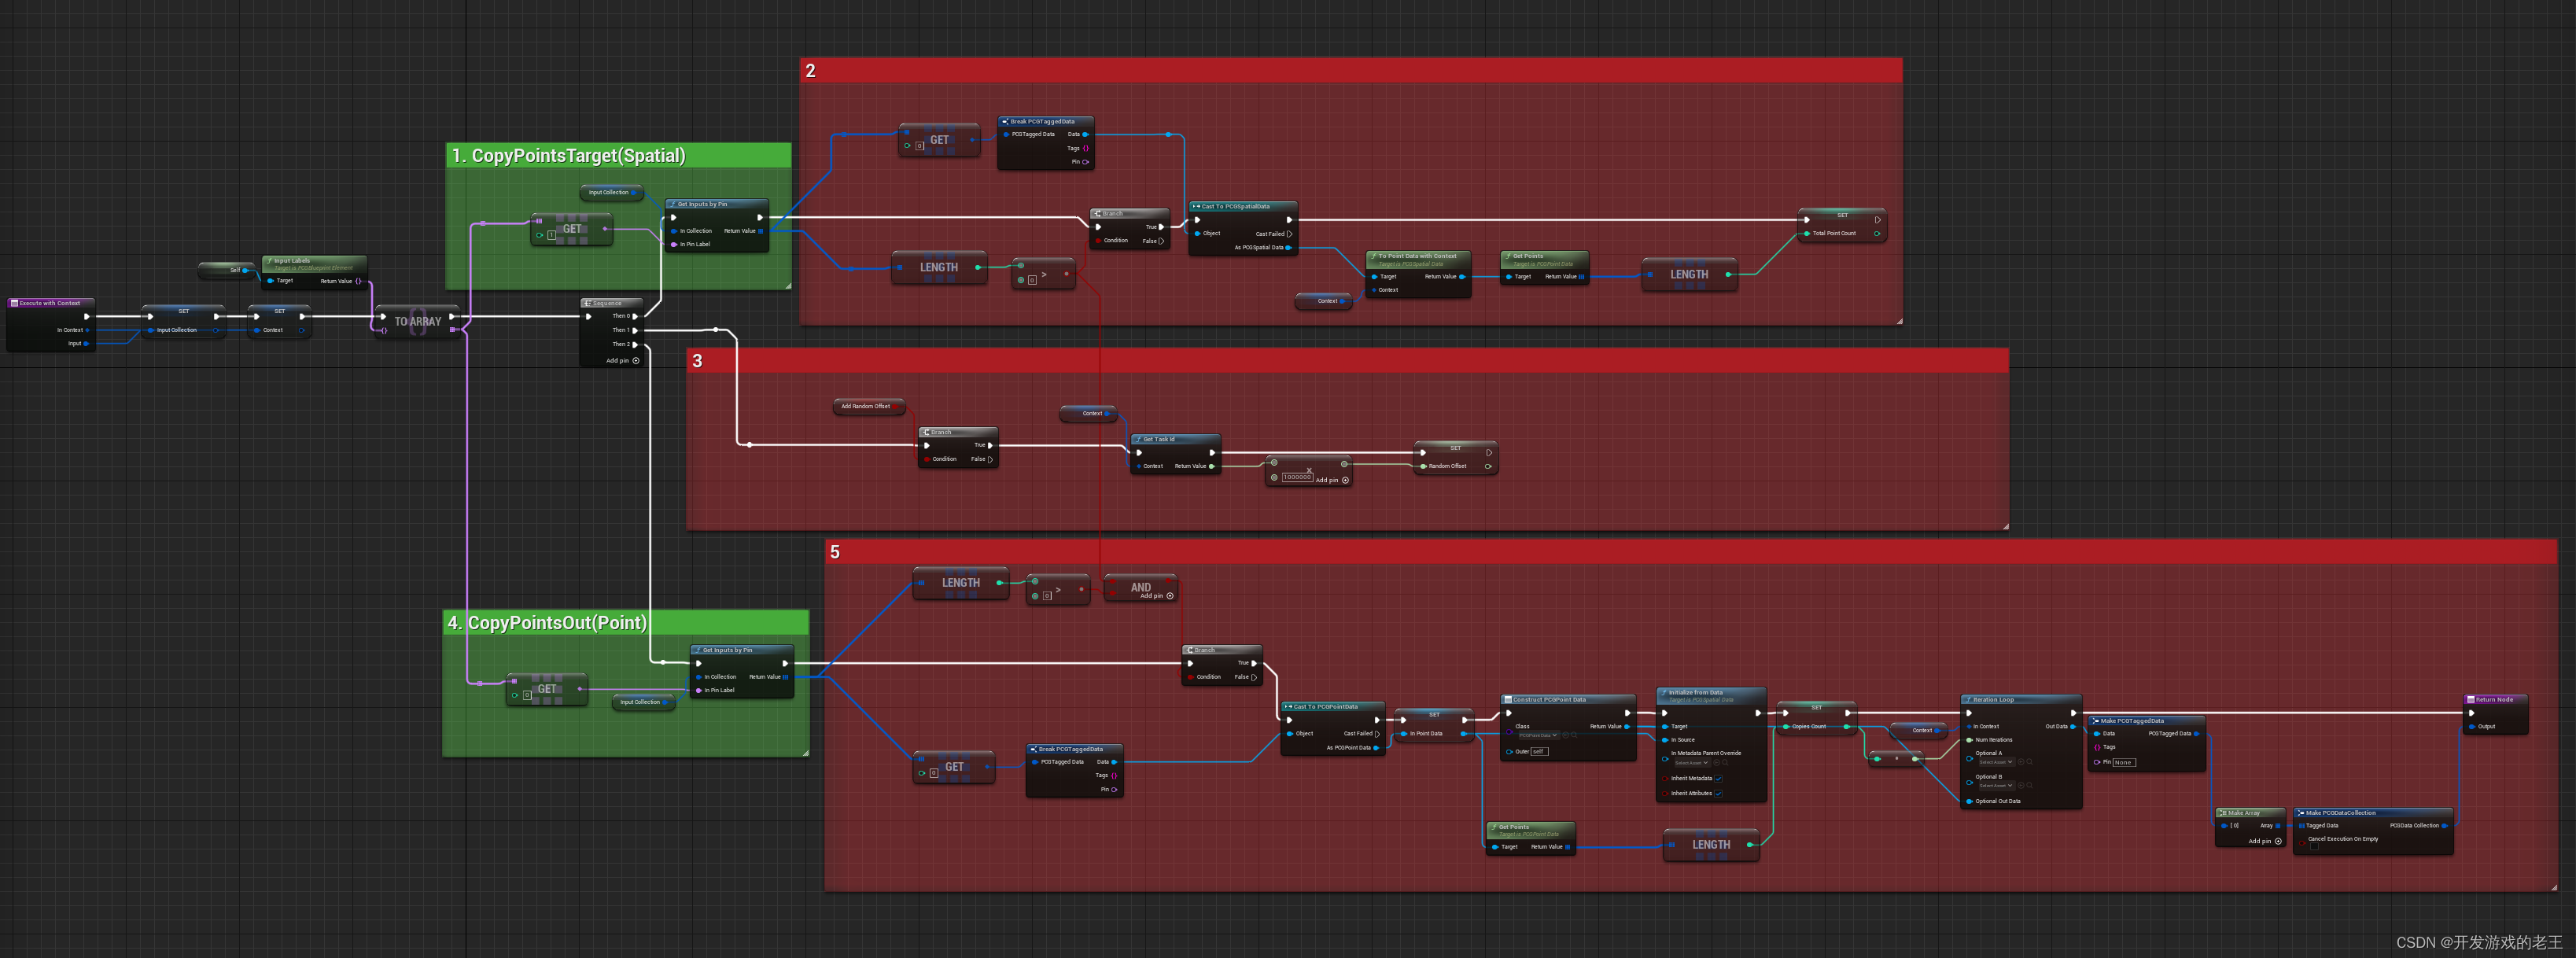
1-2. 首先获取CopyPointsTarget输入通道中第1个PCGTaggedData(→PCGSpatialData)计算出其中Point个数存入Total Point Count
3. 获取Context的TaskId计算出Random Offset,这里TaskId就是一个uint64类型的整数,相当于一个随机种子
4-5. 获取CopyPointsOut输入通道中第1个PCGTaggedData(→PCGPointData),其中PCGPoint的数量会作为IterationLoop的迭代次数。
Iteration Loop Body
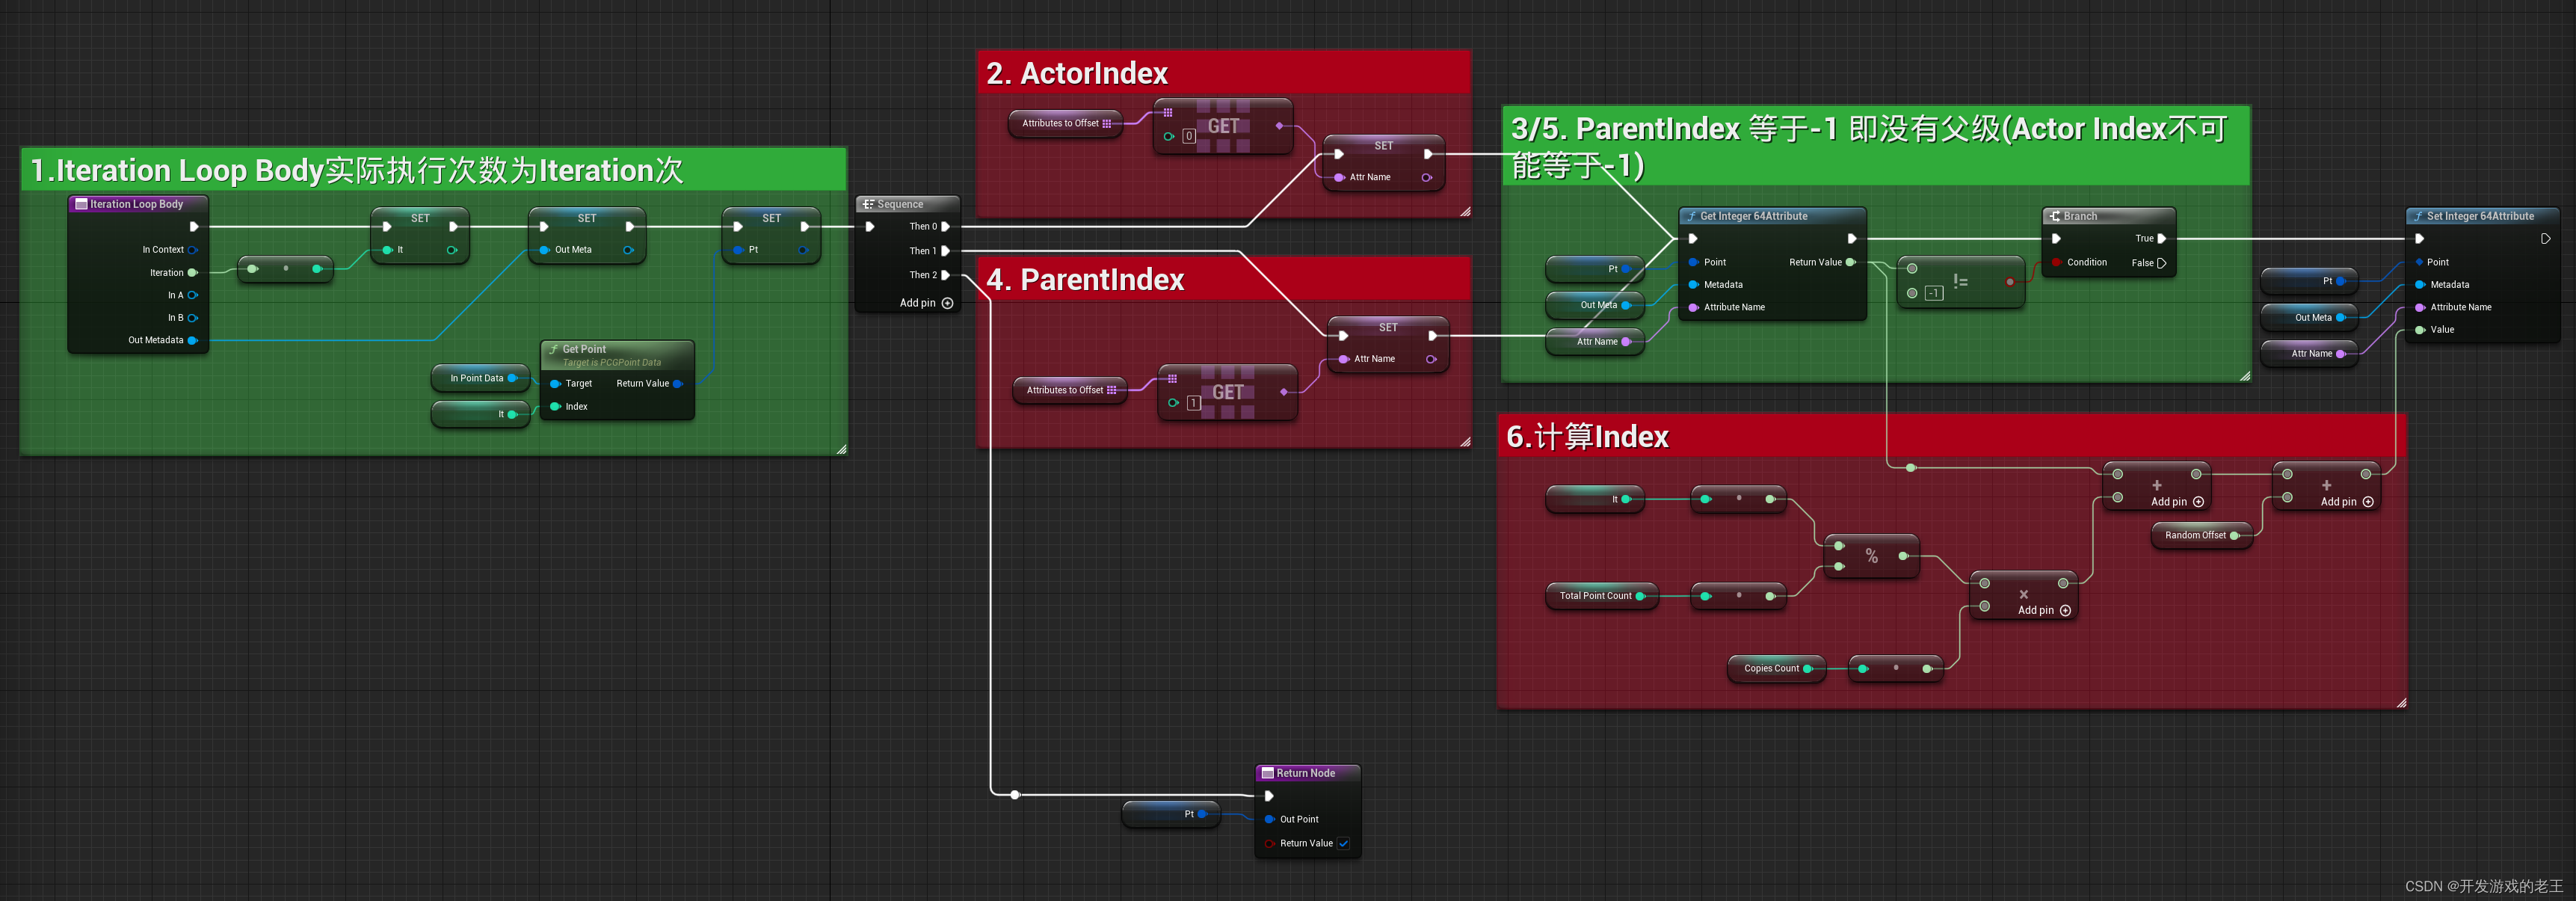
Iteration Loop Body的目的就是为Point的两个Int64类型的特性:ActorIndex和ParentIndex重新赋值,保证每个Point的子Point有足够的编号空间。
小结
-
SG_CopyPointsWithHierarchy其实就是携带source中层级信息和相对Transform的高级版CopyPoints。
- 它需要和"PCGSettings"以及"PCG-Level to PCGSettings"一起工作(需要"PCGSettings"中原始
ActorIndex和ParentIndex信息)。