文章目录
- 1 MobileNetV3创新点
- 2 block变成了什么样
- 2.1 总体介绍
- 2.2 SE模块理解
- 2.3 ReLu6和hardswish激活函数理解
- 3 网络总体结构
- 4 代码解读
- 5 感谢链接
在看本文前,强烈建议先看一下之前写的
MobilenetV2。
1 MobileNetV3创新点
- bottleneck结构变了
- 让网络更宽、更深,宽多少?深多少?采用NAS(Neural Architecture Search)搜索得到
- 重新设计耗时层结构(针对NAS搜索的结构进行设计,咱可以不管)
2 block变成了什么样
2.1 总体介绍
参考大佬的图片进行解读,Mobilenetv2中的block如下图所示

Mobilenetv3中的block如下图所示
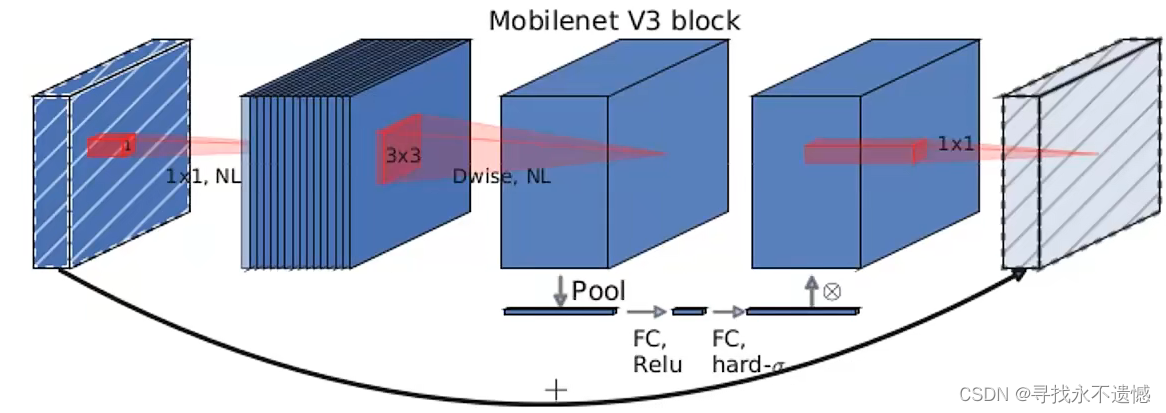
可以发现,Mobilenetv3的block中加入了SE模块,更换了激活函数 。
SE模块下一节讲。
此处更新的激活函数在图中用NL(非线性)统一表示,因为用到的激活函数不一样,主要有hardswish、relu两种。
最后那个1x1降维投影层用的是线性激活(f(x)=x),也可以理解为没用激活。
2.2 SE模块理解
SE(Squeeze-and-Excitation) 模块类似于一个注意力模块,以在Mobilenetv3中的应用为例进行理解,如下图所示。

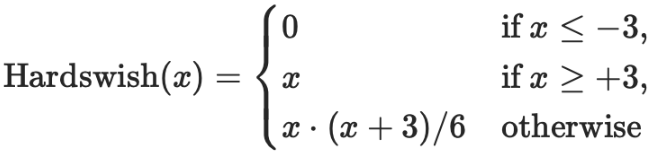
2.3 ReLu6和hardswish激活函数理解
ReLu6激活函数如下图所示,相当于加了个最大值6进行限制。

hardswish激活函数如下图所示,相当于分成3段进行限制。
采用hardswish,计算速度相对较快,对量化过程友好

3 网络总体结构
作者针对不同需求,通过NAS得到两种结构,一个是MobilenetV3-Large,结构如下图:
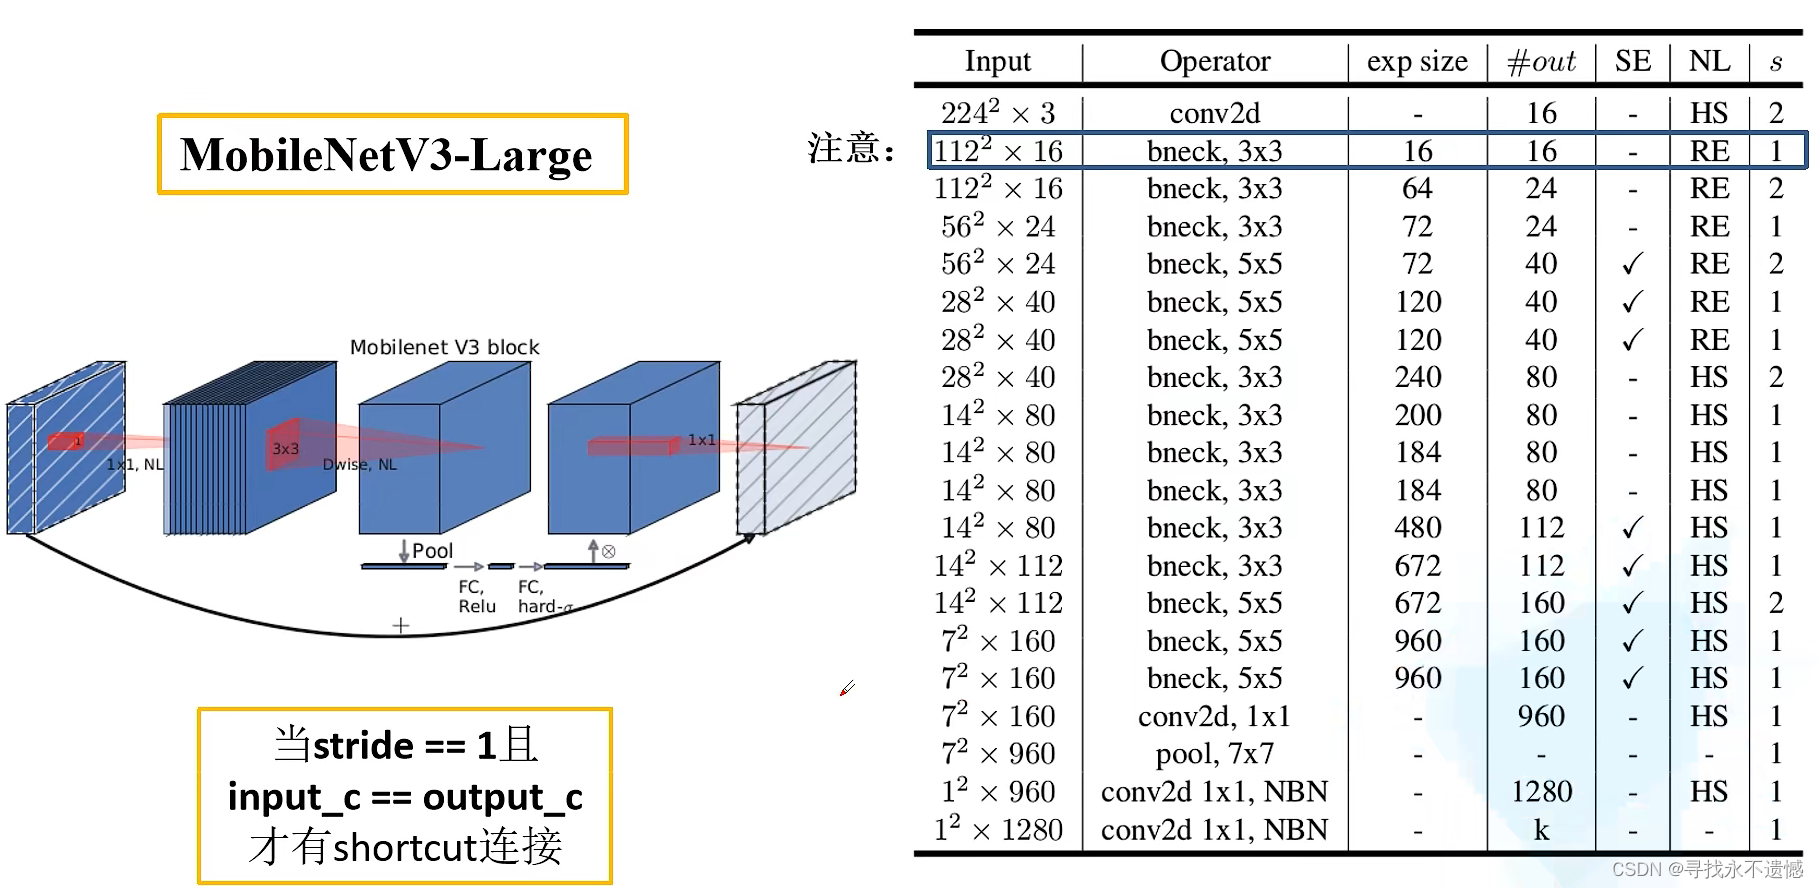
图中部分参数解释:
- Input表示输入尺寸
- Operator中的NBN表示不使用BN,最后的conv2d 1x1相当于全连接层的作用
- exp size表示bottleneck中的第一层1x1卷积升维,维度升到多少(第一个bottleneck没有1x1卷积升维操作)
- out表示bottleneck输出的channel个数
- SE表示是否使用SE模块
- NL表示使用何种激活函数,HS表示HardSwish,RE表示ReLu
- s表示步长(s=2,长宽变为原来一半)
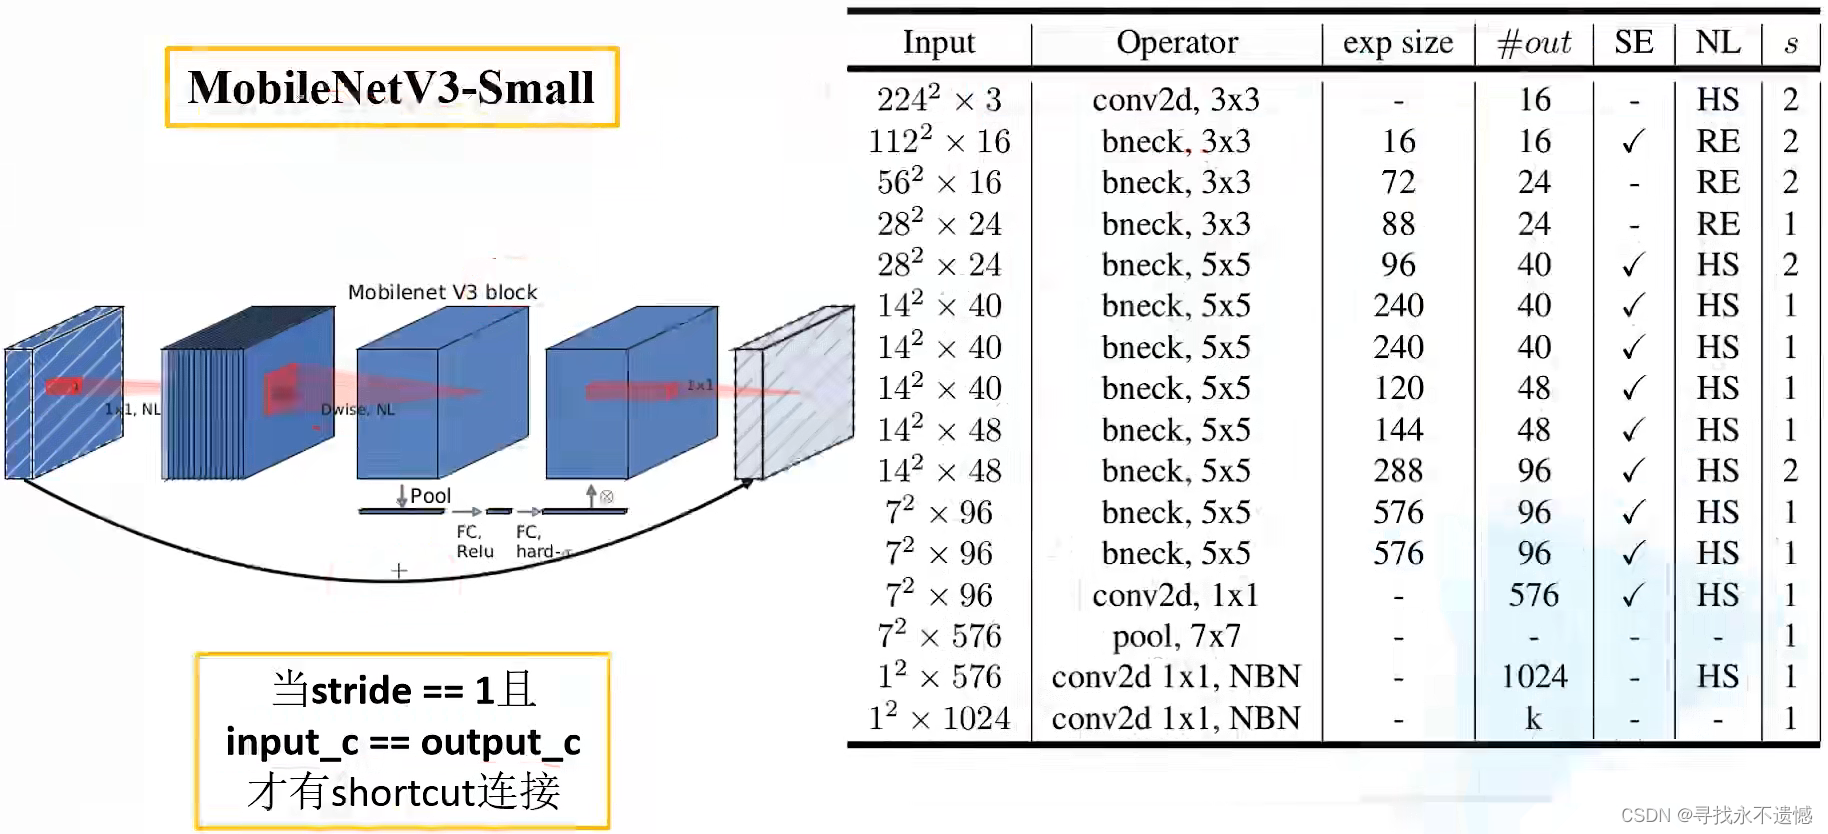
另一个是MobilenetV3-Small,结构如下图:
4 代码解读
直接看代码注释即可,可运行
from typing import Callable, List, Optional
import torch
from torch import nn, Tensor
from torch.nn import functional as F
from functools import partial
def _make_divisible(ch, divisor=8, min_ch=None):
if min_ch is None:
min_ch = divisor
new_ch = max(min_ch, int(ch + divisor / 2) // divisor * divisor)
if new_ch < 0.9 * ch:
new_ch += divisor
return new_ch
class ConvBNActivation(nn.Sequential):
def __init__(self,
in_planes: int,
out_planes: int,
kernel_size: int = 3,
stride: int = 1,
groups: int = 1,
norm_layer: Optional[Callable[..., nn.Module]] = None,
activation_layer: Optional[Callable[..., nn.Module]] = None):
padding = (kernel_size - 1) // 2
if norm_layer is None:
norm_layer = nn.BatchNorm2d
if activation_layer is None:
activation_layer = nn.ReLU6
super(ConvBNActivation, self).__init__(nn.Conv2d(in_channels=in_planes,
out_channels=out_planes,
kernel_size=kernel_size,
stride=stride,
padding=padding,
groups=groups,
bias=False),
norm_layer(out_planes),
activation_layer(inplace=True))
class SqueezeExcitation(nn.Module):
def __init__(self, input_c: int, squeeze_factor: int = 4):
super(SqueezeExcitation, self).__init__()
squeeze_c = _make_divisible(input_c // squeeze_factor, 8)
self.fc1 = nn.Conv2d(input_c, squeeze_c, 1)
self.fc2 = nn.Conv2d(squeeze_c, input_c, 1)
def forward(self, x: Tensor) -> Tensor:
scale = F.adaptive_avg_pool2d(x, output_size=(1, 1))
scale = self.fc1(scale)
scale = F.relu(scale, inplace=True)
scale = self.fc2(scale)
scale = F.hardsigmoid(scale, inplace=True)
return scale * x
class InvertedResidualConfig:
def __init__(self,
input_c: int,
kernel: int,
expanded_c: int,
out_c: int,
use_se: bool,
activation: str,
stride: int,
width_multi: float):
self.input_c = self.adjust_channels(input_c, width_multi)
self.kernel = kernel
self.expanded_c = self.adjust_channels(expanded_c, width_multi)
self.out_c = self.adjust_channels(out_c, width_multi)
self.use_se = use_se
self.use_hs = activation == "HS"
self.stride = stride
@staticmethod
def adjust_channels(channels: int, width_multi: float):
return _make_divisible(channels * width_multi, 8)
class InvertedResidual(nn.Module):
def __init__(self,
cnf: InvertedResidualConfig,
norm_layer: Callable[..., nn.Module]):
super(InvertedResidual, self).__init__()
if cnf.stride not in [1, 2]:
raise ValueError("illegal stride value.")
self.use_res_connect = (cnf.stride == 1 and cnf.input_c == cnf.out_c)
layers: List[nn.Module] = []
activation_layer = nn.Hardswish if cnf.use_hs else nn.ReLU
if cnf.expanded_c != cnf.input_c:
layers.append(ConvBNActivation(cnf.input_c,
cnf.expanded_c,
kernel_size=1,
norm_layer=norm_layer,
activation_layer=activation_layer))
layers.append(ConvBNActivation(cnf.expanded_c,
cnf.expanded_c,
kernel_size=cnf.kernel,
stride=cnf.stride,
groups=cnf.expanded_c,
norm_layer=norm_layer,
activation_layer=activation_layer))
if cnf.use_se:
layers.append(SqueezeExcitation(cnf.expanded_c))
layers.append(ConvBNActivation(cnf.expanded_c,
cnf.out_c,
kernel_size=1,
norm_layer=norm_layer,
activation_layer=nn.Identity))
self.block = nn.Sequential(*layers)
self.out_channels = cnf.out_c
self.is_strided = cnf.stride > 1
def forward(self, x: Tensor) -> Tensor:
result = self.block(x)
if self.use_res_connect:
result += x
return result
class MobileNetV3(nn.Module):
def __init__(self,
inverted_residual_setting: List[InvertedResidualConfig],
last_channel: int,
num_classes: int = 1000,
block: Optional[Callable[..., nn.Module]] = None,
norm_layer: Optional[Callable[..., nn.Module]] = None):
super(MobileNetV3, self).__init__()
if not inverted_residual_setting:
raise ValueError("The inverted_residual_setting should not be empty.")
elif not (isinstance(inverted_residual_setting, List) and
all([isinstance(s, InvertedResidualConfig) for s in inverted_residual_setting])):
raise TypeError("The inverted_residual_setting should be List[InvertedResidualConfig]")
if block is None:
block = InvertedResidual
if norm_layer is None:
norm_layer = partial(nn.BatchNorm2d, eps=0.001, momentum=0.01)
layers: List[nn.Module] = []
firstconv_output_c = inverted_residual_setting[0].input_c
layers.append(ConvBNActivation(3,
firstconv_output_c,
kernel_size=3,
stride=2,
norm_layer=norm_layer,
activation_layer=nn.Hardswish))
for cnf in inverted_residual_setting:
layers.append(block(cnf, norm_layer))
lastconv_input_c = inverted_residual_setting[-1].out_c
lastconv_output_c = 6 * lastconv_input_c
layers.append(ConvBNActivation(lastconv_input_c,
lastconv_output_c,
kernel_size=1,
norm_layer=norm_layer,
activation_layer=nn.Hardswish))
self.features = nn.Sequential(*layers)
self.avgpool = nn.AdaptiveAvgPool2d(1)
self.classifier = nn.Sequential(nn.Linear(lastconv_output_c, last_channel),
nn.Hardswish(inplace=True),
nn.Dropout(p=0.2, inplace=True),
nn.Linear(last_channel, num_classes))
for m in self.modules():
if isinstance(m, nn.Conv2d):
nn.init.kaiming_normal_(m.weight, mode="fan_out")
if m.bias is not None:
nn.init.zeros_(m.bias)
elif isinstance(m, (nn.BatchNorm2d, nn.GroupNorm)):
nn.init.ones_(m.weight)
nn.init.zeros_(m.bias)
elif isinstance(m, nn.Linear):
nn.init.normal_(m.weight, 0, 0.01)
nn.init.zeros_(m.bias)
def _forward_impl(self, x: Tensor) -> Tensor:
x = self.features(x)
x = self.avgpool(x)
x = torch.flatten(x, 1)
x = self.classifier(x)
return x
def forward(self, x: Tensor) -> Tensor:
return self._forward_impl(x)
def mobilenet_v3_large(num_classes: int = 1000,
reduced_tail: bool = False) -> MobileNetV3:
"""
Constructs a large MobileNetV3 architecture from
"Searching for MobileNetV3" <https://arxiv.org/abs/1905.02244>.
weights_link:
https://download.pytorch.org/models/mobilenet_v3_large-8738ca79.pth
Args:
num_classes (int): number of classes
reduced_tail (bool): 需要的话, 设为True, 可以进一步减小网络
If True, reduces the channel counts of all feature layers
between C4 and C5 by 2. It is used to reduce the channel redundancy in the
backbone for Detection and Segmentation.
"""
width_multi = 1.0
bneck_conf = partial(InvertedResidualConfig, width_multi=width_multi)
adjust_channels = partial(InvertedResidualConfig.adjust_channels, width_multi=width_multi)
reduce_divider = 2 if reduced_tail else 1
inverted_residual_setting = [
bneck_conf(16, 3, 16, 16, False, "RE", 1),
bneck_conf(16, 3, 64, 24, False, "RE", 2),
bneck_conf(24, 3, 72, 24, False, "RE", 1),
bneck_conf(24, 5, 72, 40, True, "RE", 2),
bneck_conf(40, 5, 120, 40, True, "RE", 1),
bneck_conf(40, 5, 120, 40, True, "RE", 1),
bneck_conf(40, 3, 240, 80, False, "HS", 2),
bneck_conf(80, 3, 200, 80, False, "HS", 1),
bneck_conf(80, 3, 184, 80, False, "HS", 1),
bneck_conf(80, 3, 184, 80, False, "HS", 1),
bneck_conf(80, 3, 480, 112, True, "HS", 1),
bneck_conf(112, 3, 672, 112, True, "HS", 1),
bneck_conf(112, 5, 672, 160 // reduce_divider, True, "HS", 2),
bneck_conf(160 // reduce_divider, 5, 960 // reduce_divider, 160 // reduce_divider, True, "HS", 1),
bneck_conf(160 // reduce_divider, 5, 960 // reduce_divider, 160 // reduce_divider, True, "HS", 1),
]
last_channel = adjust_channels(1280 // reduce_divider)
return MobileNetV3(inverted_residual_setting=inverted_residual_setting,
last_channel=last_channel,
num_classes=num_classes)
def mobilenet_v3_small(num_classes: int = 1000,
reduced_tail: bool = False) -> MobileNetV3:
"""
Constructs a large MobileNetV3 architecture from
"Searching for MobileNetV3" <https://arxiv.org/abs/1905.02244>.
weights_link:
https://download.pytorch.org/models/mobilenet_v3_small-047dcff4.pth
Args:
num_classes (int): number of classes
reduced_tail (bool): If True, reduces the channel counts of all feature layers
between C4 and C5 by 2. It is used to reduce the channel redundancy in the
backbone for Detection and Segmentation.
"""
width_multi = 1.0
bneck_conf = partial(InvertedResidualConfig, width_multi=width_multi)
adjust_channels = partial(InvertedResidualConfig.adjust_channels, width_multi=width_multi)
reduce_divider = 2 if reduced_tail else 1
inverted_residual_setting = [
bneck_conf(16, 3, 16, 16, True, "RE", 2),
bneck_conf(16, 3, 72, 24, False, "RE", 2),
bneck_conf(24, 3, 88, 24, False, "RE", 1),
bneck_conf(24, 5, 96, 40, True, "HS", 2),
bneck_conf(40, 5, 240, 40, True, "HS", 1),
bneck_conf(40, 5, 240, 40, True, "HS", 1),
bneck_conf(40, 5, 120, 48, True, "HS", 1),
bneck_conf(48, 5, 144, 48, True, "HS", 1),
bneck_conf(48, 5, 288, 96 // reduce_divider, True, "HS", 2),
bneck_conf(96 // reduce_divider, 5, 576 // reduce_divider, 96 // reduce_divider, True, "HS", 1),
bneck_conf(96 // reduce_divider, 5, 576 // reduce_divider, 96 // reduce_divider, True, "HS", 1)
]
last_channel = adjust_channels(1024 // reduce_divider)
return MobileNetV3(inverted_residual_setting=inverted_residual_setting,
last_channel=last_channel,
num_classes=num_classes)
if __name__ == "__main__":
model = mobilenet_v3_small()
print(model)
from torchsummaryX import summary
summary(model, torch.randn(1,3,224,224))
输出:
MobileNetV3(
  (features): Sequential(
    (0): ConvBNActivation(
      (0): Conv2d(3, 16, kernel_size=(3, 3), stride=(2, 2), padding=(1, 1), bias=False)
      (1): BatchNorm2d(16, eps=0.001, momentum=0.01, affine=True, track_running_stats=True)
      (2): Hardswish()
    )
    (1): InvertedResidual(
...
(classifier): Sequential(
    (0): Linear(in_features=576, out_features=1024, bias=True)
    (1): Hardswish()
    (2): Dropout(p=0.2, inplace=True)
    (3): Linear(in_features=1024, out_features=1000, bias=True)
  )
)
================================================================================================
                                           Kernel Shape       Output Shape  \
Layer
0_features.0.Conv2d_0                     [3, 16, 3, 3]  [1, 16, 112, 112]
1_features.0.BatchNorm2d_1                         [16]  [1, 16, 112, 112]
...
123_classifier.Dropout_2                      -          -
124_classifier.Linear_3                  1.025M     1.024M
------------------------------------------------------------------------------------------------
                          Totals
Total params           2.542856M
Trainable params       2.542856M
Non-trainable params         0.0
Mult-Adds             56.516456M
5 感谢链接
https://www.bilibili.com/video/BV1GK4y1p7uE/?spm_id_from=333.788
https://blog.csdn.net/m0_48742971/article/details/123438626
https://www.bilibili.com/video/BV1zT4y1P7pd/?spm_id_from=333.788
本文内容由网友自发贡献,版权归原作者所有,本站不承担相应法律责任。如您发现有涉嫌抄袭侵权的内容,请联系:hwhale#tublm.com(使用前将#替换为@)