红外测温
前言
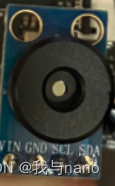
一、原理
红外测温的原理可以直接去看卖家的手册,手册多余的话太多了,知道他是IIC通信的就行了,
下面直接给出代码
二、STM32代码
1.MLX90614.c
#include "MLX90614.h"
#include "sys.h"
#include "delay.h"
u8 bit_in=0;
u8 bit_out=0;
u8 DataL;
u8 DataH;
u8 Pecreg;
void Mlx90614_Init(void)
{
GPIO_InitTypeDef GPIO_InitStructure;
RCC_APB2PeriphClockCmd(RCC_APB2Periph_GPIOA, ENABLE);
GPIO_InitStructure.GPIO_Pin = GPIO_Pin_5;
GPIO_InitStructure.GPIO_Mode = GPIO_Mode_Out_PP;
GPIO_InitStructure.GPIO_Speed = GPIO_Speed_50MHz;
GPIO_Init(GPIOA, &GPIO_InitStructure);
GPIO_SetBits(GPIOA, GPIO_Pin_5);
GPIO_InitStructure.GPIO_Pin = GPIO_Pin_6;
GPIO_InitStructure.GPIO_Mode = GPIO_Mode_Out_PP;
GPIO_InitStructure.GPIO_Speed = GPIO_Speed_50MHz;
GPIO_Init(GPIOA, &GPIO_InitStructure);
}
void start_bit()
{
GPIOA6_High;
delay_us(1);
GPIOA5_High;
delay_us(1);
GPIOA6_Low;
delay_us(1);
GPIOA5_Low;
delay_us(1);
}
void stop_bit()
{
GPIOA5_Low;
delay_us(1);
GPIOA6_Low;
delay_us(1);
GPIOA5_High;
delay_us(1);
GPIOA6_High;
}
void send_bit(void)
{
if(bit_out==0)
GPIOA6_Low;
else
GPIOA6_High;
delay_us(1);
GPIOA5_High;
delay_us(1);
GPIOA5_Low;
delay_us(1);
}
void receive_bit(void)
{
GPIO_InitTypeDef GPIO_InitStructure;
GPIOA6_High;
bit_in=1;
GPIOA5_High;
delay_us(1);
GPIO_InitStructure.GPIO_Pin = GPIO_Pin_6;
GPIO_InitStructure.GPIO_Mode = GPIO_Mode_IN_FLOATING;
GPIO_InitStructure.GPIO_Speed = GPIO_Speed_50MHz;
GPIO_Init(GPIOA, &GPIO_InitStructure);
bit_in=SDA;
delay_us(1);
GPIOA5_Low;
delay_us(1);
GPIO_InitStructure.GPIO_Pin = GPIO_Pin_6;
GPIO_InitStructure.GPIO_Mode = GPIO_Mode_Out_PP;
GPIO_InitStructure.GPIO_Speed = GPIO_Speed_50MHz;
GPIO_Init(GPIOA, &GPIO_InitStructure);
}
u8 rx_byte(void)
{
u8 i,dat;
dat=0;
for(i=0;i<8;i++)
{
dat=dat<<1;
receive_bit();
if(bit_in==1)
{
dat=dat+1;
}
}
send_bit();
return dat;
}
void tx_byte(u8 dat_byte)
{
char i,n,dat;
n=10;
TX_again:
dat=dat_byte;
for(i=0;i<8;i++)
{
if(dat&0x80)
bit_out=1;
else
bit_out=0;
send_bit();
dat=dat<<1;
}
receive_bit();
if(bit_in==1)
{
stop_bit();
if(n!=0)
{n--;goto Repeat;}
else
goto exit;
}
else
goto exit;
Repeat:
start_bit();
goto TX_again;
exit: ;
}
u16 memread(void)
{
start_bit();
tx_byte(0x00);
tx_byte(0x07);
start_bit();
tx_byte(0x01);
bit_out=0;
DataL=rx_byte();
bit_out=0;
DataH=rx_byte();
bit_out=1;
Pecreg=rx_byte();
stop_bit();
return(DataH*256+DataL);
}
2.MLX90614.h
#ifndef __MLX90614_H
#define __MLX90614_H
#include "sys.h"
#define GPIOA5_High GPIO_SetBits(GPIOA, GPIO_Pin_5)
#define GPIOA5_Low GPIO_ResetBits(GPIOA, GPIO_Pin_5)
#define GPIOA6_High GPIO_SetBits(GPIOA, GPIO_Pin_6)
#define GPIOA6_Low GPIO_ResetBits(GPIOA, GPIO_Pin_6)
#define SDA GPIO_ReadInputDataBit(GPIOC,GPIO_Pin_6)
void Mlx90614_Init(void);
void start_bit();
void stop_bit();
void send_bit(void);
void receive_bit(void);
u8 rx_byte(void);
void tx_byte(u8 dat_byte);
u16 memread(void);
#endif
主函数
#include "led.h"
#include "delay.h"
#include "sys.h"
#include "usart.h"
#include "MLX90614.h"
int main(void)
{
u16 Tem;
delay_init();
NVIC_PriorityGroupConfig(NVIC_PriorityGroup_2);
uart_init(9600);
Mlx90614_Init();
GPIOA5_High;
GPIOA6_High;
delay_us(1);
GPIOA5_Low;
delay_ms(1000);
GPIOA5_High;
while(1)
{
Tem=memread();
printf("温度是:");
printf("%d",Tem);
printf("/n");
delay_ms(1000);
}
}
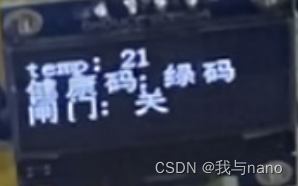
这三段代码放到工程里然后可以通过串口打印温度,我是用显示屏显示的温度。
总结
其实搞懂了IIC对于这种IIC通信的模块写代码很容易。
本文内容由网友自发贡献,版权归原作者所有,本站不承担相应法律责任。如您发现有涉嫌抄袭侵权的内容,请联系:hwhale#tublm.com(使用前将#替换为@)