坑真几把多
先在Windows上安装UE4和Airsim不再赘述,官网都有
虚拟机或其他计算机安装好ubuntu并安装PX4
1、安装PX4的ROS相关包(mavros)
1、第一种:
进入官网安装ROS相关包(也就是mavros)
Ubuntu LTS/Debian Linux 的开发环境 | PX4 自动驾驶用户指南 https://docs.px4.io/main/zh/dev_setup/dev_env_linux_ubuntu.html
要安装工具链:(这个会直接克隆PX4)
git clone https://github.com/PX4/PX4-Autopilot.git --recursive
运行 bash 脚本
bash ./PX4-Autopilot/Tools/setup/ubuntu.sh
完事,重新启动计算机。
2、第二种,更好的方法(上面那种办法还要克隆一次PX4很烦,这个办法仅可用于Ubuntu18.04)
#!/bin/bash

## Bash script for setting up ROS Melodic (with Gazebo 9) development environment for PX4 on Ubuntu LTS (18.04).
## It installs the common dependencies for all targets (including Qt Creator)
##
## Installs:
## - Common dependencies libraries and tools as defined in `ubuntu_sim_common_deps.sh`
## - ROS Melodic (including Gazebo9)
## - MAVROS

if [[ $(lsb_release -sc) == *"xenial"* ]]; then
  echo "OS version detected as $(lsb_release -sc) (16.04)."
  echo "ROS Melodic requires at least Ubuntu 18.04."
  echo "Exiting ...."
  return 1;
fi

echo "Downloading dependent script 'ubuntu_sim_common_deps.sh'"
# Source the ubuntu_sim_common_deps.sh script directly from github
common_deps=$(wget https://raw.githubusercontent.com/PX4/Devguide/master/build_scripts/ubuntu_sim_common_deps.sh -O -)
wget_return_code=$?
# If there was an error downloading the dependent script, we must warn the user and exit at this point.
if [[ $wget_return_code -ne 0 ]]; then echo "Error downloading 'ubuntu_sim_common_deps.sh'. Sorry but I cannot proceed further :("; exit 1; fi
# Otherwise source the downloaded script.
. <(echo "${common_deps}")

# ROS Melodic
## Gazebo simulator dependencies
sudo apt-get install protobuf-compiler libeigen3-dev libopencv-dev -y

## ROS Gazebo: http://wiki.ros.org/melodic/Installation/Ubuntu
## Setup keys
sudo sh -c 'echo "deb http://packages.ros.org/ros/ubuntu $(lsb_release -sc) main" > /etc/apt/sources.list.d/ros-latest.list'
sudo apt-key adv --keyserver 'hkp://keyserver.ubuntu.com:80' --recv-key C1CF6E31E6BADE8868B172B4F42ED6FBAB17C654
## For keyserver connection problems substitute hkp://pgp.mit.edu:80 or hkp://keyserver.ubuntu.com:80 above.
sudo apt-get update
## Get ROS/Gazebo
sudo apt install ros-melodic-desktop-full -y
## Initialize rosdep
sudo rosdep init
rosdep update
## Setup environment variables
rossource="source /opt/ros/melodic/setup.bash"
if grep -Fxq "$rossource" ~/.bashrc; then echo ROS setup.bash already in .bashrc;
else echo "$rossource" >> ~/.bashrc; fi
eval $rossource

## Install rosinstall and other dependencies
sudo apt install python-rosdep python-rosinstall python-rosinstall-generator python-wstool build-essential -y


# MAVROS: https://dev.px4.io/en/ros/mavros_installation.html
## Install dependencies
sudo apt-get install python-catkin-tools python-rosinstall-generator -y

## Create catkin workspace
mkdir -p ~/catkin_ws/src
cd ~/catkin_ws
catkin init
wstool init src


## Install MAVLink
###we use the Kinetic reference for all ROS distros as it's not distro-specific and up to date
rosinstall_generator --rosdistro kinetic mavlink | tee /tmp/mavros.rosinstall

## Build MAVROS
### Get source (upstream - released)
rosinstall_generator --upstream mavros | tee -a /tmp/mavros.rosinstall

### Setup workspace & install deps
wstool merge -t src /tmp/mavros.rosinstall
wstool update -t src
if ! rosdep install --from-paths src --ignore-src -y; then
    # (Use echo to trim leading/trailing whitespaces from the unsupported OS name
    unsupported_os=$(echo $(rosdep db 2>&1| grep Unsupported | awk -F: '{print $2}'))
    rosdep install --from-paths src --ignore-src --rosdistro melodic -y --os ubuntu:bionic
fi

if [[ ! -z $unsupported_os ]]; then
    >&2 echo -e "\033[31mYour OS ($unsupported_os) is unsupported. Assumed an Ubuntu 18.04 installation,"
    >&2 echo -e "and continued with the installation, but if things are not working as"
    >&2 echo -e "expected you have been warned."
fi

#Install geographiclib
sudo apt install geographiclib-tools -y
echo "Downloading dependent script 'install_geographiclib_datasets.sh'"
# Source the install_geographiclib_datasets.sh script directly from github
install_geo=$(wget https://raw.githubusercontent.com/mavlink/mavros/master/mavros/scripts/install_geographiclib_datasets.sh -O -)
wget_return_code=$?
# If there was an error downloading the dependent script, we must warn the user and exit at this point.
if [[ $wget_return_code -ne 0 ]]; then echo "Error downloading 'install_geographiclib_datasets.sh'. Sorry but I cannot proceed further :("; exit 1; fi
# Otherwise source the downloaded script.
sudo bash -c "$install_geo"

## Build!
catkin build
## Re-source environment to reflect new packages/build environment
catkin_ws_source="source ~/catkin_ws/devel/setup.bash"
if grep -Fxq "$catkin_ws_source" ~/.bashrc; then echo ROS catkin_ws setup.bash already in .bashrc;
else echo "$catkin_ws_source" >> ~/.bashrc; fi
eval $catkin_ws_source
新建一个文件,把这段粘贴到里边,后缀为.sh
运行
bash ./xxx.sh
等待即可
2、安装PX4(科学上网诶)如果前一步用的第一种方法就可以跳过下面代码的克隆源码阶段
mkdir -p PX4
cd PX4
git clone https://github.com/PX4/PX4-Autopilot.git --recursive  #(用的第一种可以跳过)
bash ./PX4-Autopilot/Tools/setup/ubuntu.sh --no-nuttx --no-sim-tools
cd PX4-Autopilot
并从 Releases · PX4/PX4-Autopilot · GitHub 中找到最新的稳定版本,并查看与该版本匹配的源代码,例如:
git checkout v1.12.3
完事之后更新一下子模块,我就出了问题shift!!
git submodule update --init --recursive
然后用j8来make他
make px4_sitl_default none_iris -j8
就安装好PX4了
运行上面那条指令出现

就是PX4已经运行了。
注意:
<span style="color:#404040"><span style="background-color:#fcfcfc"><code class="language-shell"> *******************************************************************************
 *   IF YOU DID NOT CHANGE THIS FILE (OR YOU DON'T KNOW WHAT A SUBMODULE IS):  *
 *   Hit 'u' and <ENTER> to update ALL submodules and resolve this.            *
 *   (performs git submodule sync --recursive                                  *
 *    and git submodule update --init --recursive )                            *
 *******************************************************************************</code></span></span>
每次看到此提示时,请在键盘上键入“u”。还有一个是输入“y”的,自己看着来吧,我没截图。
3、设置Windows环境下的Airsim的设置settings.json
1、Windows:
在 C:\Users\DELL\Documents\AirSim 这里
{
    "SettingsVersion": 1.2,
    "SimMode": "Multirotor",
    "ClockType": "SteppableClock",
    "Vehicles": {
        "PX4": {
            "VehicleType": "PX4Multirotor",
            "UseSerial": false,
            "LockStep": true,
            "UseTcp": true,
            "TcpPort": 4560,
            "ControlIp": "remote",
            "ControlPortLocal": 14540,
            "ControlPortRemote": 14580,
            "LocalHostIp": "192.168.1.12",
            "Sensors":{
                "Barometer":{
                    "SensorType": 1,
                    "Enabled": true,
                    "PressureFactorSigma": 0.0001825
                }
            },
            "Parameters": {
                "NAV_RCL_ACT": 0,
                "NAV_DLL_ACT": 0,
                "COM_OBL_ACT": 1,
                "LPE_LAT": 47.641468,
                "LPE_LON": -122.140165
            }
        }
    }
}
LocalHostIp是Windows本机的IP哦
完事了打开我的电脑的防火墙
打开高级设置
然后新建一个TCP4560端口


懂得都懂了
完事之后可以去查看一下TCP端口打开没有
进入CMD输入
netstat -ano

打开Airsim环境收听4560端口消息。就能看到了

当我建立链接也就是我在PX4端和Airsim链接他就显示连接状态如上图
2、Ubuntu
虚拟机的话弄成桥接模式嗷(其他不懂行不行反正我也懒得尝试)

双系统或者其它非虚拟机可能要手动一下IP,反正能ping上都好说。
进.bashrc里操作一下,把Windows的IP输入进去保存
export PX4_SIM_HOST_ADDR=192.168.1.12
然后source一下它
source ~/.bashrc
这样就拿捏了
4、运行PX4建立链接
1、Windows:
UE4和Airsim这边先运行
2、Ubuntu:
先cpdd到PX4的文件夹里
cd PX4/PX4-Autopilot
然后就可以用你强大的CPU的j8来make它了(编译过了不用你的j8也行)
make px4_sitl_default none_iris
5、这样就完了
然后Airsim也显示连接成功,PX4会返回一些消息
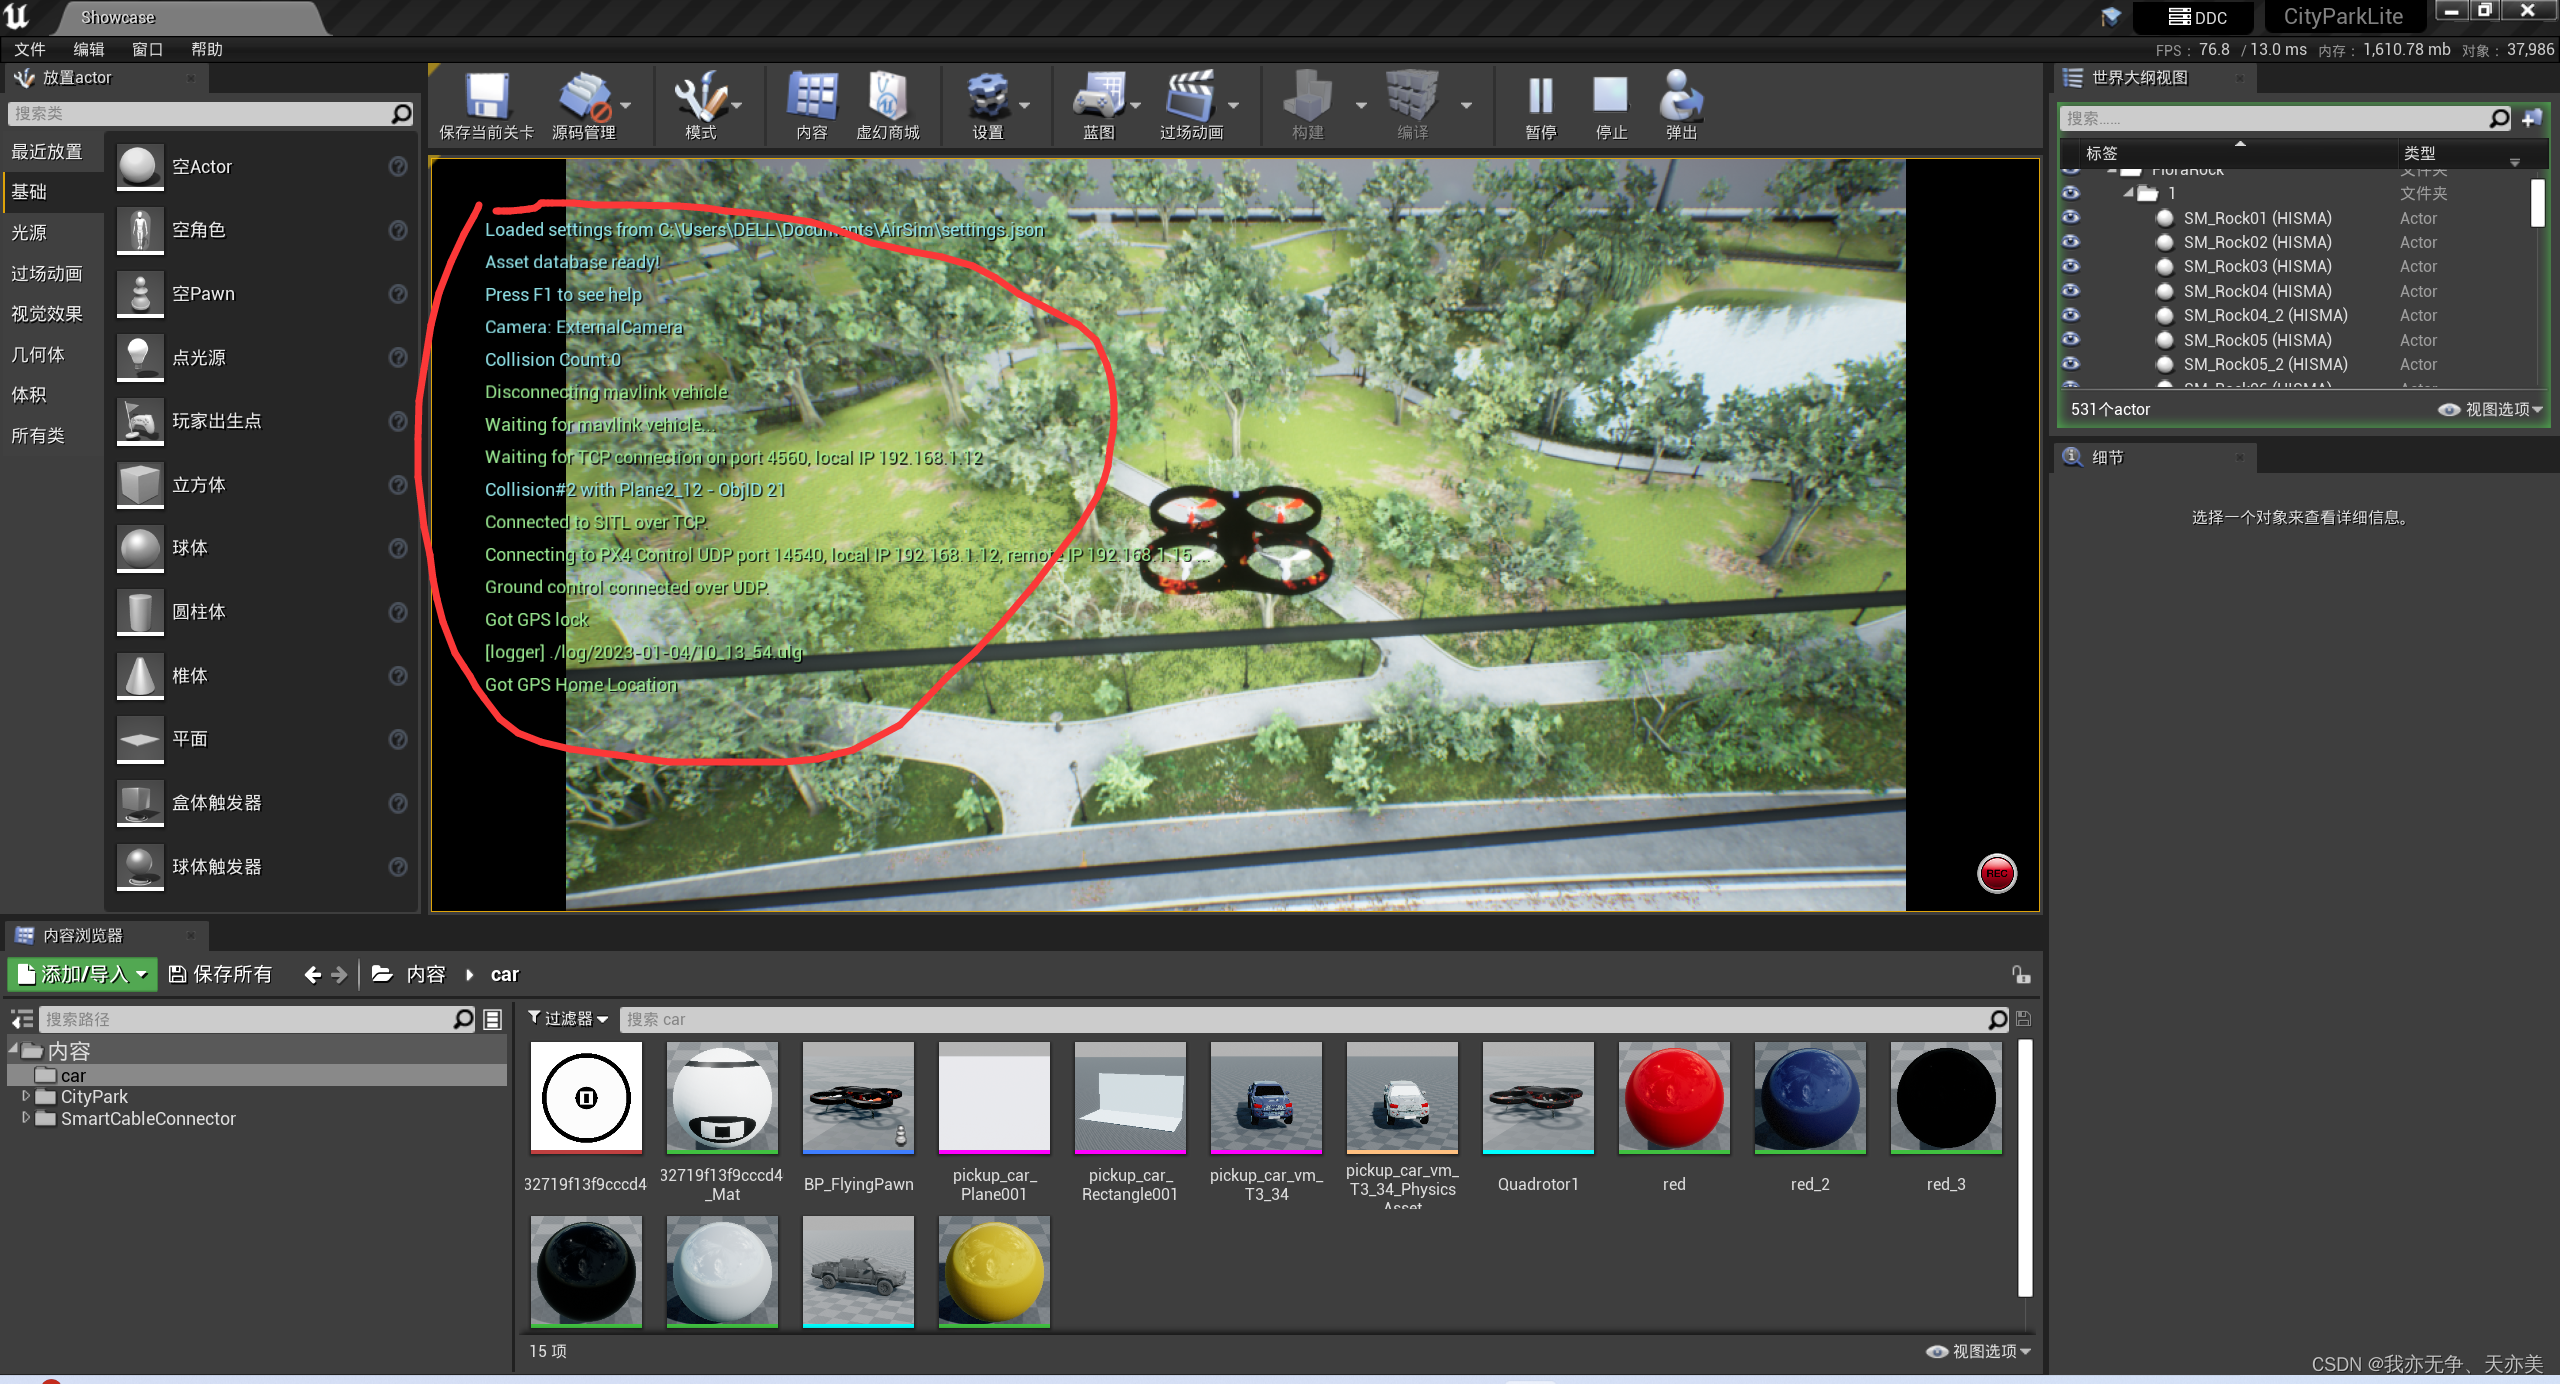

这就是链接成功了。
接下来它就听你的了,想干嘛就干嘛,也可以用ROS来教育教育它。嘿嘿嘿。
还有什么后续再补充,有什么漏的我可能也忘了。
本文内容由网友自发贡献,版权归原作者所有,本站不承担相应法律责任。如您发现有涉嫌抄袭侵权的内容,请联系:hwhale#tublm.com(使用前将#替换为@)